Making a DIY Computer Controlled Loom

Weaving on a loom is fun. I gave my son a simple loom for Christmas, and he wove an entire scarf on Christmas Day. This got me thinking about building a computer controlled loom, maybe one that could weave any pattern imaginable. I liked the idea of taking software back to its very origins with Jacquard and the original Jacquard Loom. I also new there’d be lots of interesting design challenges.

In mid December, TechShop had filed for bankruptcy. My annual Christmas Project was in full swing, and the loss forced me to “Cancel Christmas”.  I was in shock. I’d been using TechShop tools/space for 10 years, and no longer having access to their lasers, Industrial Sewing Machines, etc was paralyzing. By Christmas day, I was starting to recover and was looking for a new project. Hopefully, one that could use the PCBs that I’d already designed for my canceled project.

I still had access to a 3D printer.  Could I design a mostly-3D-printed loom that used the boards’ 3-stepper motor controllers and bluetooth LE?  I’d give it a shot! The basic idea I had was for a 2-motor loom.  One motor would sweep through a bunch of cams, and the other motor would set the position of each cam in turn.

I took the basic specs of my son’s loom as a good starting point for basic size/layout. His is a 10″ loom with 8 threads per inch, so each control section of the loom would have to be 1/8″ wide, and there would be 80 of these sections. An initial sketch of the mechanism indicated 7 parts per section, so the loom would have more that 560 moving parts that would all have to operate flawlessly time after time, row after row, 100s of times per piece of material.  I told my friends up front that it seems impossible and that this thing was never going to work, but working on the design would be really fun and get me out of my post-TechShop project funk.

Now real weaving is an art that involves rhythm, consistency, and pattern. This would never be that. The time to update the cams would be too slow for any real rhythm, but there might still be some fun art and process to it, and stringing up the loom would be quick and easy in comparison to warping a traditional loom. I also had some ideas for programatic pattern generation.  Wouldn’t it be neat to weave out something unexpected? Discovering it row by row? That sounded like fun to me.

A much faster system could be built with 80+ solenoids or something, but that didn’t really appeal to me. It would drive the cost way up and certainly wouldn’t take advantage of these circuit boards I had lying around.

The Big Idea

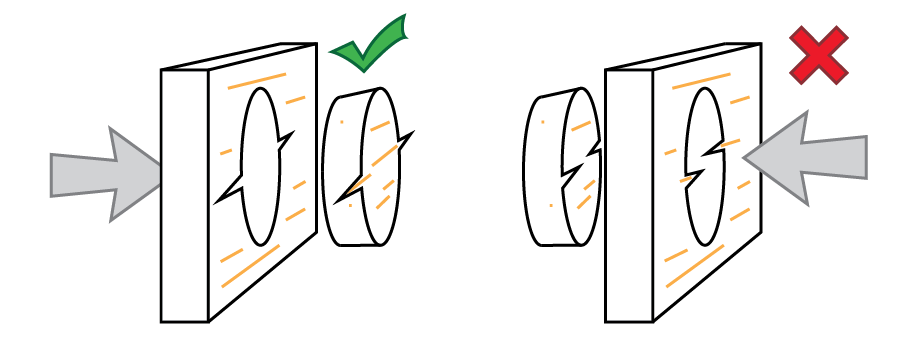
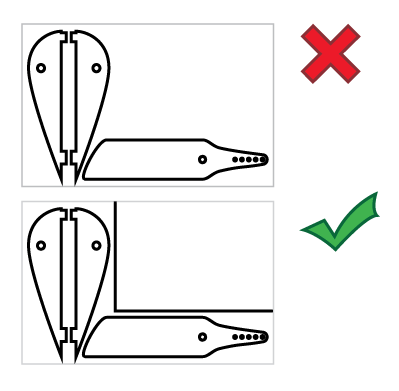
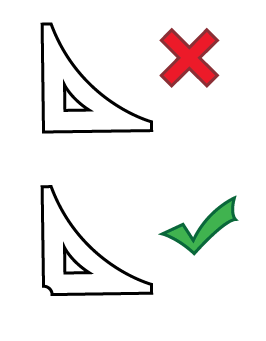
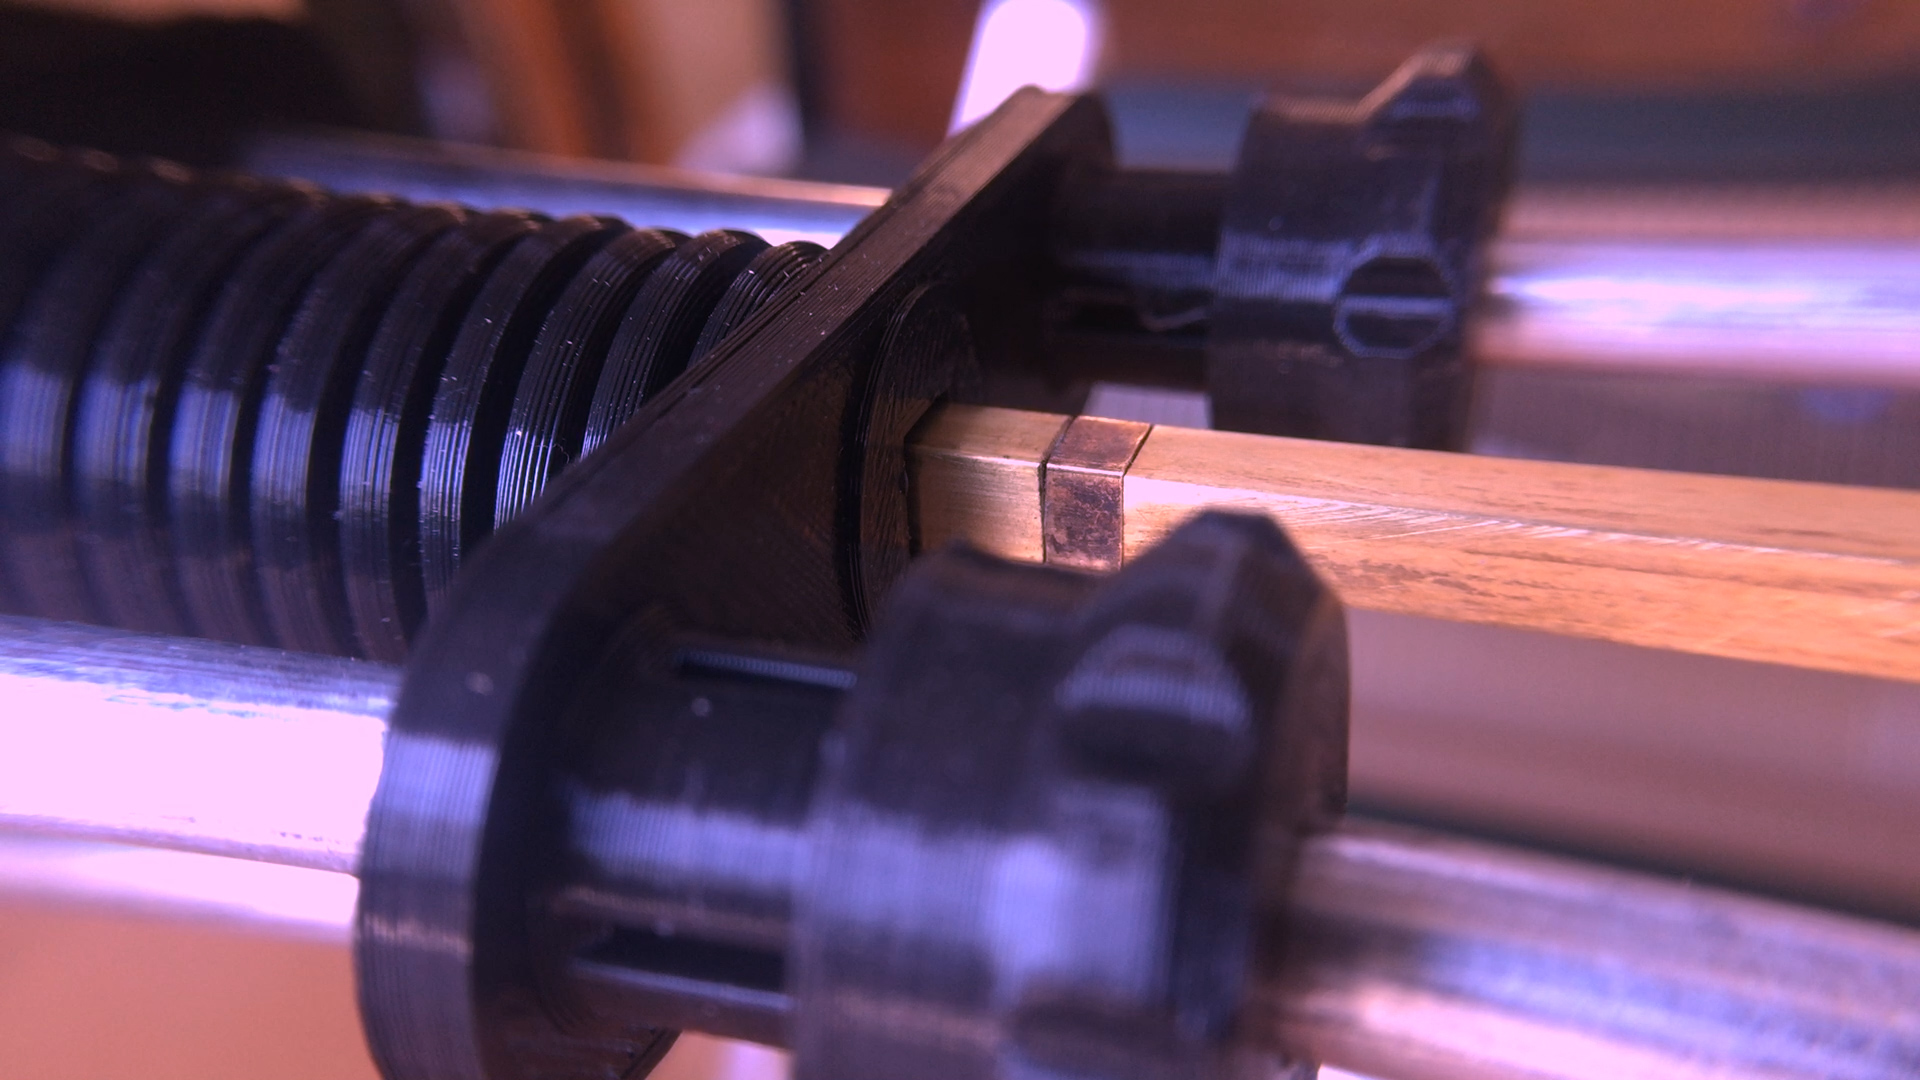
At the heart of the loom is a long row of cams sitting on a square shaft. In order to not have this giant row of cams jamming up horribly, the cams would have to have almost no load. The square shaft locks most of the cams in position but has one section that can rotate to spin a single cam. The main idea was to have the cams not do the lifting and lowering of threads directly, but to have them shift some hooks back and forth. If the hook was over a bar, then the bar could do the work of raising and lowering the threads.

In order to be able to pull threads up or down, I use a second set of hooks and a teeter-totter arrangement. With a second set of bars and hooks, this also makes it very easy to invert the pulling up/down pattern, so an alternating weave requires no change in the cams or hook positions. It also avoids extra loads imposed by something like a per-thread return spring or weight and doubles the distance between the threads.

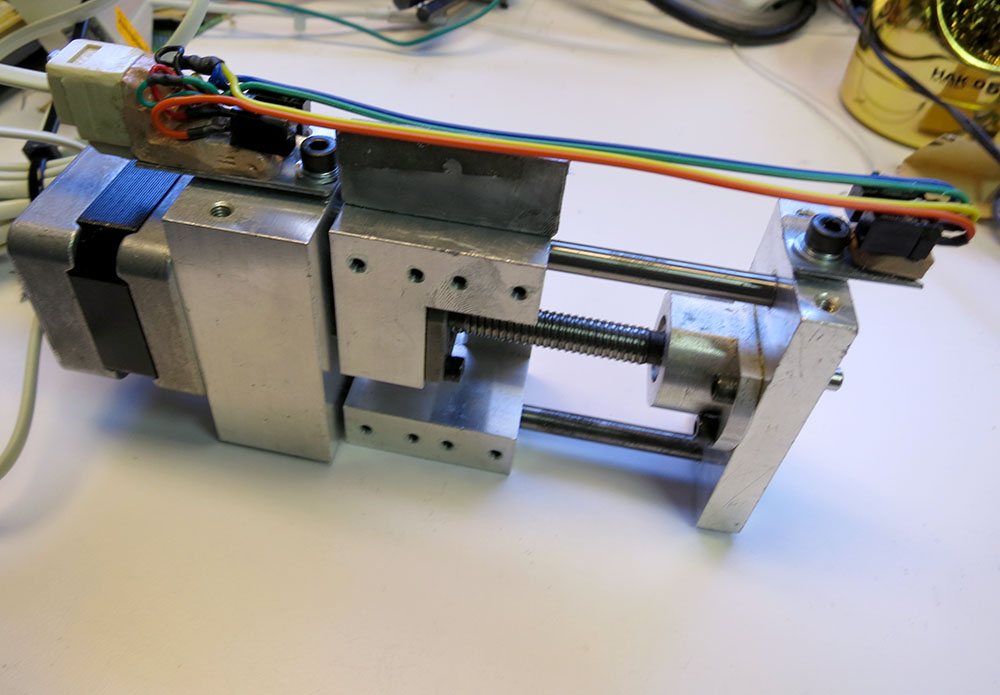
At first I worked on getting the carriage working. It had to slide back and forth smoothly with little backlash. I did some initial prototypes using just 1/4″ bronze bushings and flat end caps. These basically jammed all the time since the 3D printed flat plates could easily flex enough to take the bushings out of alignment. I changed the design to be much stiffer and to use one pair of linear bearings with a larger main shaft that does all the load bearing and a second 1/4″ shaft with no bearings at all that is just provides additional rigidity and alignment.

Would it work at all?

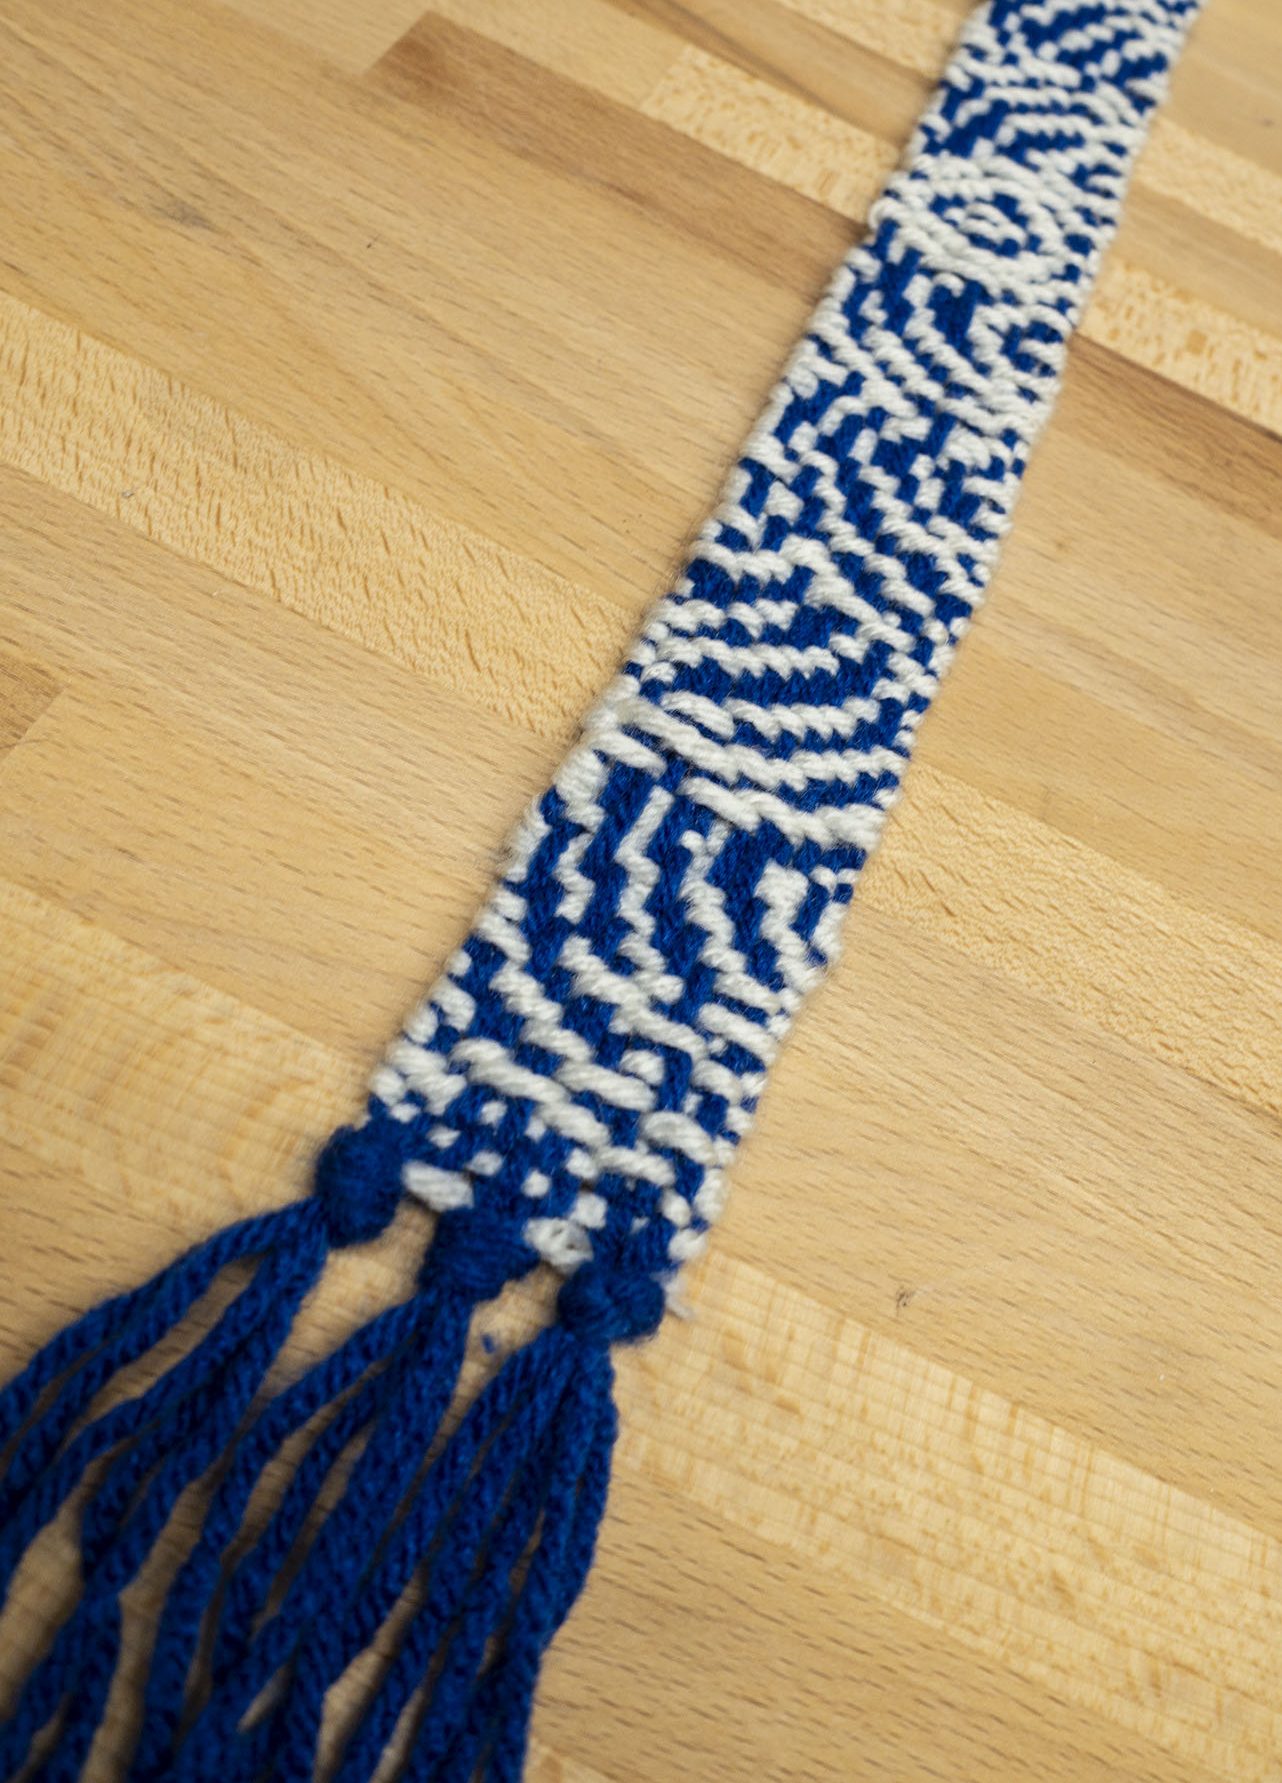
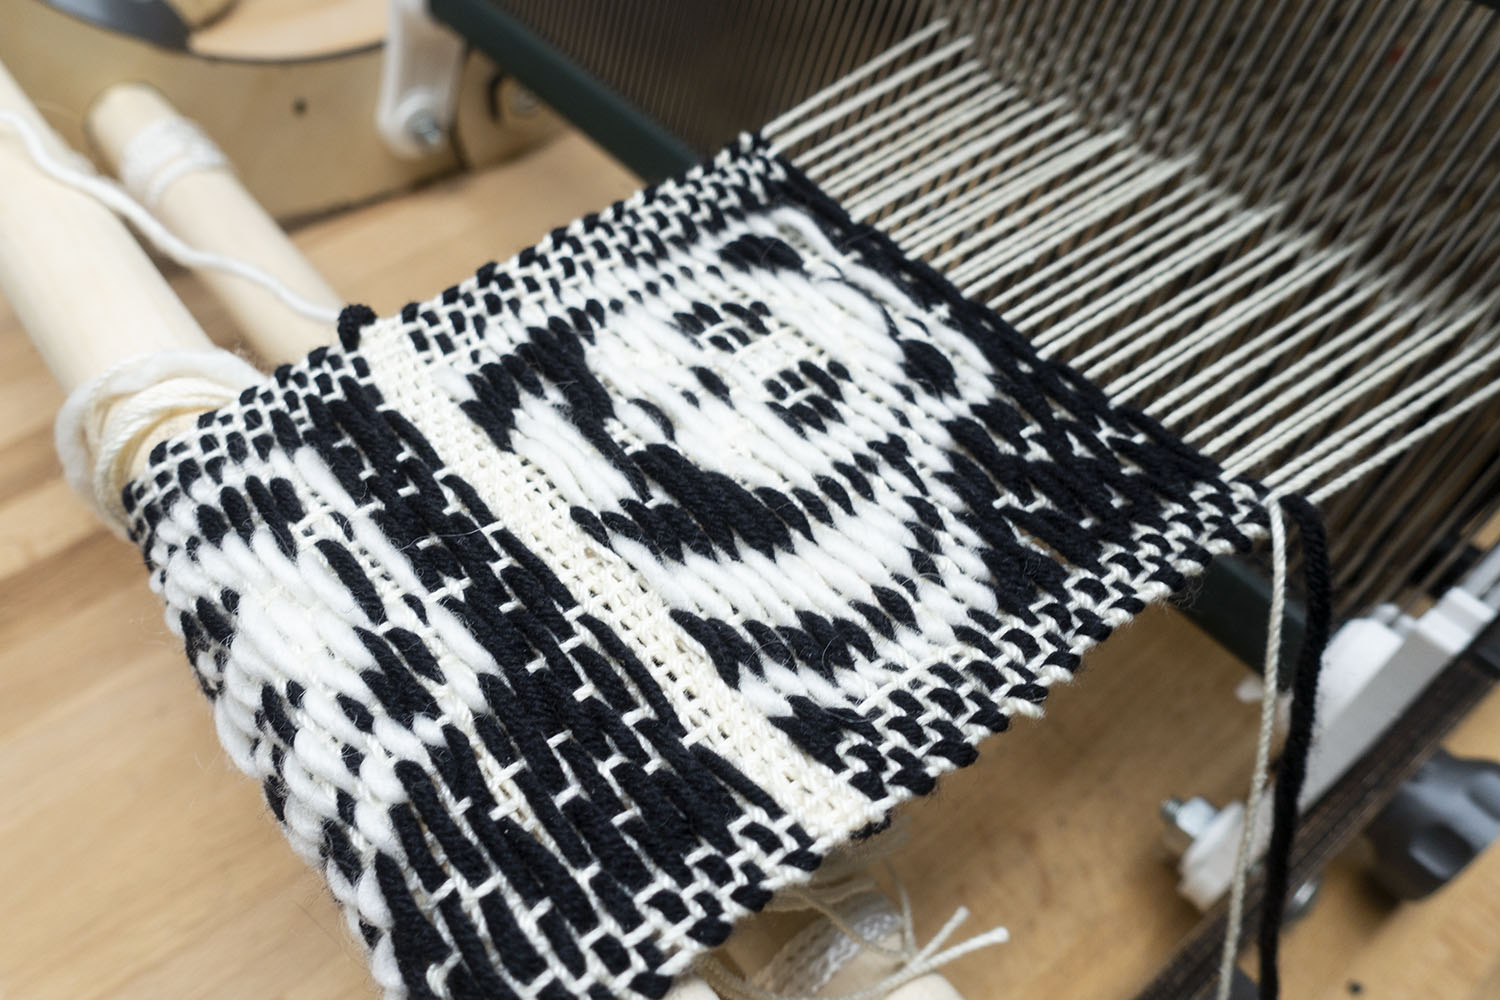
Even though the carriage movement back and forth was now working without jamming, the first time I tried to rotate a cam and seek to the next cam caused a horrible jam. The issue was that after driving the cam there’s still a lot of load from the cam on the square plate, so when you try to seek to the next position that load makes the cam really want to jam on any imperfection between the rotating square segment and the rest of the shaft, and those loads keep adding up as you rotate more cams. Thankfully this was easy to fix in software by overshooting a tiny bit and then returning so there was no longer any load from the cam before trying to seek to the next position. After fixing that, the system seemed to work. I did a 16-thread build and wove this strip of patterned material, then I built it out to 36 threads and wove these pandas.

.  

Problems at scale

So after those successes, I built the loom out to 60 cams. Horrifyingly, at 60 cams I discovered an issue where the hooks really needed to be slightly thinner because the cumulate drag on each other kept adding up. It’s terrible to find issues that only manifest at 60 layers because it is not easy to iterate on a design if you have to reprint 120 hooks for each revision. This is why I started at 8 layers since I could print out 8 or 16 new parts fairly quickly. I probably went though something like 9 revisions on the cams adding features, adjusting things so that they could slide more smoothly long the square shaft, and adding some gaps in their contact ring so you can actually peek in and see where the cam mover is located. Trying to do that iteration with 120 parts is a whole different ball game since it can only print maybe 12 hooks a day it takes me close to 2 weeks of printing to change the design.

The other big issue when going up to 60 layers was that just using dead reckoning to position the cam mover exactly in each of the cams started to no longer work. Slight variations in cam thickness made it so just dividing the full range by 60 and assuming you would be in the right place stops working. I’m sure if these were identical injection-molded parts that might work at 60+ layers, but for my hand-crafted cams it stopped working. Everything was fine at 40, but when you go up to 60 it just starts falling apart. I ran into this issue on Christmas Eve after one year of working on the loom and had to give up on giving any 60-thread woven gifts for Christmas that year.  Oops Fail.

Adding cam position sensing

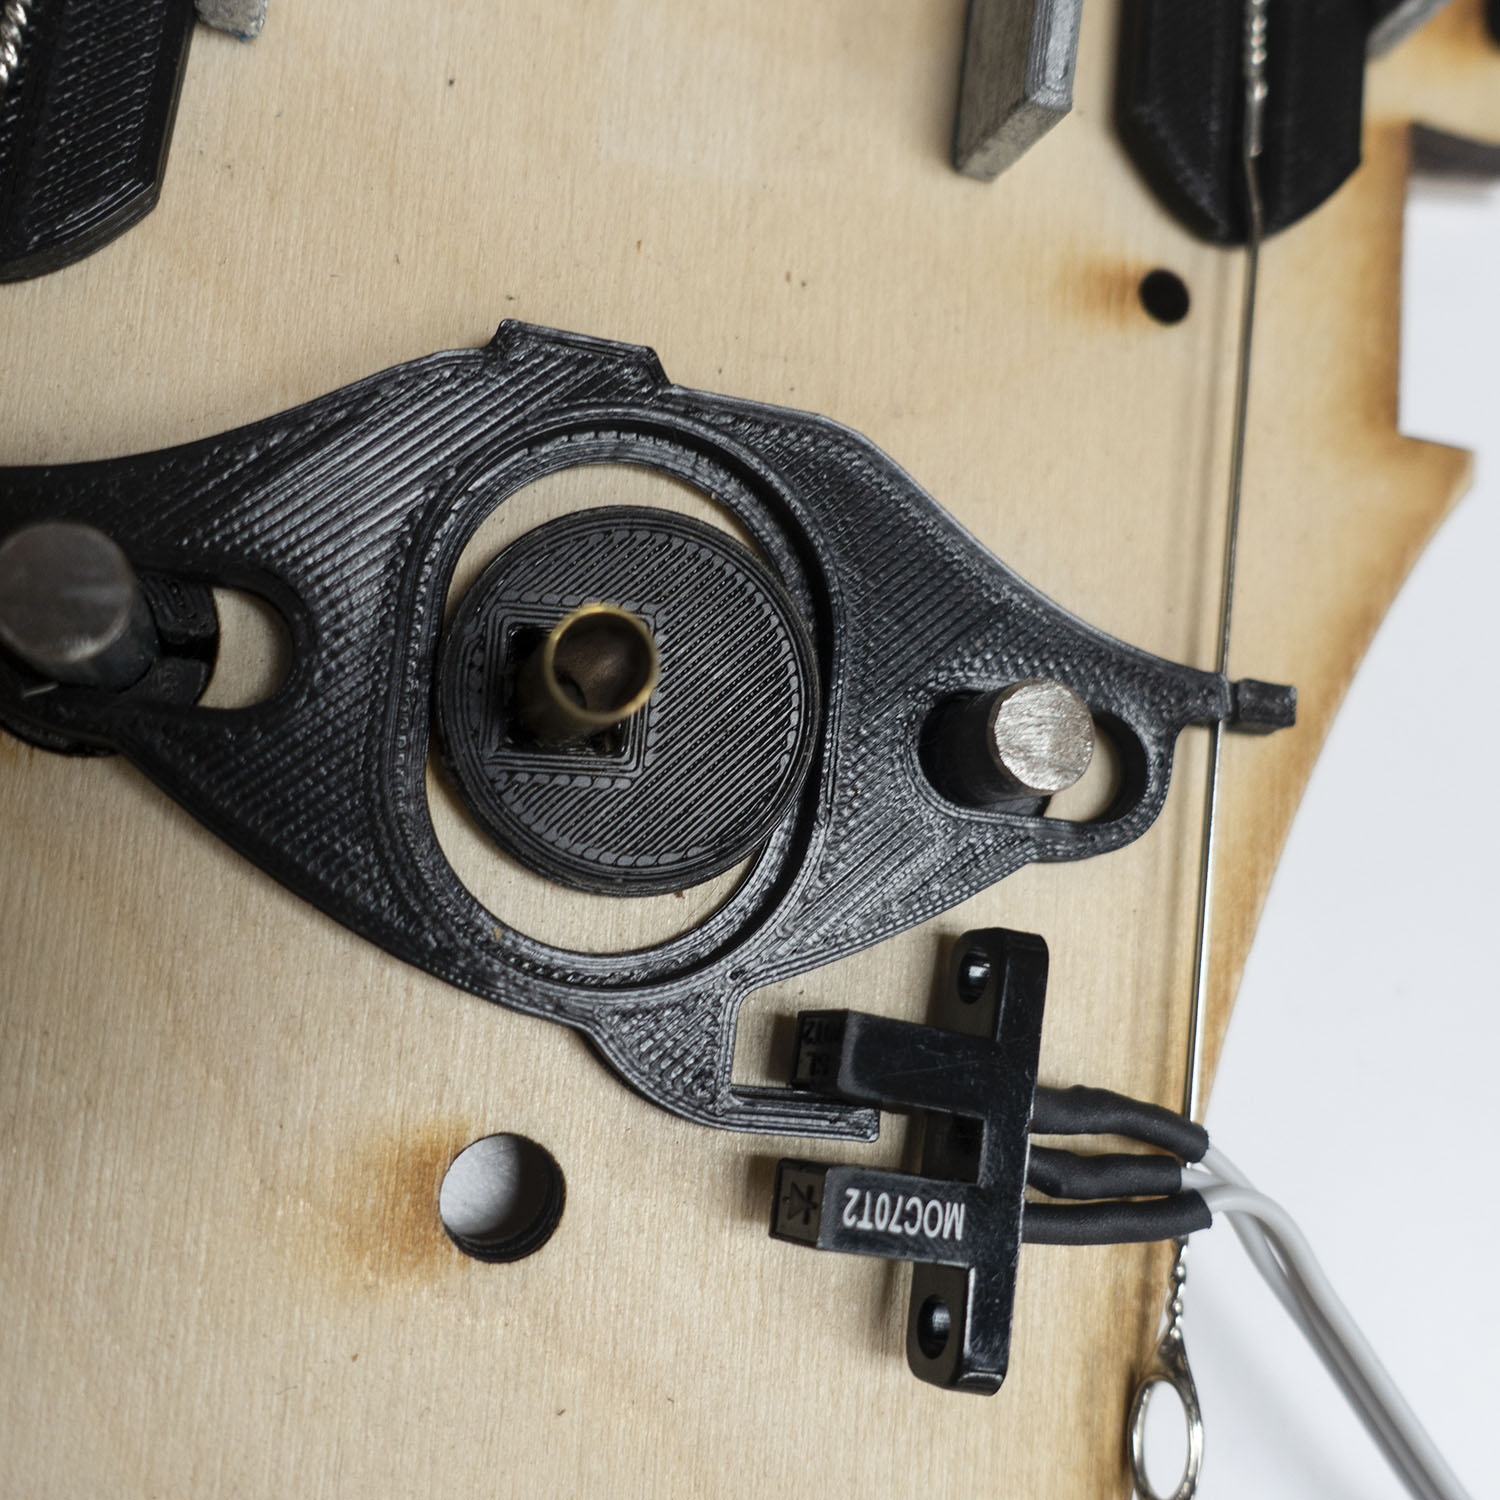
At this point, I really wanted a way to tell which position each of the cams is in, so on power up the loom would be able to scan though and check the physical state of the loom. Up until this point, I’d just been leaving the loom in a known state or manually adjusting the cams to that state, and that was a drag. Thankfully I’d put a IR gap sensor leg on each of the cam followers. When the cam was fully forward, the IR sensor would not be blocked, but when the cam was all the way back the IR sensor would be fully blocked. The IR gap sensor moved around with the cam driver, so it always knows about the current cam follower position. This made it easy to write some code to scan though all the cam positions and read the state of all the followers. This really reduced the startup time on the loom if I had left it in some random cam state on power off.

In order to view the IR sensor output directly, I added a way to poll it over bluetooth so I could see a kind of chart recorder output from the sensor. This made it easier to set the various thresholds and also see how much noise was in the signal.

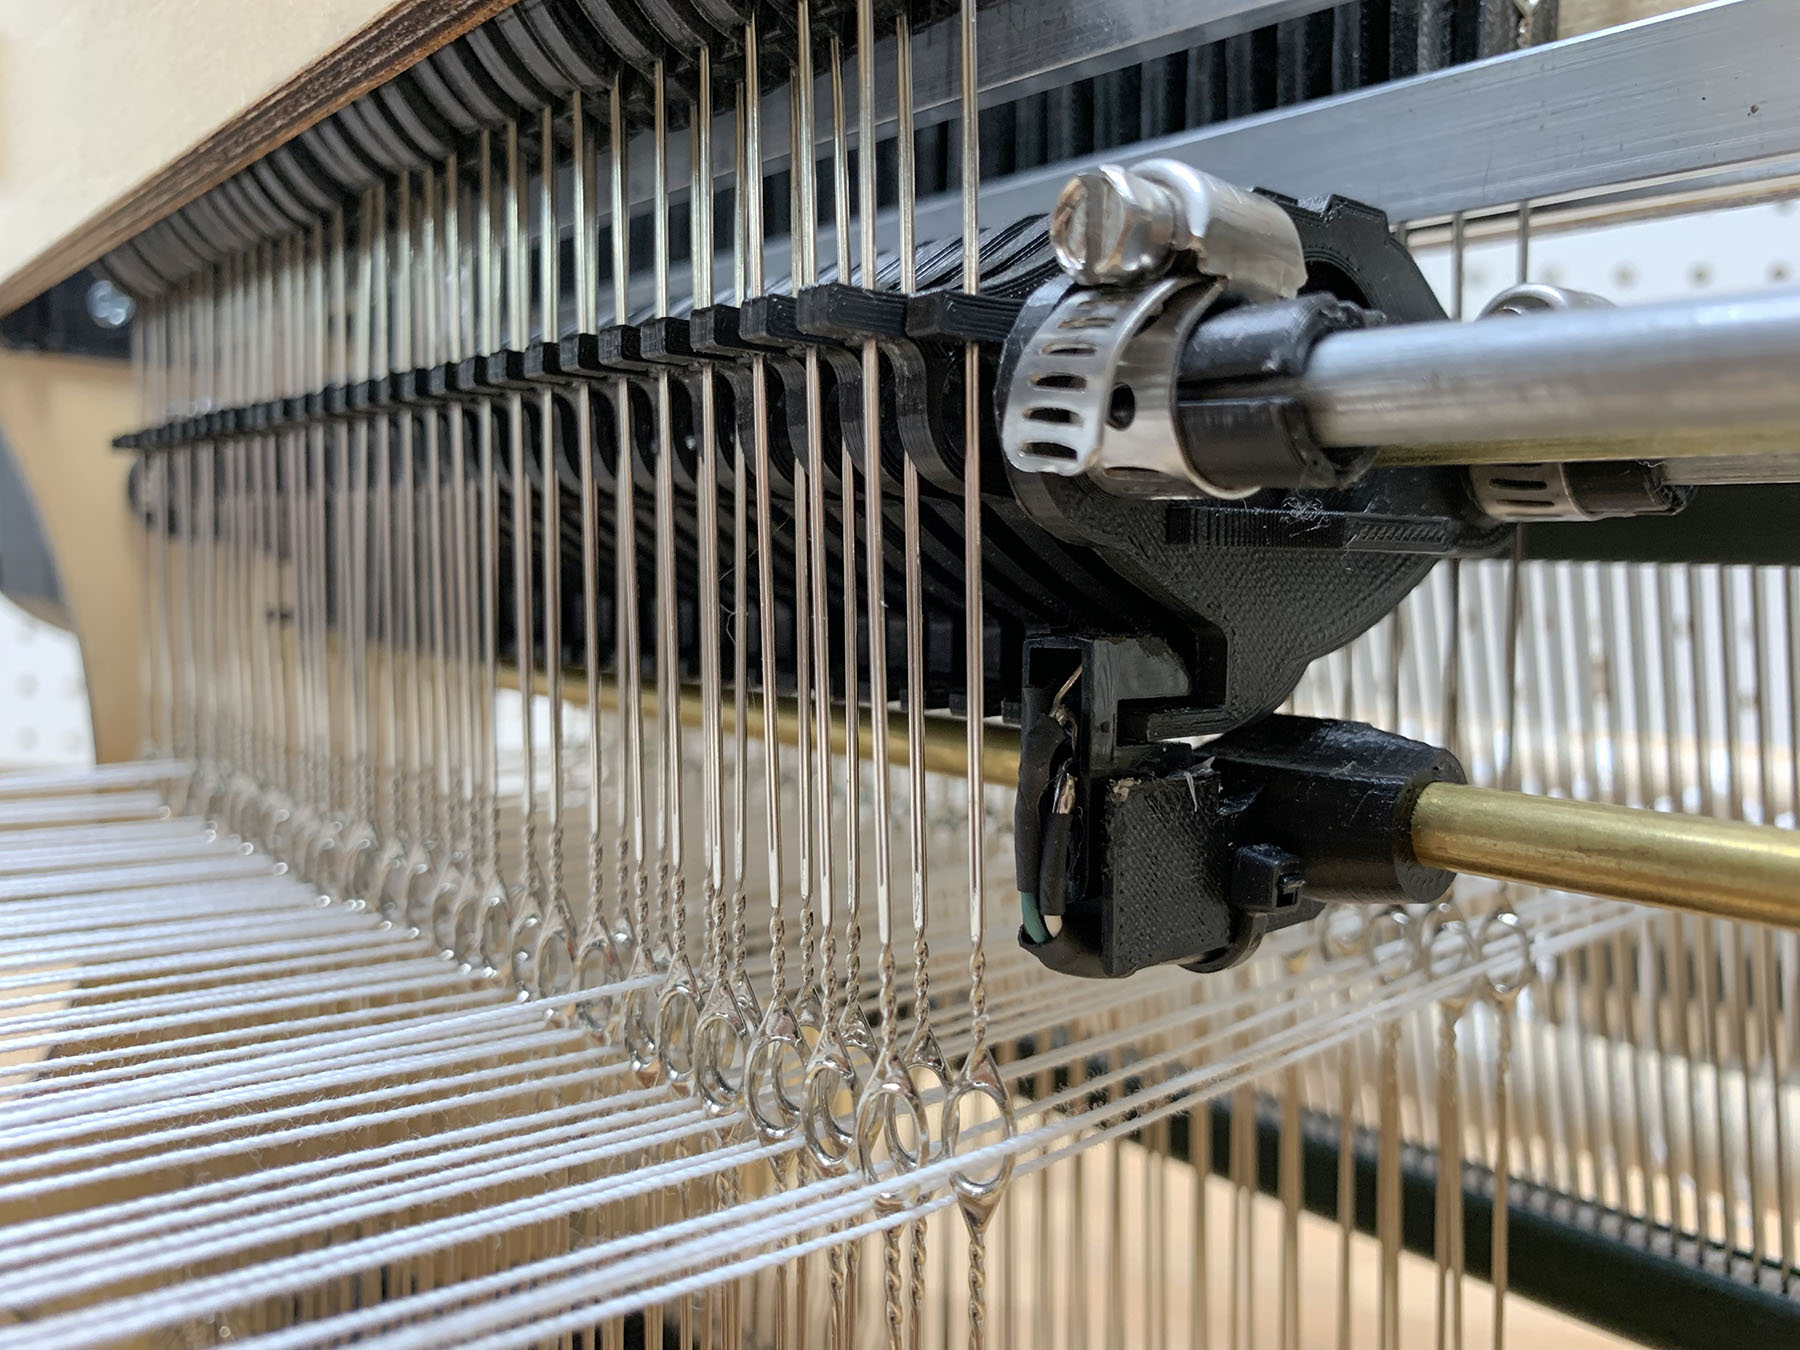
IR Sensor reading a cam position. The wires for the sensor run inside that brass tube.

How do you deal with positioning if the cams are not all identical?

At first, I thought I could scan for the cam positions using the IR sensor I’d added that detects cam positions.In theory that might work, but sadly because the cam followers are thin enough to not rub against one another and float a bit on the cams, there’s a lot of noise in the exact positions relative to the cams.  So scanning their positions was not really the silver bullet I’d hoped for.  Thankfully I had another idea. I could number all the cams then assemble the loom with JUST the cams. Then I used my phone to manually seek the positioner section to the center of every 10th cam. I wrote down those values and wrote some interpolation software that would compute cam positions interpolating between those values. This caps the interpolation error. It’s almost like having six 10-cam looms lined up. Then you just have to re-assemble the loom with the cams in the same order. This was somewhat annoying to do, but it totally worked, and I was back in business.

The hardest part?  The On/Off switch.

After the loom was no longer jamming, I worked on redesigning the PCB and making an integrated enclosure. The problem was that the original board had been designed for something that was never going to be turned off, so it used 2 power supplies and had no support for an on/off switch. When I designed the board, I decided I wanted to simplify down to a single high current 19v laptop supply and used a buck converter to generate the 5v needed for the LEDs/electronics. However, my initial choice of using an ACT4088 was a bad plan. It didn’t have great application notes, and my initial stab at layout caused some sort of power on spike that was killing all the downstream electronics. I blew up a number of those chips and even contacted some folks online who’d used them in their projects only to find out they’d had troubles with them too, especially when operating above 12v.  Clearly, I was trying to be too clever, and this was not working. I decided to make that piece of the design someone else’s problem by using a 3-pin switching regulator. I switched to the $3  VX7805-500 and got a whole new version of the PCB made.  (V3 at this point)

This seemed to work, but eventually the board would die on power up. Some sort of power on transient that was still killing my boards dead. This is kind of the worst way to die since you think it’s working, fully populate the board, and think you’re done, then it eventually dies and takes $40 of other components with it. At this point I very nearly gave up, but then at the very end I decided to try again with a somewhat more expensive Traco Power TSR 1-2450 three-pin regulator. I also tacked in a 5.6 zener to try and add some protection to the 5v rail and soldered a 10uf filter cap across the BTLE daughter board since that was the only daughter board that didn’t have its own decoupling cap. This seems to have worked. At least, the most recent build of the board has survived a zillion turn ons now, so I’m going to declare it working.  *knock wood*

Frankly, this version of the board is kind of crazy since it actually has the cam motor shaft passing through the board, and it uses a lot of space for a 3rd stepper motor controller that I never populate/don’t expect to populate after giving up on trying to calibrate in a second cam moving motor. So the board really should be shrunk down quite a bit, but it was fun making it fit the enclosure, etc.

One last try

I decided to warp the loom one last time and try once again to weave at 60 threads, and it finally worked without jamming. I could probably go a tiny bit higher on the thread count, but I punted on my original design plan of two cam movers since I was having enough trouble with getting one cam mover to not jam. This limited the range of travel/the total number of cams. It’s also good to have some free space on either side, so one can work in the guts of the loom if something goes wrong. I’ll probably stop at 60 instead of 80, since it’s slow enough as it is.

Video Mish-Mash

I deiced to video this project. However, I spent over a year making the loom and shooting video. During that time, I slowly got better at the video-making process, which means that the style and quality of the early videos is way worse than the later videos. This has made for a somewhat lumpy feeling for the final video. There are some sequences I’m very proud of, and others that I think are just horrible looking now. Oh well, it would be too much work to reshoot some of that stuff. It is what it is.

Where to now?

Well, I’m tempted to work on making the loom faster, but a year and a half is a long time to work on a project (for me). Most of my projects are < 6 months, so I may just move on. I would like to work on some error diffusion style weave dithering, maybe write some procedural weaving pattern stuff, but frankly I think all my friends, coworkers, and family have heard enough about weaving/looms to last a lifetime, so maybe I should work on something else.

I’ve open sourced all the designs and the code, but be warned these things are a dump of the design files/software as I made them. There are no instructions. It’s not the least bit cleaned up.  There may not even be super obvious names/labels, so trying to build a functioning loom from those files would be pretty difficult. I was barley able to get the thing to go, and I’m fairly meticulous when building these kinds of things. I’m relieved it worked. Still, if you’re interested in this kind of build, it might give you some inspiration and a place to see what others have done.  I’m kind of surprised there aren’t more of these things around. The ability to weave crazy designs is pretty awesome.


Soldering Iron Drill Press Adaptor

ironAndInserts
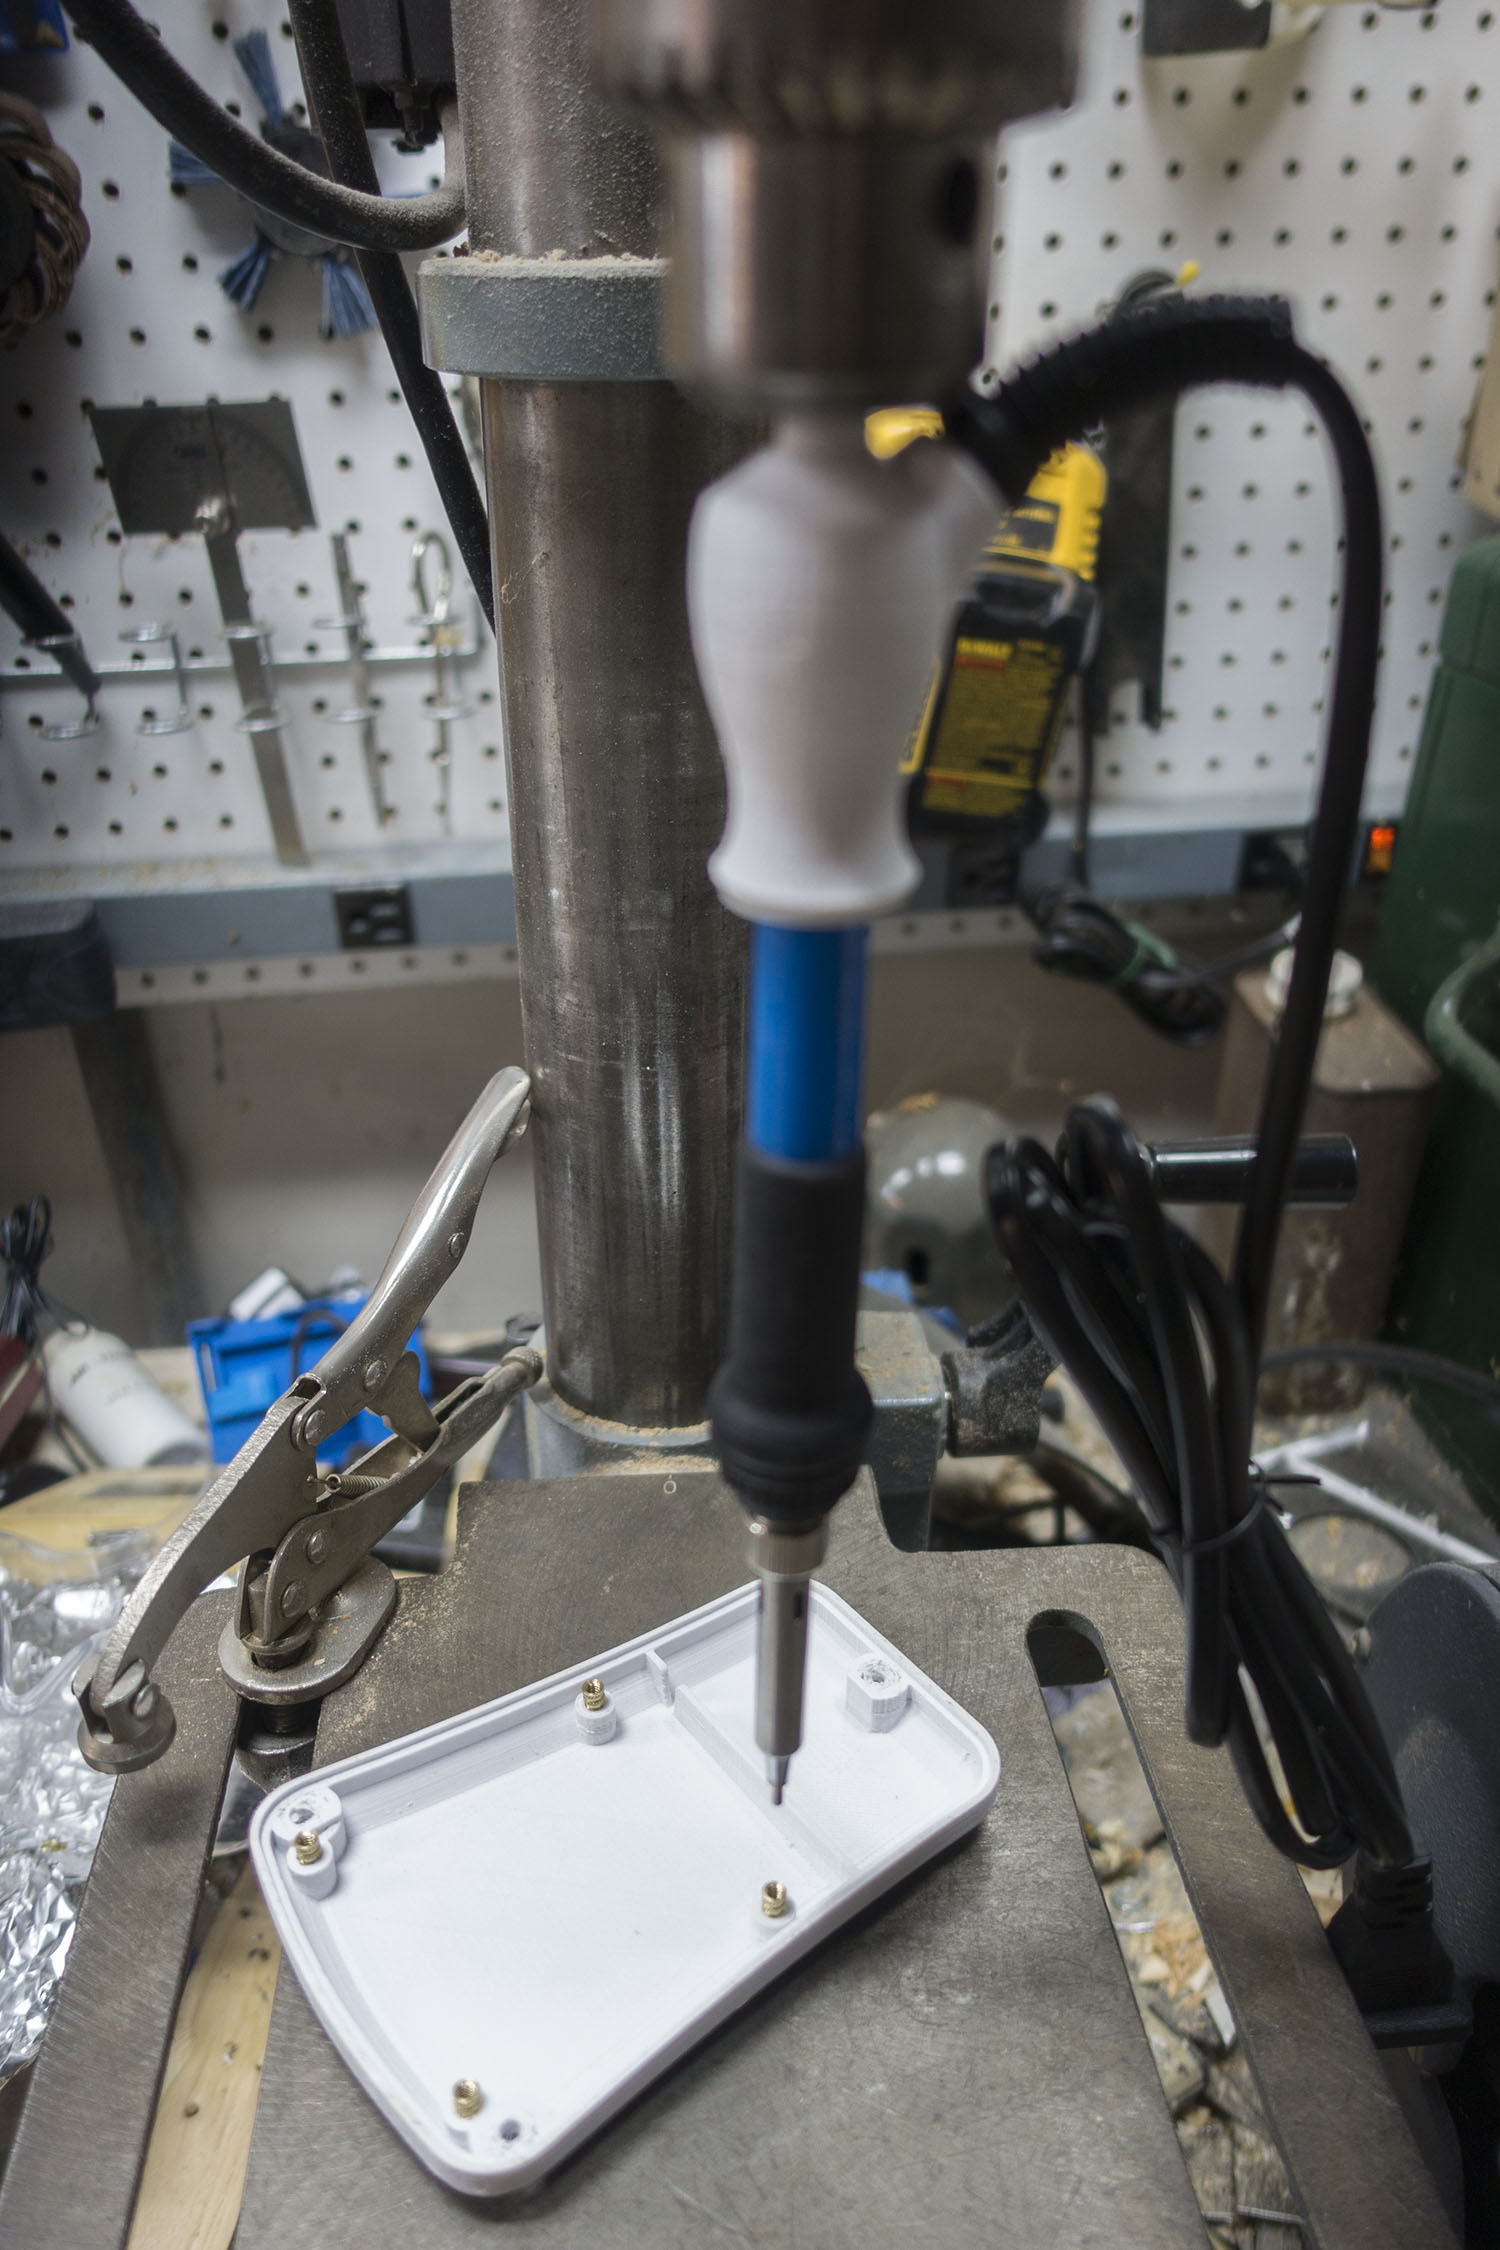
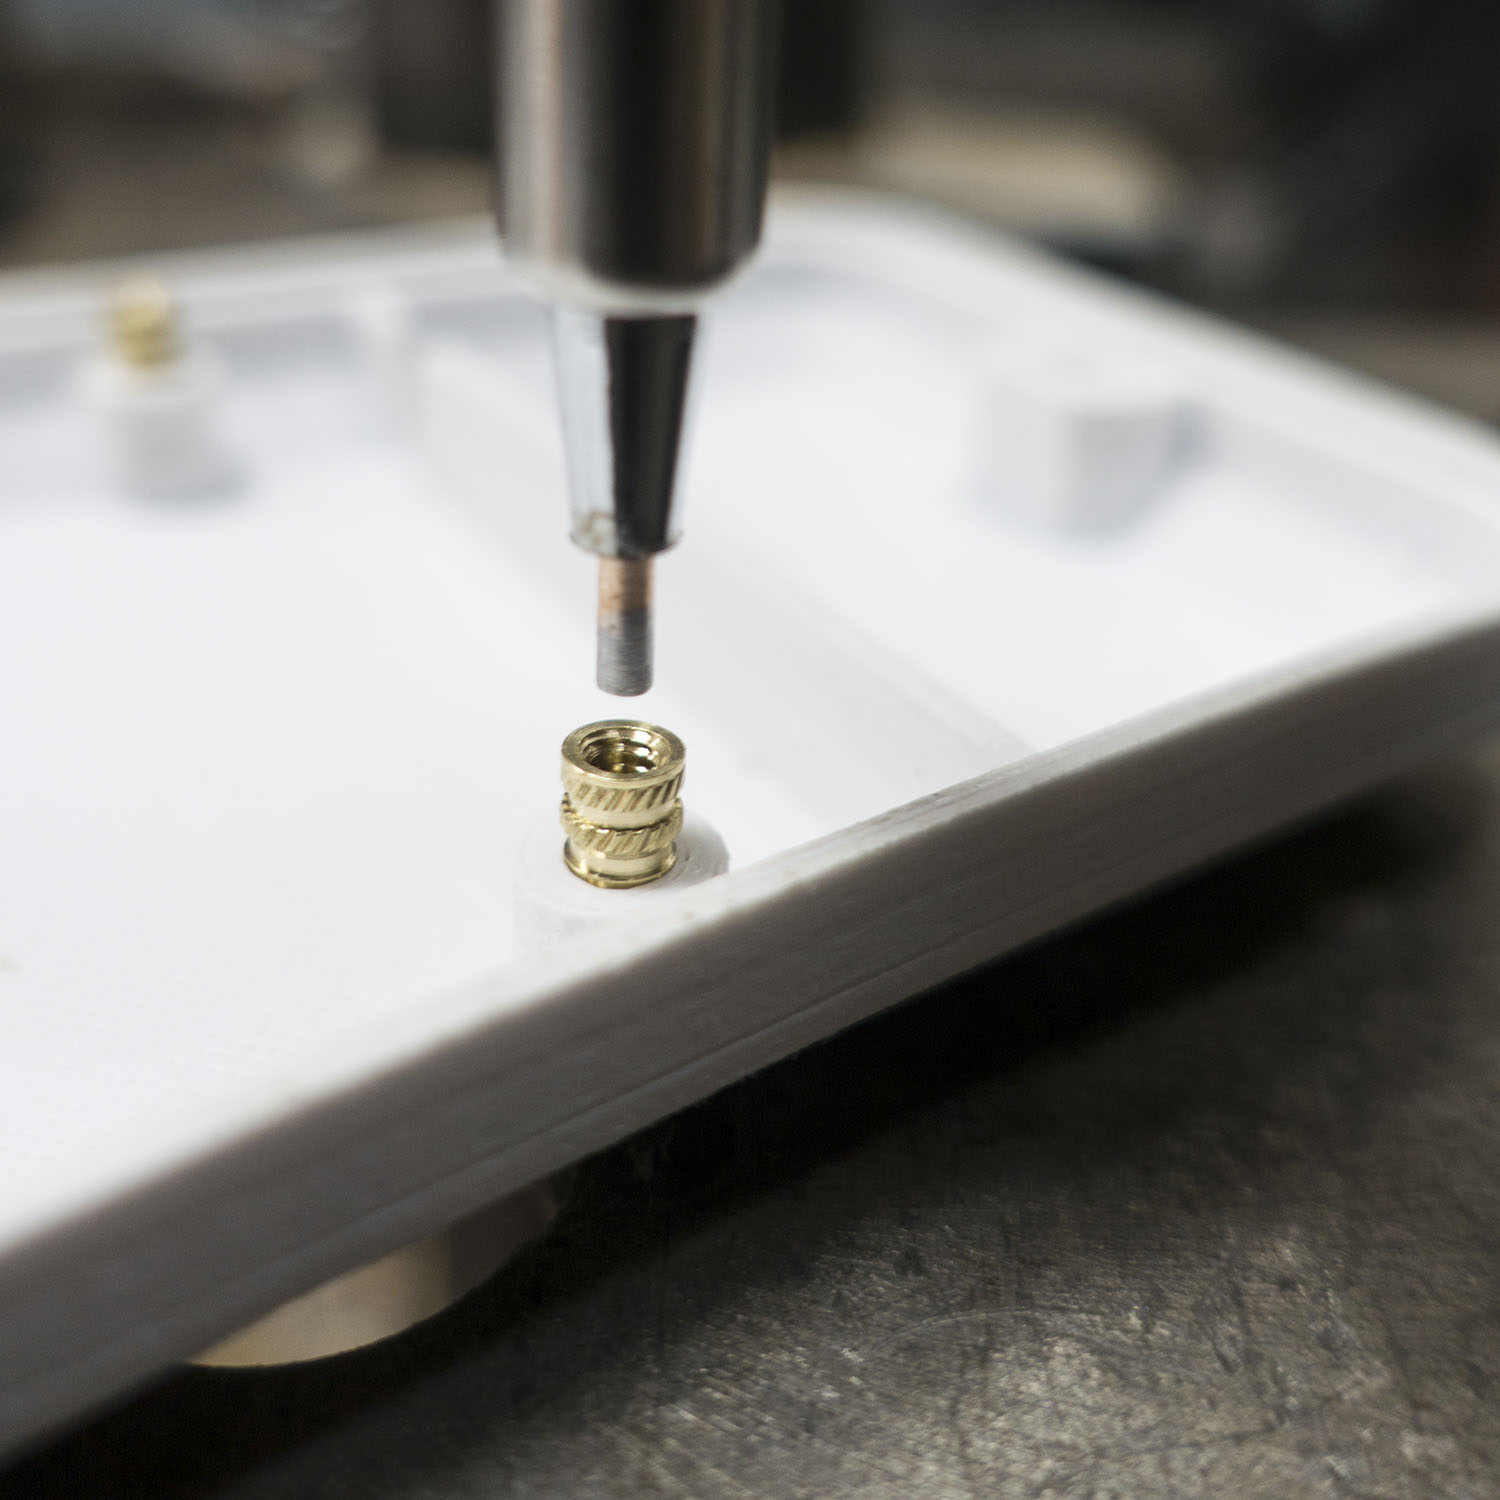
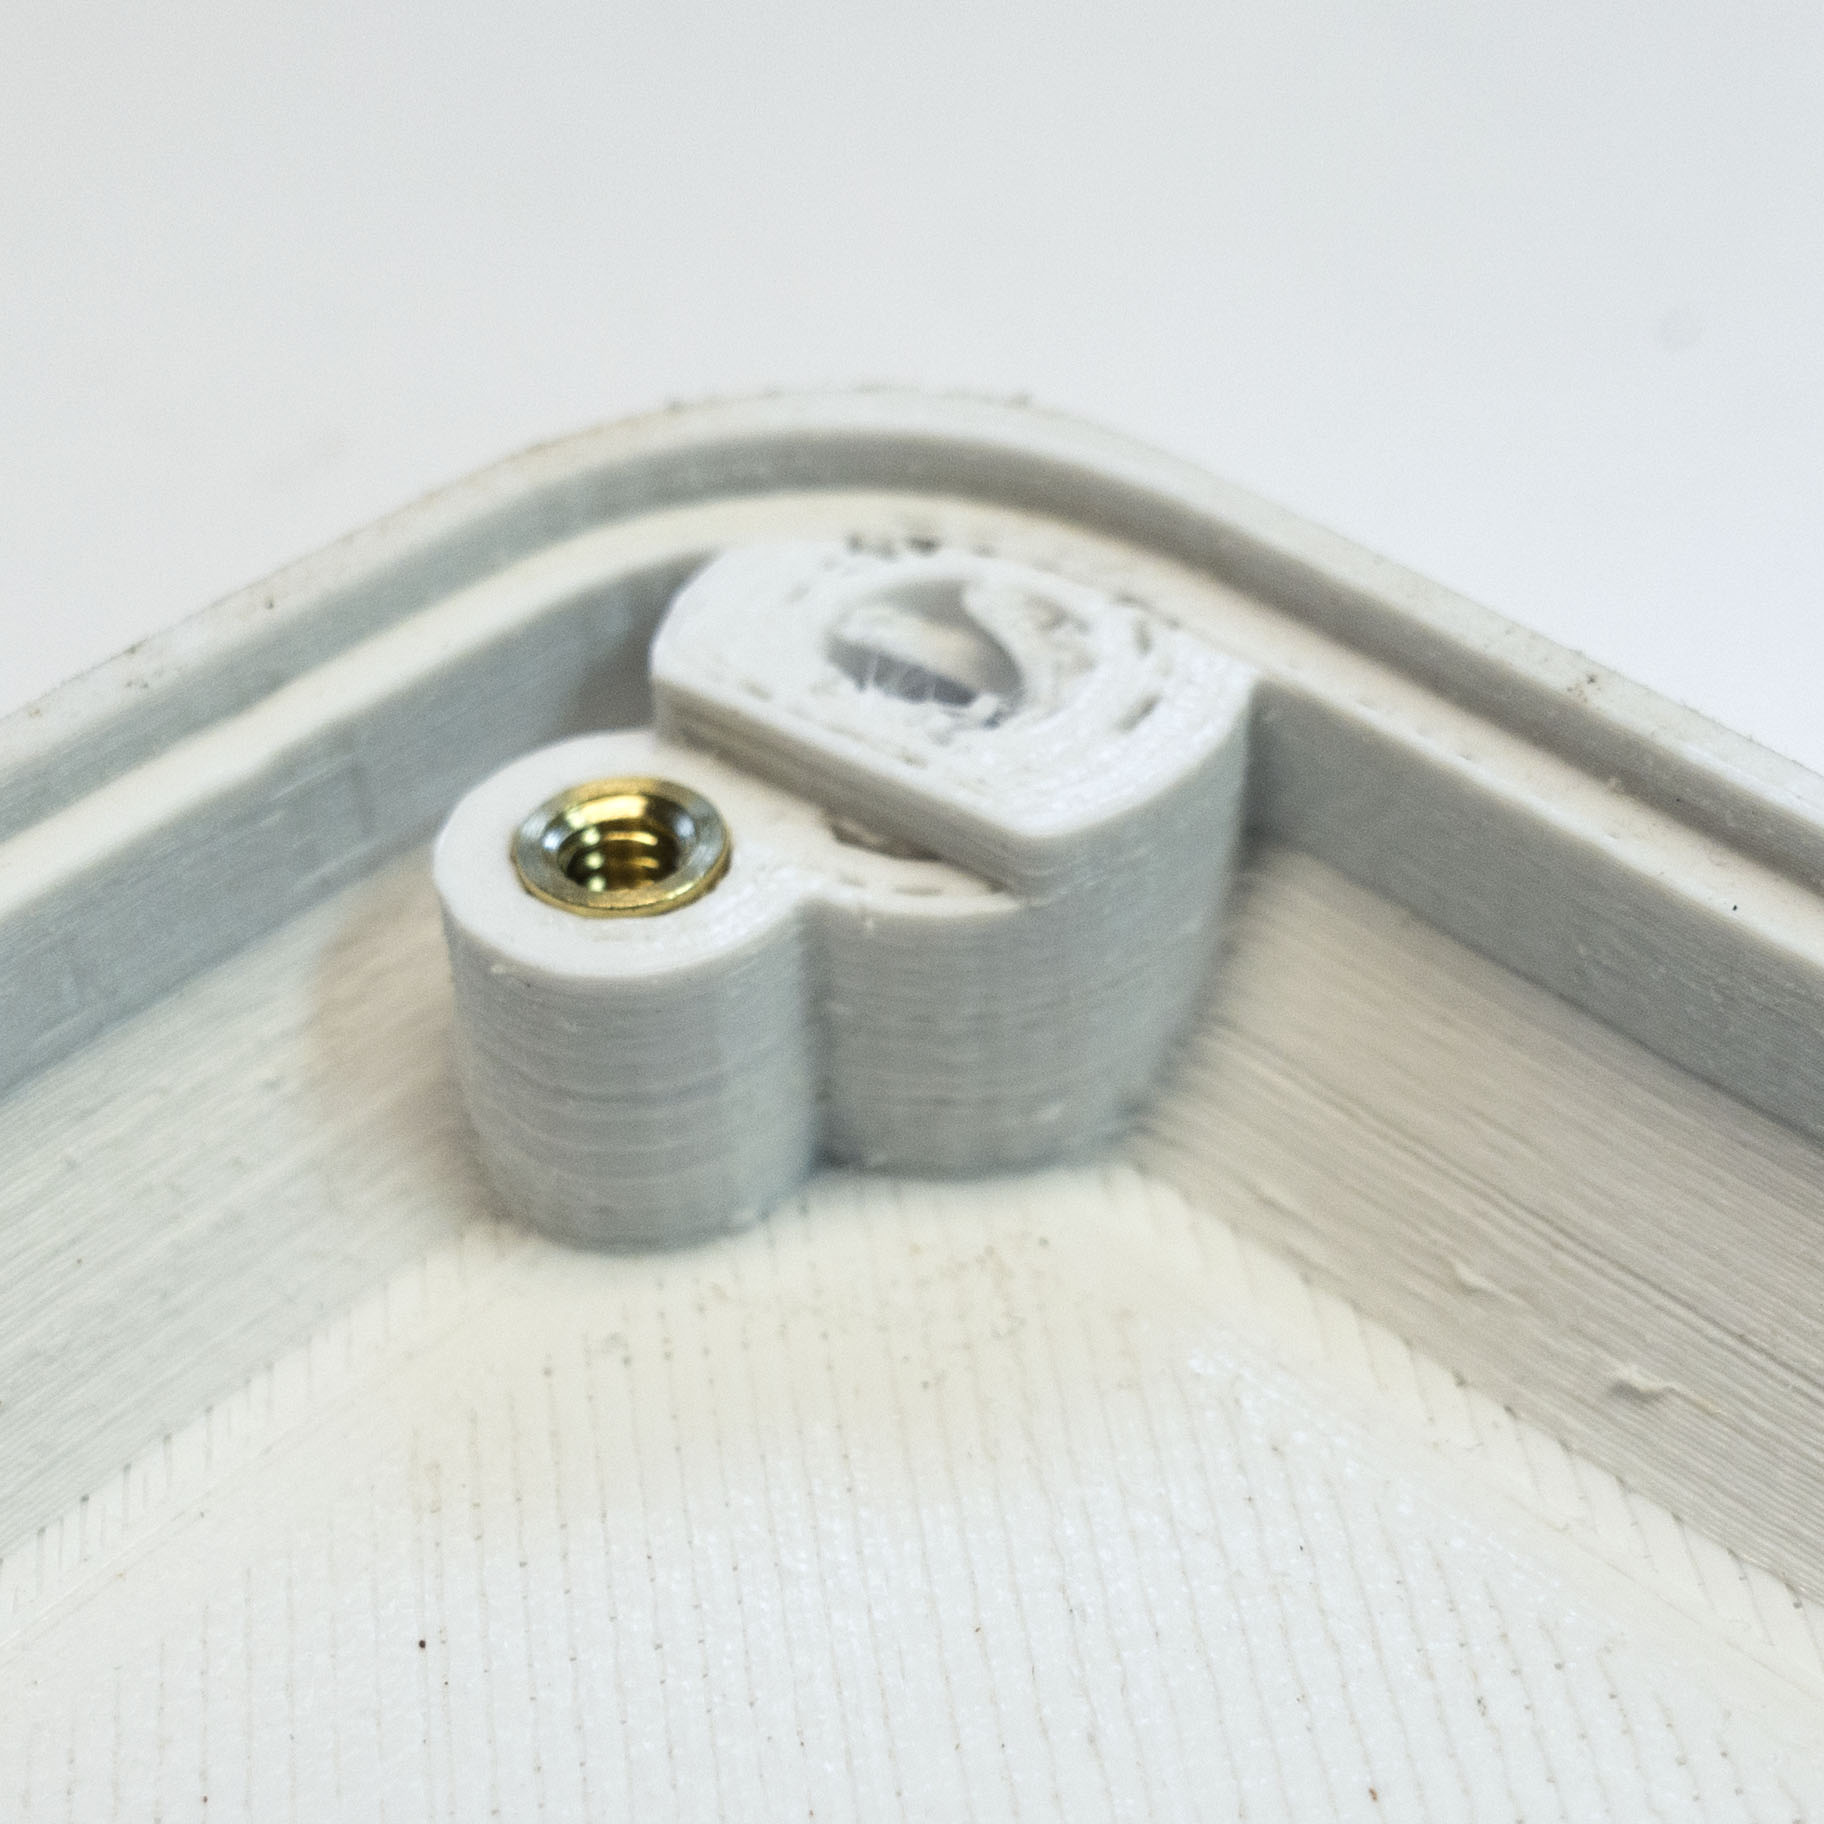
Here’s an cheap and easy way to accurately press metal thread inserts into 3D printed objects.

3D printing provides a wonderful way of making custom boxes for all your projects.  Often these boxes are held together with self-tapping screws driven into plastic holes. That’s great if you are only opening and closing the boxes a few times, but eventually cross threading/stripping will make you sad.  Think how much more awesome the boxes would be if they had integrated metal threaded holes!

threadInsertPressThankfully, that’s pretty easy to do. You can get brass inserts specifically designed to be heated and pushed into plastic. McMaster Carr sells such inserts and the irons and tips used to push them. The inserts themselves are pretty cheap, but once you add an iron and a number of different tips, the price starts creeping up, leaving you having to push the inserts in by hand.

So I had the idea of making a little adaptor for mounting a soldering iron in a drill press.  This process allows you to be sure you are pressing the insert in plumb to the surface, and you can set the drill press’s depth stop so you can press a number of inserts in to just the right depth. Easy peasy.  Hey look this post was even featured on Hack-a-Day!

I used this soldering iron because it’s the cheapest iron I could find that came with a number of replaceable tips. You can convert some of the tips into thread-pushing tips and still have a couple left over if you’d like to use the soldering iron as a soldering iron.  It also has a heat adjustment that should be cranked down to minimum for this project.

wireSizeOfHolderMounting the iron on the adaptor is simple. You just pull the rubbery strain-relief collar from the back of the iron, stick the iron into the hole at the bottom, thread the wire up through the slot, and re-mount the collar into the hole on the side of the adaptor.  PRESTO! You have a soldering iron ready for the drill press!

Remember folks, never turn the drill press on while you’re doing this!  Being whipped in the face by an electrical cord is bad news.

inTheDrillPressWithCaseMaking the tips was easy.  I have a lathe, so it was trivial to machine two of the soldering tips into 4-40 and 6-32 tips for pushing threaded inserts.  The geometry of these things is pretty non-critical.  Just a nub on the end that has to be smaller than the minor thread diameter and a square shoulder that does the actual pushing and heat transfer.

puttingInsertIn

If all you have is a drill press, it’s probably still pretty easy make a serviceable tip by chucking the tip into the drill and turning it at your lowest RPM setting. Then you can use a metal file to cut a shoulder 2/3 of the way up the tip.

Heck, you can probably even just use a cone tip as it is, but with less good heat transfer and less of a guarantee that it will stay plumb.  Thankfully, the inserts go into a tapered hole, so that should help them stay aligned as you sink them in.
sunkProperlyThese tiny inserts will heat up super fast, so set your drill press stop so you can press them in and retract quickly. If you pause too long the whole area will get soft and your insert may end up like this.

So there it is: $16 and one 3D print between you and metal thread insertion nirvana.

Laser Cutter Tips and Tricks

  • Do designs in alignment, but then break up all the objects into “cut sheet” layers organized by the material they need to be cut from.
  • Do design in exact dimensions without kerf compensation, those tiny .002 changes are nearly invisible and will drive you crazy. “Did I already compensate that?” I only every apply the compensation to a copy of a single layer I’m going to cut and then save it out as a ToCut version of just that layer.
  • Design with groupings for easy editing, but collapse parts down into individual compound paths using the path finder when you are making your cut sheets. This helps offset paths do the right thing for kerf compensation.  If everything comes out right, but you have a few holes that are way to large, you forgot to collapse them, and the kerf compensation made them bigger instead of smaller.
  • Control Cut OrderControl Cut order.  If you’re cutting open paths or have closed paths that overlap the normal “inside before outside” cut ordering won’t apply if you care about cut ordering organize the parts into separate cut passes.
  • Look out for exactly duplicate paths hidden on top of one another. That causes double cut problems. Find them by zooming way out so the anti-aliasing makes the overlapping ones appear darker.
  • Do Not Put Parts Too Close TogetherAvoid paths that are too close together.  The thin sliver of material won’t be able to dissipate the heat as well as a wider section and may melt or burn.
  • Use tape to hold pieces in so the excess material forms it’s own parts organizer.  You’ve already carefully laid these things out in an nice sheet, why not take advantage of that?
  • Use 3 ring binder sleeves to hold on to thin sheets of organized parts. If you’re using the tape and excess material trick above, if you limit yourself to 8.5″x11″ sheets of thin material you can orgnize a zillion sheets in one three ring binder.   Just be careful not to pick it up upside-down.
  • Use pulse rate to control edge properties lower on wood for a less chared edge. Higher on plastic for smoother finish.
  • Remove uneven protective coatings.  If cutting pastic with an uneven or bubbled protective sheet of plastic on top peal it away first to get more consistent cuts.
  •  minimizeRasterDistance raster areas into blocks to minimize the raster span.  When raterizing the laser goes back and forth over and over. The shorter the distance it has to go the quicker the raster progresses.  Clumping your raster parts can really cut down on the amount of time spent waiting.
  • Pay Attention To Grain DirectionPay attention to the grain orientation on wooden parts.  It’s important visually and also important structurally.  It’s not as important for plywood.
  • Use char artifacts to you advantage.  When laser cutting wood the compressed air blast adds a charred “cut shadow” on the upper surface, you can orient parts to take advantage of this, by making that shading part of the design.
  • Do small test cuts with a particular laser and material before deciding on the settings for a long set of cuts. I usually use some 1/4″ circles in a scrap area of the design.
  • On wood go a bit slower than your test cuts indicated. Wood is not a uniform material go slower/use more power than the minimum you needed for your small test cuts so as not to leave a few tough areas uncut at the bottom that you’ll need to cut loose and touch up.
  • Push Parts Out In Correct DirectionPush not-fully-cut wooden parts toward the bottom.  If the wooden part very nearly cut though and you’re able to just push the parts free, pushing on the top of the part makes sure that any splinters that pull free at the uncut areas pull free from the scrap around the part.  If you push the other direction the splinters come off your part, and ruin it.
  • Use a wood burning pencil to hide hand cut edges.  If you have to cut some wood loose, trim splinters, or sand down some edge it will leave unburnt bright wood in the otherwise evenly burnt edge.   You can shade these areas in with a wood burning pencil or cheap soldering iron so they mostly disappear.
  • Don’t make everything a rectangle.  Part of the lasers power is awesome curve cutting. Don’t make everything a rectangle. Add some curves. Not everything has to be 90 deg or a strait line.  Do not assume everything is a box.
  • Use Scrap To Form Clamping JigUse the scrap around a cut piece to form a handy clamping  jig.  If you use complex shapes they can be hard to clamp for gluing.  The scrap material around your part fits it like a glove and a few extra cut lines can make that come free and you can use it to hold your part in a clamp while gluing.
  • If  your forming a box edge with mating fingers don’t use alternating squares.  Work joins into your design.  Make a nicer more intentional patterns.
  • HideTabs Under Other ObjectsHide slot an tab connections if you can.  Sometimes you need some tabs and slots to hold on a part, and you haven’t been able to make the tabs fun enough to work into your design, you can do other things to deal with them.   You can hide them under glued on decoration or reinforcement pieces, you can position them under other attaching pieces.  You can laser etch transitions to make them more interesting than just a weird rectangles.  Jazz it up.
  • Use an alignment jig to force holes and pins to be plumb.   Just because a pin joins two pieces don’t assume that the pin is plumb, the conical cutting of the laser means there’s nothing forcing it to be plumb. For 1/8″ pins I use a drill press to make a 1/8 plumb hole in a piece of wood, and put a stub of 1/8″ rod in that hole. Now if you stack two pices on the rod and down onto the surface they’ll be reasonablly plumb and you can glue them.
  • Use the protective paper on acrylic as a paint mask.  If you laser etch into acrylic though the protective paper, the remaining paper makes an awesome paint mask.  If you don’t need super alignment between the raster and vector cuts you can even do the raster pass first, paint, and then do the vector pass. That lets you paint the whole sheet willy nilly without having to worry about getting paint down in the cuts, or having to paint individual little pieces.  Take care to use some extra power/slowness to fully etch though the paper and into the plastic.  If you “only just barely” etch though you can have sticky residue from the paper still on the plastic and that is real pain to remove.
  • It takes more power/takes longer to cut/etch though plastic that has the paper on VS not. (and it’s different for paper/plastic protective layers)
  • If you’re cutting lots of small plastic parts consider pealing the protective paper away first.  If you don’t need a super pristine surface finish free of any slight fogging near the cut lines it’s way easier to just peal the protective paper/plastic away before you cut.  It’s a time sink peal it off a zillion tiny parts individually.
  • Cut Out Unused Sections for ReuseUse extra cut lines to separate and save unused areas.   When you lay out parts for cutting, you often have some areas that are not used.  If you add some extra cut lines to cut those ares into their own rectangles.   It’ is much easier to re-use that material and it’s much more compact to store.  Trying to hit some good areas in a big sheet full of holes is hard and a waste of your time.
  • Cut fancy paper weights. If you’re cutting very thin things like paper it will often just blow away while you’re cutting it because of all the air motion in the machine.   If you take a wood or plastic sheet and cut out a part just inside/outside the lines you’re cutting in the paper the sheet can form a curve hugging paper weight for both the inside and outside of the cut.  With those pieces in place while you cut the paper stays put.
  • Use tabs to hold paper shapes in place. Paper parts can blow away so put gaps in the cut edges to keep them in place. Position the tabs where it will be easy to trim them (avoid corners or curves)  Cutting the gaps screws up the lasers inside/outside cut ordering so use explicit layers to control ordering. You can get away with a single tab if you put it “upwind” of the direction the compressed air on the laser will be blowing.
  • Make a paper clamp. If you want to cut a lot of sheets of paper all at once you can use the “fancy paper weight” idea but use 1/4-20 bolts and wing nuts to make a clamp to hold the paper together as a single chunk. (be on the lookout for fire though!)  I did this to cut secret compartments out of books.  It works but is messy and kind of a pain.
  • Use the mechanical properties of your material. Thin areas can be used to add springiness  Keep in mind that sharp corners and nicks can concentrate stress.
  • Cut some extras. It’s always a trade off between cutting time and output, but if your project needs 5 of something consider cut 6 or 7 of them. If they’re tiny or easily broken cut more.
  • Look for the flash. If you want to know if the laser is compeletly cutthing though your material, look for the flash as the laser hits the honeycomb support below the material.  If there are no flashes then you’re not getting all the way though.   This is easier to see with acrylic, not so easy to see with wood, etc.
  • Remove Inside CornersFor 90 deg braces cut out the inside corners.  If you are added braces to hold other pieces in alignment, and they’re just a tiny bit off the inside corner of the brace will push the brace away and spoil the glue bond.  Removing the inside corner makes the glue up more forgiving and makes for stronger joints.
  • Use water to deal with bowed wood.  Often with a sheet of plywood it will be somewhat cupped.  Instead of trying to fight that with weights you can use a paper towel and water to moisten the concave side.   In a couple of minutes the water will make that side of the wood expand and flatten out the wood.  I’ve used this to great effect on 1/4″ plywood.
  • Use water to protect thin sections on multi pass cuts.  In wood it’s easy to have thin sharp angled features char badly on the second pass.  Between passes use a syringe to put a tiny amount of water into the groove at these points.  The water will soak into the walls and keep them from charing as badly on the next pass.
  • Etch an alignment aid.  Want to laser etch consistently at a specific location on an uneven shape?  Etch an alignment sheet with the outline of the foot of the shape and use that to position the parts.   If you etch the alignment sheet deep enough it can even positively position the part since it’s footprint will click into the etched depression.  You can even use a flat bed scanner to figure out the footprint if it’s complicated.
  • Spiral cut to make deep pockets. Want to cut a deep pocket that doesn’t go all the way though? You can vector cut a tight spiral. You have to experiment with the specific material to get the right spacing. If you can try to etch from the center and spiral outward. Watch out for major heat build up.  Fire risk.
  • Be careful about versioning.  If you have a project witha lot of parts and your iteratively improving the parts take care not to mix versions of the parts.  It’s better to pitch old versions of the parts then to try and tell which ones have  modified slots that are 0.005″ narrower.
  • Check design orientation when cutting multiple passes in wood.  If you have long features where the laser moves in the same direction as the forced air at the cutting head that air will blow back along the cut fanning  any coals formed on the walls.  This makes the charing much worse. Try to orient the wood so the air blows across the grooves not along them.
  • Slow rasterization for dark details.  I used to always use max speed for rasterization, and adjust power to suit, but if you’d like to put dark details on wood it’s better to use lower power and slower speed to char dark details that are not deep.
  • Cut part way though to do kerf bending.  If you cut a lot of parallel lines most of the way though the material it makes the material much easier to bend.  If you are doing this in wood make sure to cut perpendicular to the grain so it doesn’t just split when you bend.

If you have other laser cutting tips put them in the comments!

Building an Arduino based Motorized Camera Rig

I’ve always wanted to make a time lapse video. It’s like building a machine to catapult forward in time.  What could be more fun?  I really feel like the best time lapse videos integrate camera motion to give the scene an additional compelling dimension. I spent a couple of evenings building a quick and dirty motorized camera slide from a dead inkjet printer. It was a failure.  It was unable to produce the slow steady motion needed for video, much less the kind of control needed for time lapse.  I started to think about what a serious system with substantial time investment would have.  It could be bigger and have at least two-axis camera motion.  It would need a bunch of software with some way of key-framing the camera motion, maybe an LCD display, maybe a pendant control for stepping/snapping frames without jiggling the camera.  What else?  A way to power and auto-trigger the camera for time lapse.  All in all a much, MUCH bigger project.  OK, if that’s the end goal, what’s a good first step? I’m always wary of  physically big projects. As the size goes up, costs go up. Big projects are harder to get into/out of the car, take up more workbench space, and ultimately collect dust in a bigger way.   If I can fit a project into a single project box, life is simpler.

Bigger Motor ControllerSo instead of embarking on a large two- or three-axis rig, I decided to build a very small one-axis rig.  Heck, I already had a small one-axis slide.  This way I could get my feet wet with the software, LCD, motor controllers, and all the other fun stuff, but without as much schlepping. A friend of mine pointed out that a little motorized stage like that could also be used for focus stacking, and he’d been wanting to build a focus stacking rig.   He sent me little linear slide with a stepper motor drive and a tiny ball screw.  I’d never seen a ball screw that small!   It was sweet!  I poked around on Amazon and ordered a A4988-based stepper motor driver the size of a postage stamp.  They were cheap, small, and the data sheet made them sound like they were doing a decent job with the microstepping, which might be useful for very precise focus stacking.  I used to build stepper motor drivers out of discrete components, but it’s unbelievable what you can get these days for not much money. I’ve been itching to try some of the pre-made ones out, so I ordered the stepper motor and a much bigger driver board based on the TB6560, mostly because I was having trouble convincing myself that a driver without a heat sink was really going to be able to do the job. And even the big one was cheap.  It was less than $17,  including two-day shipping to my door. I’d also been wanting to play with some of these cheap LCD displays I see around, so I ordered a 4-line 20-character blue one that Amazon Primed its way to my house for $16. I ordered the blue one because a green-and-black LCD was going to make the project look like it was from the early 90’s.  I ordered one that had an I2C daughter board because I wasn’t sure how many IO pins this project was going to need, and I didn’t really want to burn half of them driving the display. When the display came, I was bummed that they’d shipped me the green and black version, not the blue one!   I set my time machine for the early 90’s and kept moving.  I wired up the display to an Arduino Uno.  I downloaded the Arduino IDE and a library to drive the display.  I wired it up like this:

Screen Shot 2014-04-23 at 8.44.48 PM

Then I ran this exciting bit of code.

#include <Wire.h> 
#include <LiquidCrystal_I2C.h>

//Addr: 0x3F, 20 chars & 4 lines
LiquidCrystal_I2C lcd(0x3F,20,4);

void setup()
{
 lcd.init(); 
 lcd.backlight();
 lcd.setCursor(0, 0);
 lcd.print("Hello World");
}

void loop()
{
}

Two DisplaysThankfully, it just worked.  The text was super crisp and readable.

I was still a bit bummed about the color, so I decided to roll the dice and try ordering the blue display again.  I’d be able to compare the two colors side-by-side and see which one I liked best. This time I did get the blue one. It worked and was crisp and clear.  Our eyes don’t like focusing on dark blue things though, and if I had to be brutally honest I’d have to say that the green display was more readable.  I decided to switch to the blue one anyway.

Special CharactersI wrote a little program to page through all 256 characters that could be sent to the display to see what sorts of special characters might be available.  There were a few useful ones like left and right arrows, the deg symbol, and a solid block character which I might actually use in my interface.

The next step was to put the various parts I was thinking about using together to visualize how things were going to fit.

Component Layout And Sizing

I was originally going to mount everything to the side of the motorized stage so I could cut down on external wiring.  I could even put the end-of-travel sensors inside the project box.  But it was starting to look 10 pounds of project in a 5-lb bag.

The project box was big, and it was going to have to be right under the camera or using it would be uncomfortable and trying to manipulating it would jiggle the camera.  Those issues seemed like deal breakers.  The next plan was to put the control box at some distance from the motor and make a separate control pendant that could plug in.  I’d need OK and Cancel buttons and some sort of spring-loaded pot for jog control.

Remote Jog WheelI went poking around at the local surplus store and scored a VCR remote with a nice spring-loaded jog wheel.  It even had two buttons inside the wheel, so I thought my control pendant problems where over.  I’d wire up the jog wheel/buttons through a phone connector to the main control box, and I’d be all set.  However, when I dissected the remote, I found that the jog wheel was not a pot.  It had 3 digital pins providing gray code position info.  That meant only a few jog speeds in each direction, and it meant I’d need more lines than a standard phone cord.  Back to square one.

Spring Return PotI decided to take a stab at adding my own spring to a pot to make a “return to center” jog controller.  I drilled a hole through the pot’s shaft and bent up a spring.  It worked. After some fiddling, I was able to make it control the motion of the slide.  It had a really sloppy feel to it. The center was always just kind of approximate, and it was harder to turn in one direction than the other.  Kind of a cruddy experience compared to the feel of the remote’s nice jog wheel.  I decided to punt for a while and work on other parts of the project.

End of Travel SensorsI wired up the end-of-travel sensors.  I was using IR gap sensors for a no-contact way of measuring the travel.  Now that the sensors couldn’t be mounted inside the project box, I decided to make them fit inside a bit of metal wiremold that I had lying around.  I used some Bondo to hold the sensors at the correct height and support a phone jack at the end so the sensors could be easily connected up.

This was by far the most annoying part of the entire build.  The phone jacks turned out to be back-stabbing fiends.  Fitting everything in the wiremold was annoying, and I had a wire tear out when I was closing it up.  Then the sensors weren’t working, so I ripped everything apart trying to figure out why. I had accidentally grabbed a two-conductor phone cord even though I’d  purchased a 4-conductor one. Then when I finally figured that out, I failed to realize that when using phone connectors, the wires get flipped from left to right so red on one end becomes green on the other, and black becomes yellow.  *Smack Forehead*  After I figured that out, I thought I was home free, but it still didn’t work.  I finally traced the problem to a poorly designed jack where the connector could clip in, but was still not fully seated and wasn’t making contact.  After that got resolved, everything was fine. But I’d burned an entire afternoon trying to run 4 wires a few feet.

Quick Release Plate MountedI got a super cheap quick-release plate.  When I was taking it out of the packaging, a spring and pin fell right out of the bottom.  I deemed them to be unnecessary and threw them out.  Then I noticed that  the cam lock tends to slowly unscrew and the screw can’t actually be tightened properly without making the cam hard to turn.   A dab of Loctite could solve that.  Hey, it was cheap!  My only regret is that I wasn’t able to mount it so the cam stuck out the same side as the wiremold.  This would have made the whole thing more compact left to right, but that might have required tapping some blind holes, and this way around it was simple to mount.  Just a 1/4-20 though an already existing hole in the carriage.

LCD Rig Wire MessI had all this wired up to an Arduino Nano.  It could jog the motor when I twisted the pot, and it could read the end-of-travel sensors.  Next was to start designing some UI for the LCD.  I played around with being able to highlight various menu options by quickly toggling the solid block character behind them, etc.  It all seemed doable, but it was kind of tedious Arduino development. I kept thinking “How is this going to scale up for multi-axis key frame animation craziness?”

 Massive Feature Creep Occurs

It was then that I noticed Bluetooth LE boards for the Arduino.  Could I control my whole rig from an iPhone app? I could ditch the LCD, buttons, pendants, and all the associated wires and connectors.  I could make the project box smaller.  I could write an iPhone app to do the interface heavy lifting, and I’d only have to do a moderate amount of stuff on the Arduino end of things.  No more planning out of awkward LCD interfaces.  Plus, it just sounded fun!

Blue Tooth ConnectedSo I ordered one of the boards, and I was off to the races. Adafruit’s page about wiring up the board is very clear, and I hooked up an Arduino UNO just to try it out.  I was able to get their UART echo communication going right away.  Simple, Pimple.
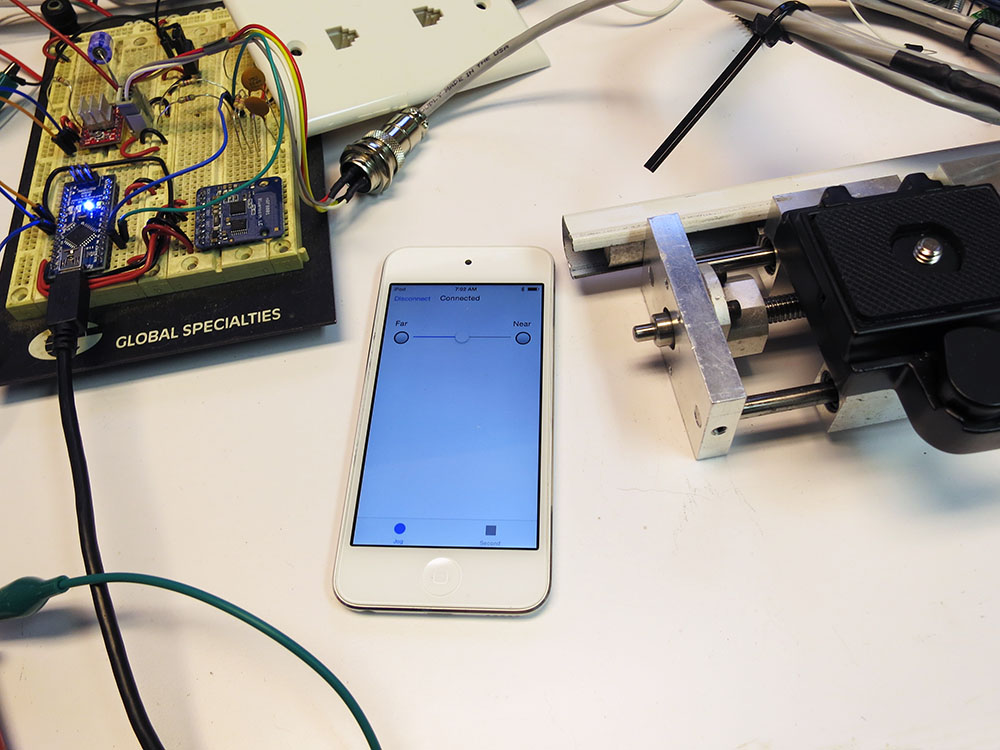
The next test would be to write my own program to establish the Bluetooth communications and see if I could use a slider to jog the motor.  I wanted to test the latency and to see if stepper motor switching noise would affect the communications.

The great thing about Bluetooth LE is that you don’t need any special licensing.  I spent one of my precious Wednesday nights ripping the com parts out of the Adafruit example and sticking them into my own simple app.  The app just had a connect/disconnect button, a connection status indicator, and two end-of-travel indicators. The communication is only 9600 baud, so I made a special jog loop the Arduino could go into where the phone would keep sending single bytes of  jog slider info, and a 0 would indicate that the jog portion was done and go back to the main loop.

The very first version wasn’t wired to anything. It would just indicate end-of-travel limits having been reached if you slid the slider close to the end of its travel path.  After tracking down an issue with a rough signed char, I got it working. The latency was quite low.

Jog Actually WorkingNext up: rewire the Nano to remove the LCD/knob and wire in the Bluetooth LE board.  Then I’d be able to jog an actual motor. I powered it up and could hear the motor making some ticking sounds, but jogging wasn’t working.  I went to hook up the scope and bumped the alligator clip that was providing motor power.  It touched something on the board, and the Arduino’s LED’s went out.  Yup, I’d fried the Nano.  Ouch. Oh dear. Had I fried the USB port on my computer?  Apparently not. *phew* No need to panic.   I did not, however, have a spare Nano on hand.  Trying out the jogging was going to have to wait until next week.

Jog On OscilloscopeIn the mean time, I rewired some parts of the protoboard to make it a bit less hairy.  I don’t want accidental short circuits killing things, but I also don’t like clipping the leads on resistors and caps.  When the replacement Nano came, I decided to only connect motor power after I was reasonably sure the other things were working.  I  used the oscilloscope to see if the Nano was producing the expected step pulse trains.

Yup, that seemed to be working.  With some trepidation, I decided to try and hook up motor power again.   Nothing burned out, and it worked!  Next I needed to see if the limit switches worked. I jogged the stage all the way down to the end, and one of my limit indicators on the iPhone started flickering like crazy. But it was the wrong indicator. I swapped near/far sensors and added some software switch debouncing.  The slow linear ramp of the limit sensor was producing a lot of noise when it got close to the logic level boundary.  I’d love to run it into a nice Schmitt Triggered gate.  That would keep the software nice and clean, but if I was going to have PCBs made, it would add area and expense.

I could have made them go-to-analog inputs and just used two thresholds.  That’s probably what I should have done, but  stepping at 1/16 of a step was putting me at 54400 steps per inch, which was really taxing the powers of the accellStepper library and I didn’t want to add much to my inner loop.  That’s probably silly of me and adding two analog reads to my loop wouldn’t matter. Instead, I did digital reads and required a large number of matching consecutive answers before alerting the iPhone. Probably over complicating the code since the real bottleneck in accellStepper is probably its use of millis() not a couple of  analog reads.
Camera On RigNext up was to install CHDK on my camera and see if I could manage to use a USB cable to act as a remote shutter switch.  CHDK runs on various Canon cameras and lets them do things they normally couldn’t.  My camera (a Canon S100) didn’t have a way of remote triggering, so I had to hack it with CHDK  to do that.  You have to make a special bootable SD card.  I used a tool called STICK to analyze a photo taken by my camera, determine the exact firmware in the camera, and download and format a bootable SD card.   This made setting it up simple.  Then I went through a maze of  menus to turn on remote shuttering. I wired one of the Nano’s output pins to my camera’s USB port and wrote a snippet of code to take a picture. It worked! Right now I hold a line high for 1 second, and then it takes a photo when the line goes low. I haven’t tried running a shorter cycle.  Maybe with manual focus/metering it could take photos more quickly.  I haven’t tried.

timeLapseStagetimeLapseSetup

I had motion, I had photo taking. It was time to try and do a time lapse with this rig. I took it over to my son’s Lego studio area and set up a magic crystal garden I’d purchased online.  I used fun-tack and clothespins to aim the rig, plunked an old calendar photo of clouds in the background, and we were almost ready to go.  I set all the camera settings to manual. Then I set the code to move though the system’s full range of motion over 10 hours, taking one frame every 2 minutes for a total film length of 10 seconds.

I waited until it was dark, and I fired off the time lapse.  It felt like Christmas Eve,  and I didn’t know if Santa was going to leave me a time-travel movie or a lump of coal. I told the kids we couldn’t go into the garage for 10 hours. In the morning, I went out to see what had happened.   The first thing I noticed was that one of the big chunks of foam I’d taped up over the garage windows had fallen down during the night.   Oh, oh.  Still, the crystals were fully grown and there were 300 photos on the camera, so it was time to try and play them as a movie.   Unfortunately, iMovie only lets you specify still frames down to 0.1 seconds in length, so you can’t really make a 1/30 of a second one-frame-per-image movie.  Argh!  Photoshop can do it, but that requires loading all the frames into layers. On my machine, loading in 300 big 3000×4000 pixel images was taking for-ev-er.   Finally, I just downloaded some freeware frame encoding tool and used that to build my time lapse.  Then I could use iMovie to add title, fiddle with the sound, etc.  By 11am, I’d finally managed to unwrap My First Time Lapse.  It was over-exposed and didn’t have great focus, but the kids thought it was cool.  Success!


crystalsFinalState


Making Medicine Count Down Board

Sick Simon Simon had a high fever for several days. We got him to take liquid Tylenol exactly twice: he took the cherry flavor once and the grape flavor once. After that, he declared they both tasted like toothpaste, and even though they helped him feel better, he was not interested. When we took him to the doctor, it turned out he had an ear infection, so Simon was prescribed a 10-day course of antibiotics to heal what was ailing him. Simon did not like to take the medicine.  He was groggy, feeling miserable, and having none of it.  For one dose, we  had to force him to take it.  It was a parenting fail.

When I was growing up, my parents would make count down boards so we could count the days until we went on a trip. They would have a row for each day and two columns of treats, one for me and one for my sister. It was a bit like an advent calendar, but it helped us watch the days until we drove off to Florida or some other destination.

Gesso The BoardI thought maybe I could do a similar thing for Simon. He would have a treat after each dose of his meds, and it would visually represent the number of doses left so there would be an end in sight. I thought that might become pretty important as he started to feel better and was even less excited about swallowing a big pink spoonful of yuckiness.

In the interests of time, I didn’t design this thing to be laser cut. I needed one NOW! I sketched the design onto a piece of plywood and cut it out freehand on the bandsaw. Then I slathered the whole thing with Gesso, a kind of primer for doing acrylic painting. Normally I would have done a couple of coats and sanded it smooth, but I didn’t have time for that and I figured the rough Gesso brush strokes might add something to the look. The next morning it was dry and I sanded it lightly being careful not to sand through.

The Final BoardThen I got out my brushes, painted the design with acrylic artist’s paint, and did the outlining with a sharpie since my tube of black paint was AWOL. I used the black to paint the faces on my pastry cutters, so it’s probably still in that project’s box.

The design has a sun and a moon for the morning/evening dose columns. I have built some boards where I just hot-glued the treats right to the board, but  I decided instead to glue them to a card that would hang on the board. That way the next time one of the kids needs to take meds, I can just make a new card.

Board Close UpI had some trouble with the sun’s rays. I had them coming too far into the face area.  I had to let it dry and repaint that part a bit. Haste makes waste. Simon liked the board, and was good about taking the meds once he was “on the board”. It’s hard to tell how much of that was “Simon getting used to the medicine” versus “Simon is encouraged by the count down board.” I’m going to guess it was about 60/40.
I do think it really helped with the later doses since he always knew they were coming and how many there were left.

I’m glad we have the board. The next time one of the kids needs to take some medicine, it will be waiting to lend a hand.

chocolatesInPlace