
No, that’s not a typo. This year I built my son a Halo Master Chef costume for Halloween. I love making Halloween costumes. They’re usually a wonderful excuse to do some sewing and pattern design. When my son asked to be “A Halo Spartan,” I knew I was in for a different kind of build. People who build Halo armor (There are more than you think!) often use a program called Pepakura to decompose 3-D models into paper cutouts. There’s a free viewer, and the full program is only $40. A few years ago, I built my son a Boba Fett helmet using Pepakura, and I’d already developed a system for outputting the designs and cutting them out of card stock using a laser cutter. There was still a lot of tedious gluing, but I could cut all the pieces out and perforate the fold lines, which makes it quite a bit quicker to assemble. I started building this set of armor mostly because the author had done a good job of providing the files and a spreadsheet to help you scale the costume parts.
 One of the big issues with Pepakura builds is that you really want the scale to be correct. After gluing 200 pieces together is not the best time to figure out that your scale is off. I think if I were doing a Pepakura deconstruction, I’d provide two versions of the model. A super simple rough draft with only about 10 pieces that would have the basic shape and let you adjust the size, and then a fully detailed version for the complete build. I didn’t really have time to do that. Lots of folks spend a year building their armor, and I was only going to have a couple of weeks. So I downloaded the files, fiddled with the scales, laid out the parts for 24″x14″ card stock that could fit in the laser, and exported the vectors into Illustrator. The vectors already have styles to show mountain VS valley folds, but you have to adjust the spacing to work better on the laser. You don’t want the card stock to get too weak at the fold lines, so no long dashes. I used .4pt dots and 2.5pt spaces for valley folds and 1/2.83/.25/2.83 pt for mountain folds. You can use Select -> Same -> Appearance to select all the mountain/valley/cut lines and adjust them all at once.
 When I laser cut the parts, I used 2′ x 2′ card stock purchased from Michael’s for $.75 a sheet. I cut each big sheet in half to make two. Because I’m not printing on the paper, I can’t include any of the edge alignment numbers. I had to keep all the parts organized in some way, so I used blue masking tape to hold the parts in their original cut positions, and just kept all the pages in a folder made from one of the card stock sheets. Then I had to use Pepakura to look up where each piece was in the cut sheets. It was a bit like doing a puzzle. The torso has 200 parts on 6 sheets, and it was important that none of them went wandering off. Blue masking tape is very forgiving and can be pulled off without damaging the card stock. Don’t use normal masking tape, or you’ll be tearing your parts and then your hair out along with some gnashing of teeth.
 I used Elmer’s white glue for the gluing. It’s great for this task because it has a long enough working time to let you get things into position and holds well. The one down side is you sometimes have to hold things in position for 30 seconds or so in order to have it start to hold. I modified a few clothes pins by sawing off the tips, making them into more nimble paper-pinching helpers.
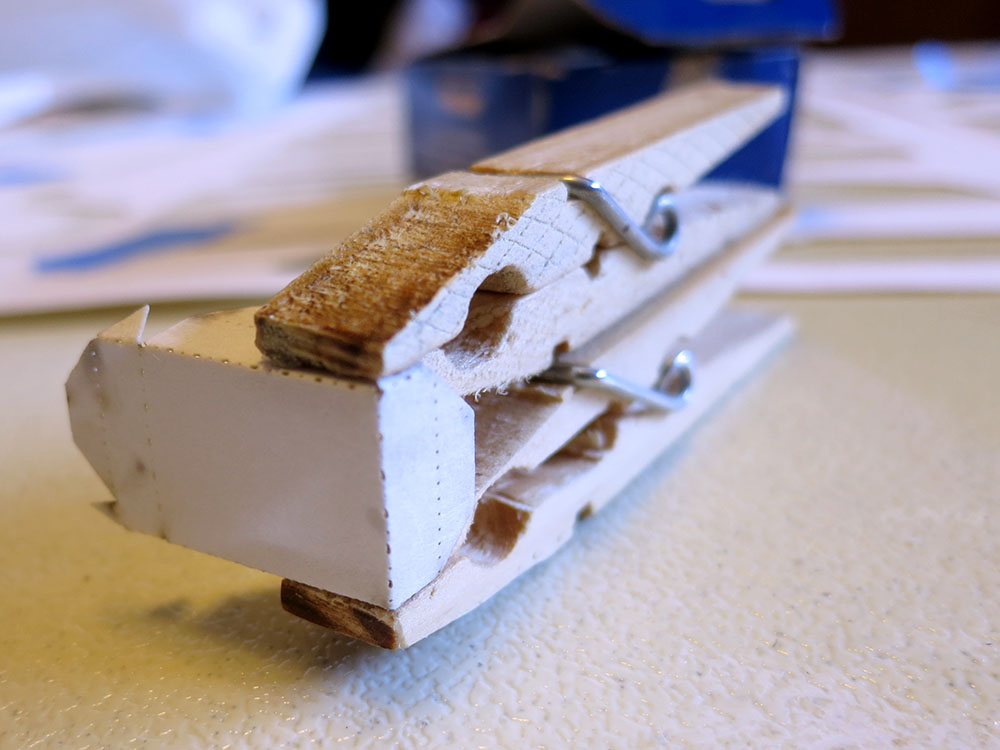 The clothes pins were super useful for holding paper edges together long enough for the glue to set. Because I was using pre-perforated folds, I mostly didn’t have to crease the fold lines, and the few that I did crease I could do freehand with a bone folder following the connect-the-dots style along the fold lines. I only did this on a handful of folds. All the others could just be done freehand thanks to the perforations.
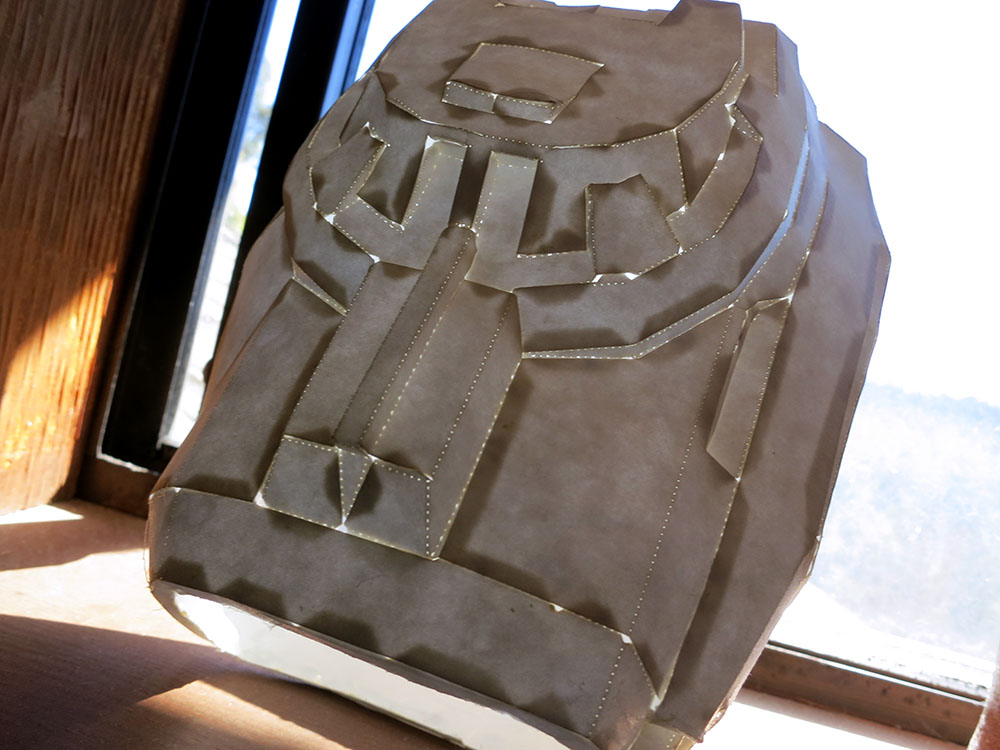

 The laser cutting took about 2 minutes for cut lines and 6 minutes for the dotted lines. The cutter is stupid about the short segments in those perforated lines, so it actually cuts them significantly more slowly than the normal cut lines. Laser time was maybe 10 mins per page, including setup and taping after cutting. The torso was 6 sheets, so it took almost a full hour to cut, but I can only imagine the amount of time saved. How long did the gluing take? I spent a weekend gluing up two biceps and a forearm. I had started a new audio book and listened to it while I was working, so I unintentionally timed my gluing. It took 13 hours 45 minutes for those three pieces. They have about 45 segments each.
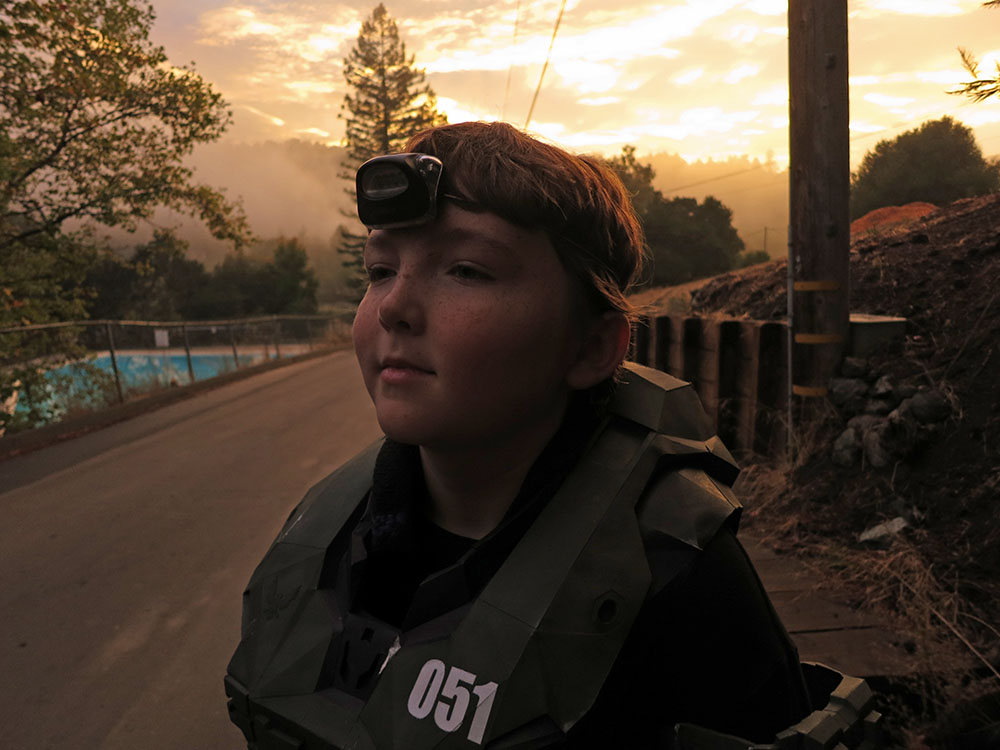
 When I started, I told my son I wasn’t making any leg pieces or the helmet. I didn’t have enough time to build a full suit and the helmet and legs seemed like the pieces he wouldn’t be able to wear for trick-or-treating anyway. Partway though the build, he told me he actually wanted to be not just any Halo Spartan, but the Master Chief. I told him I couldn’t swap armor types at that late date, but I could paint it in the Master Chief color scheme. We were joking that maybe instead of a Master Chief he could go as a Halo Master Chef, and he could have a chef’s hat and apron instead of a helmet and leggings. Pioneer loved the idea, and that’s how the Halo Master Chef project was born. After rejecting ideas like the “Gravity Ladle,” we finally decided that the rolling pin was the funniest of the weapon options.
 Once the paper shell was done, I decided to back the paper with hot glue. Many people use fiberglass for strength, but that seemed way too slow, messy, and toxic for something he was going to outgrow in a few months. Hot glue is deeply wonderful for doing this sort of thing. Just squirt it in with the gun and let gravity pull it into an even coating. Keep drizzling more hot glue at the front of the downward sliding wave of glue, and it just works.

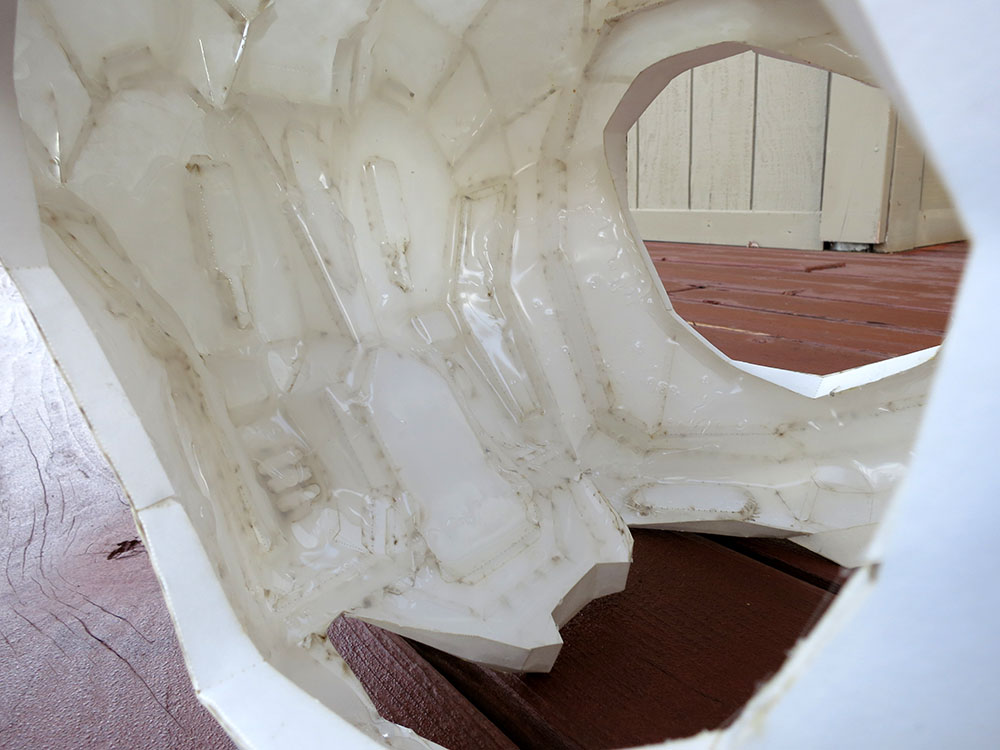 When you have thick glue, it can take several minutes to fully cool and set. This long setting time along with the need to re-enforce all sides of various openings forces you to glue it in stages. You need to let each stage cool before working on the next side. Tilt things so the glue moves the right way and dams up in the places you want. You can also use things like a straight piece of wood to position edges so they cool flat instead of bulging, etc. It’s very quick, especially compared to fiberglass. I was able to hot glue all the arm pieces in a single evening. After that, the parts are quite tough. There was one casualty of this process. After pushing several pounds of glue though my trusty (but cheap) hot glue gun, my impatient squeezing finally drove the heating element right out of the front of the gun. I guess it’s time to try a slightly more upscale gun.
 The torso is kind of a strange shape, and it was really hard to tell if it was going to be the right scale. I knew I’d have to modify the neck hole because it simply was too narrow for my son’s neck. I did some freehand paper design with card stock to make the neck hole bigger. After that had been re-enforced with hot glue, I had to hold my breath and cut open the entire torso with a hobby knife. I still didn’t know if my son would really be able to get into the torso. I even bought a longer chef’s apron in case he couldn’t get the torso piece on. I was worried I’d have to hack some bigger arm holes or perform other violence to make it work. Thankfully, we were able to get it on him. *phew*
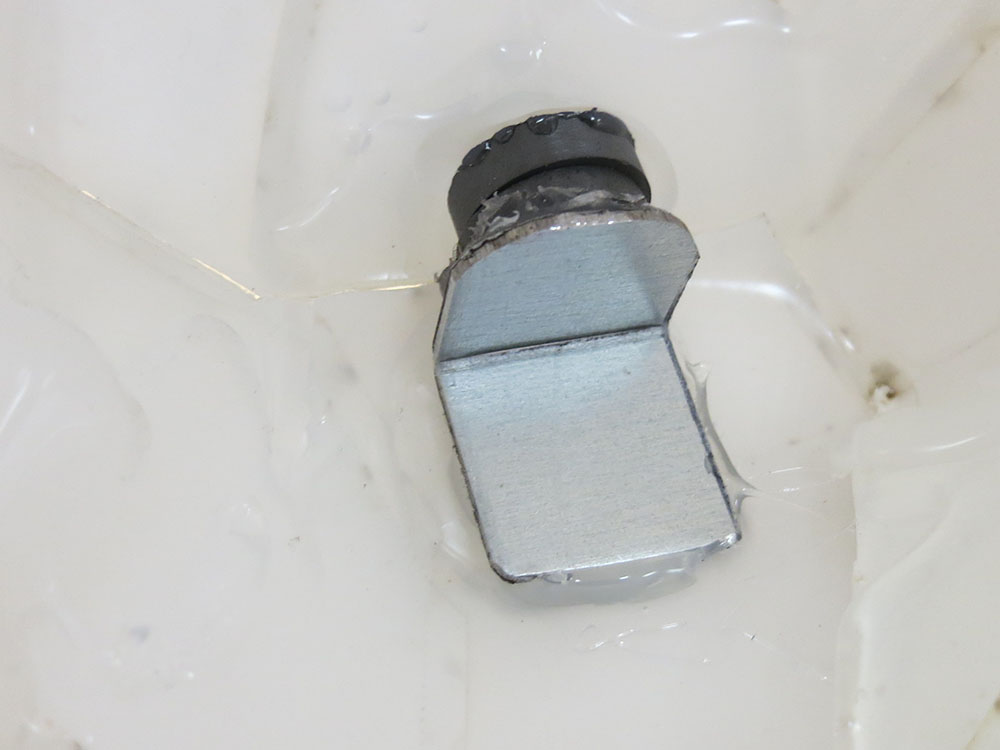
Getting the torso armor off and on was a bit of a squeeze, but it worked. The only down side was that part of the front panel has to flex a bit to be able to open the back, which puts some wrinkle marks on the most visible part of the suit. I hot glued a magnet in the upper corner of the suit to hold that in alignment, and I also added two Velcro straps. I think it would have been nicer to have pairs of rare earth magnets all along the seam, so it all would get held in perfect alignment, but those magnets would need to have some sort of holding ring to give them enough surface area for the glue. I didn’t have time to figure that out or order special magnets, so Velcro was an easy on-hand solution.
I painted all the parts with primer then applied coats of army green. I masked the neck and arm areas of the torso and painted them black. After that, it was time to hand paint a bunch of dirt and grunge and a dry brush silver paint on various high points and projections to make it look as if the original paint had scraped off to show the metal underneath.
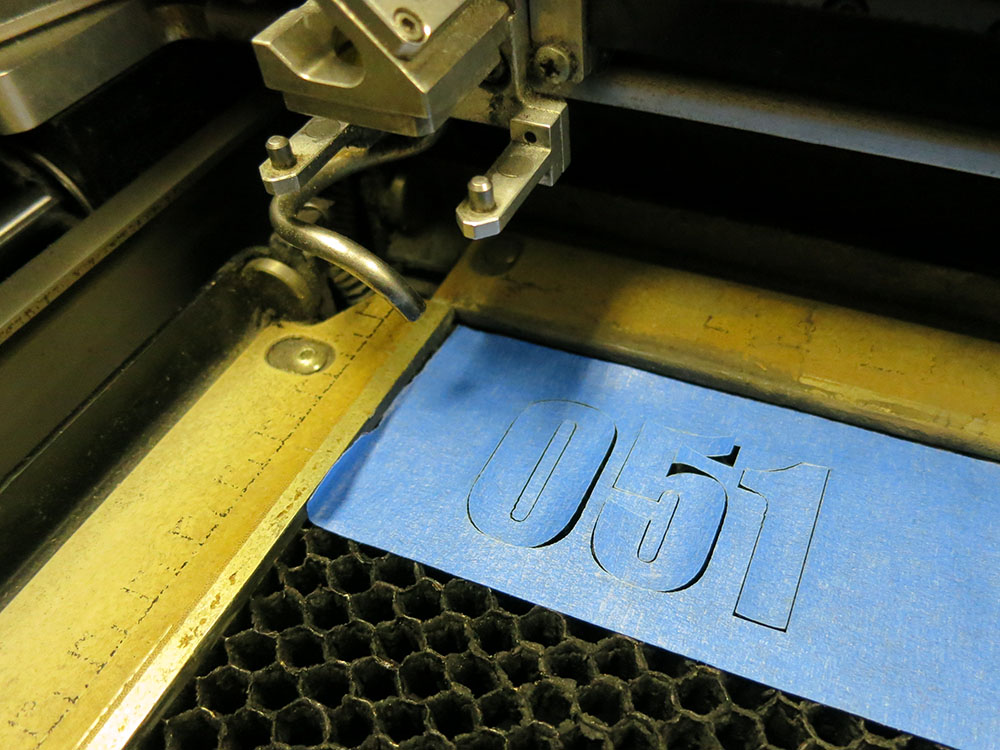

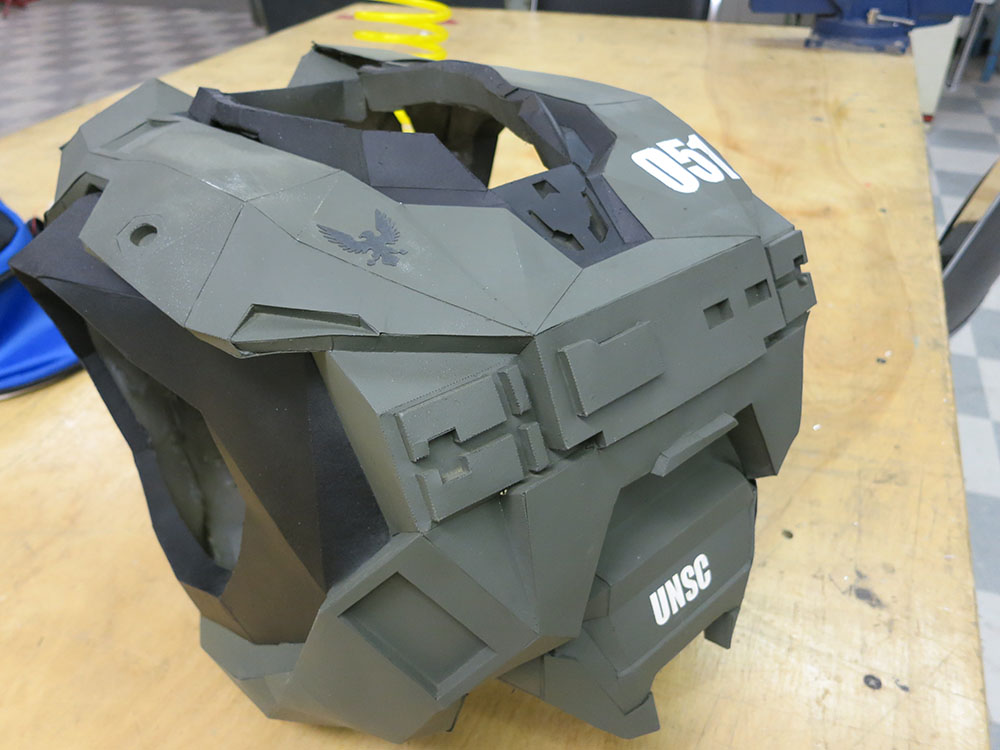
I laser cut some blue masking tape so I could spray paint the identifying numbers on the torso. I used 051 which is a nod to my namesake Kurt (Ambrose). I also put a black laser cut UNSC Eagle on. I finished Pioneer’s torso detailing the night before Halloween, and it was all ready to wear to school. I was surprised how well the suit held up. Paint was scraped off all the way down to the paper on some of the joints where the arm pieces rubbed against the torso, but in general it still looked good after a day and a night of candy-fueled revelry. We added a black sock as padding around the neck, but that was pretty much the only game-day alteration. Thankfully, the whole rig is still pretty light. I thought he would be less mobile with that rig on, but it wasn’t that bad. He could even ride in the car and use the seat belt without any problem.


I’m going to mark this one down as a success. I have a video of the Master Chef looking tough on Halloween Morning.

I love this DIY post! Great blog as well. 🙂
Emory
http://helloscarlettblog.com/2014/11/04/have-you-seen-haveheart-8/
Thanks! I’m glad you like it!
Pingback: Making a Bulbasaur Halloween Costume | Retro Tech Journal
That is noble six, not Chief.
It’s funny you should notice. That’s just a joke I made because 051 is a Kurt and my name is Kurt….