Building a Custom Waffle Iron 

Sometimes a project gets started with something as innocent as having a few waffles.

I was at my uncle’s house having breakfast, and I noticed that he was using a quaint electric waffle iron.  It looked like it dated from maybe the 30’s or 40’s, and it was pretty cute.  The thing that really caught my interest was that the waffle “iron” had aluminum grids on it.  I realized that I could probably buy an electric waffle iron, make some new grids for it, and turn it into a personalized waffle making machine.  That thought put quite a sequence of events into motion.

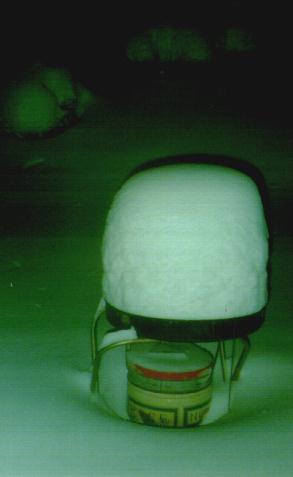
The first order of business was to select the right candidate for conversion.  I went to a number of thrift stores, but most of their waffle irons didn’t have much character.  However, I did discover a few things about electric waffle irons.  There seemed to be a wide variety of ways the grids were mounted and heated.  Some grids were clipped in and could be popped out for cleaning; others had the heating element and grid as a single integrated unit. Clearly I needed to steer clear of those.

So it was off to eBay for me.  What did I find?  154 waffle irons, almost all of them different.  Luckily I could ignore the cast iron ones which were designed for use with a coal stove, and that cut the list down to something like 50 electric irons.  After much indecision, I eventually bid on an iron which I thought looked nice and seemed to be in excellent shape.  I couldn’t tell from the pictures if the thing was going to be easy to retrofit with custom grids, but it seemed worth the risk.  No one seems to take pictures of the inner workings of the waffle irons they’re selling on eBay. Not surprising I guess.

I won the auction, and a few days later the iron was at my house undergoing a thorough cleaning and disassembly.  I was lucky that the iron had heating elements which simply screwed onto the grids.  Removing these elements was a bit ticklish because I could tell that the fragile heating element would be very easy to break, and there’d be no real hope of re-attaching it if it did. So I removed the heating elements from their nest of hook-up wires, which felt a bit like defusing a sticky 50-year-old time bomb.

After the heating elements were out, it was nice to give the rest of the  iron a very thorough cleaning.  WD-40 did a good job of cutting through the ancient baked-on oil and flour mixture that filled every nook and cranny.  I wouldn’t recommend using it on any section that you can’t later de-grease, or on parts which are going to be coming in contact with food, but for cleaning parts like the hinges, it really did the trick. I was thinking about giving my Mom a little fire extinguisher as one of the auxiliary gifts.  95% as a joke.

The plan was to cast new replacement grids out of aluminum so I needed to come up with a pattern. The original grids had been die cast and had various knobs and bumps that were drilled and tapped to take mounting screws.  I realized it would probably be a lot easier to use the back half of one of the actual grids as the pattern for the back of my new grids. I used auto body filler to fill all the waffle grid holes and remove some of the extraneous details which would make it harder to cast in a sand mold.

originalGrid

What about the actual grid design?

I thought it would be best to make a board-mounted pattern and design it so the deepest parts of the mold were less then halfway through the board. As long as I kept the outline of the design symmetric I could use the same pattern to cast both the top and bottom grids.

pattern

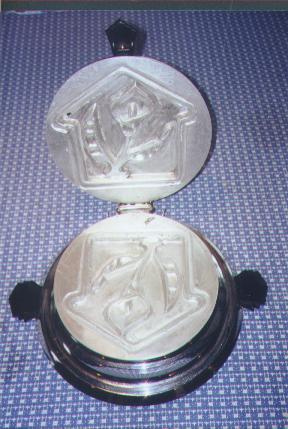
The plan was to give the waffle iron to my mom for Christmas. She and her husband Stan have been building a victorian home in Historic Rugby, Tennessee. Since Stan likes Calla Lilies, they named the house “The Calla Lilly Cottage”.  I thought the house would be a nice theme for the grid design, so I decided to make the Calla Lilly Cottage Waffle Iron.

I drew sketch after sketch trying to make a design that embodied Calla Lilly Cottage but was simple enough to act as a practical waffle iron.  The design had to have a balance of high and low regions so that the waffles wouldn’t be too fat and doughy or thin and crispy.

Eventually I settled on a design that produced a simple house silhouette-shaped waffle with a calla lilly embossed on it.

Carving begins

I decided to lay out the design on thin poplar, cut out the rough high and low areas, carve in the details, and then glue and fillet the whole thing back together. This was by far the most time consuming part of the construction.  I put more then the usual amount of draft on the pattern because not only would the waffle pattern have to come out of the sand, but waffles would have to come out of the iron, so I based my draft on the amount of draft on your average waffle griddle squares.

Casting begins, but time is running out

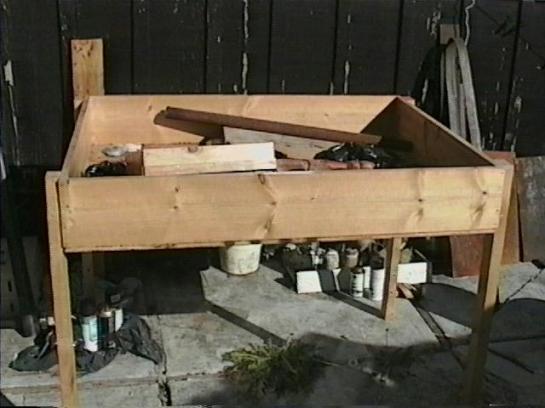
Finally the pattern was finished.  The iron was cleaned up and ready to go, and the stage was set to cast the new grids and get a move on.  I made a board-mounted pattern with alignment pins so I could use the original waffle iron grids in conjunction with the calla lilly pattern. This required making a flask with some very long alignment pins so the flask could maintain its alignment both with the board in place and after it was removed.  So I made a new flask with long dowels, but that was the cause of the first big failure of the project.

The Christmas holiday was fast approaching, and I still had a long way to go with the project.  The special flask made it so I could only cast one iron at a time, and that meant pretty much one casting per night. It was down to the last week, and I really needed to get two good castings right out of the gate in order to be able to have enough time to finish the project.

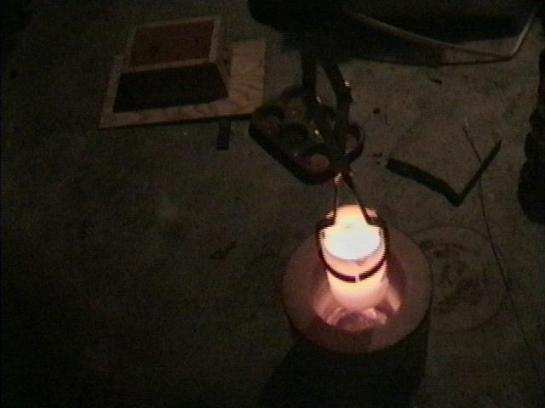
Then disaster struck.  I rammed up the mold as usual, separated the flask, and removed the pattern. So far so good.  The cope (the top part of the flask) was pretty darn heavy.  The grids are perhaps 7″ across, and that meant the cope was maybe a foot on a side. With it rammed full of sand it weighed as much as two cinderblocks.  As I was heaving it back into place and aligning the unfamiliar alignment pins, I (unbeknownst to me) brushed the face of the sand with one of the alignment pegs. This cut a channel from the mold cavity to the outside world.  And I didn’t know.

Fountain of molten aluminum!

So I fired up the furnace, and melted a large charge of aluminum.  I used cut up pressure cookers and other things that I felt were probably semi-food-safe flavors of aluminum. I got everything up to temp, skimmed the dross off as usual, and then went to pour.   As I poured, a stream of aluminum shot out the far side of the mold and began to pool on the ground.

failedTop

I stopped pouring into the mold. I poured the remaining aluminum into the muffin tin ingot molds, but I could tell that the casting was shot for sure.

The interesting thing about the resulting casting was that you could see the exact path the the rouge dowel took as it cut that channel.  The aluminum frozen into the channel had the exact shape of the dowel’s path.

channel

The other interesting outcome was that the form created by the spilled aluminum was rather beautiful.

artSpill

The aluminum was on concrete, but the puddle actually spanned a gap in the concrete that was filled with a piece of wood.  The wooden strip burned and produced a nice colored line across the form. I’m thinking about making that into a lamp.

As far as casting screw ups go, no one was hurt and I got two interesting pieces out of it, but it didn’t exactly help my time table.  The next two nights of casting went without a hitch, but I still had the task of cleaning up and machining the castings.

I had designed the main casting with a sprue that was centered and perpendicular to the face of the iron.  I did this by taking advantage of a long mounting screw that was centered on the original waffle iron grid. This gave me a handy shank to mount in the lathe so I could clean up the casting and make it fit exactly into the waffle iron body. Now you know why I selected a round iron rather then a rectangular one.  This turned out to be a god send in terms of getting the whole thing to fit.  The cast plates had warped a little as they cooled, so it was nice to have some extra meat on the casting that I could face off on the lathe so they would fit together nicely.  (There should be a little space between the plates so that steam can escape from the waffles.)  If I had it to do again, I’d probably leave a good 1/8″ of extra material on there and just face off the whole thing.

In the end I took one extra day of vacation and worked from 9am to about 2am. Fitting, machining, sanding, filing, drilling, tapping, wiring. *phew* Finally the iron was finished.  A few hours later I was off to the airport with my waffle iron in a carry-on bag.  There was no way I was going to check that baby!  I was hoping to get to see an X-ray of the iron at the security gate, but no such luck.

Where there’s Smoke there’s Wire!

Of course, I hadn’t had much time to run a test of the iron.  I had checked for shorts and continuity across the coils, but that was about it.  On Christmas Day the iron was put to the test and FAILED. The iron would not heat up.  I quickly discovered that the cord that had come with the iron was a dud. All that testing of the iron’s wiring, and I never checked the cord.  Crazy.  So we were off to Drogan’s for a new cord.

waffleIron

Was that the happy ending?  No.  As the iron came up to temp, we noticed some smoke!  I had given my mom a kitchen fire extinguisher as a warm-up gift for the iron, but I hadn’t actually thought we might need it!  Actually it wasn’t that big a deal; it was just a thin plume of smoke rising from the top grid.  The ancient wiring was slowly smoking because it was still somewhat soaked in oil and pancake batter.

Argh!  This fix required another trip to Drogan’s for a few lengths of high temp appliance wire and some crimp connectors.  I spent an evening doing the ticklish bomb defusing dance trying not to break the heating elements while attaching replacement wires.  The iron was reassembled with fresh new wiring, and finally it was taken on its first fully successful waffle run.

It works!

We set about making a whole pile of waffles. The waffles came out easily and were lovely. For added fun, the pattern in the waffles fills with butter and syrup.  Mom, Stan, Cheryl, my sister Inge, and our friend Heather all tried a few waffles.  Finally the Calla Lilly Cottage Waffle Iron was fully operational.

kurtWithIron

It’s funny casting a waffle iron grid because the iron grid, in turn,  is used to cast the food batter.  Now mom can have fun casting waffles in the kitchen. I had originally thought it would be fun to make more custom irons, but I think I’ll put that off for a good long while.  It is rather a crazy amount of work, but can be pretty rewarding.

kurtWithWaffle

I was thinking it would be somewhat easier to make two matching “mirror image” grids by sandwiching two thin boards together, cutting them at the same time with a scroll saw, and mounting them on two different boards.  If the pattern were a simple two-level design without any carved bass relief, it wouldn’t be to hard to knock a pair out, glue them up on two boards, and then fillet them with filleting wax. That would be a lot faster then my approach.  Maybe in a few years I’ll have forgotten enough about how much work it was that I’ll be willing to embark on another one.

The original page in the Internet Archive.

Backyard Foundry Info

foundryInDayLight

I can remember looking through the classifieds in the back of Popular Mechanics. There were plans for go-carts, personal helicopter, making your own solid fuel rocket motors, and melting metal in your back yard. Maybe I’m not commuting to work in my personal helicopter but my House-mate Mark and I have gone pretty far setting up and operating our own backyard foundry.

What we did first

Well the first thing we did was to do a lot of reading (and mooning) on the subject. Probably the most influential books we read were the Dave Gingery books on how to make a machine shop from scrap. Our current setup is based quite closely on what Dave describes in his books.

Building the Furnace

We were living in Pittsburgh at the time, so we called around and found a ceramics supply store that sold silica sand and fire clay. That was fairly easy, but then we had to find a steel bucket that was the right size for our purposes. (That didn’t cost an arm and a leg, or come complete with 5 gallons of tar.) We ended up using a large metal canister that a friend of ours had. It had been used as the packaging for a whole mess of caramel corn (which washed out nicely) and came decorated with Santa Clauses. So our foundry is both functional and festive. We rammed up the lining inside the bucket around a cylindrical form made from two plywood disks and a piece of sheet metal. It was quite the laborious/exciting evening sitting in our basement ramming up the lining and the lid. Finally we were past the reading stage, and getting on to the doing!

Mark devised a tuyere formed from a rectangular piece of sheet metal that screwed onto the side of our Santa can, and lead to a squirrel cage blower that we’d scrounged from some equipment. After pre-baking the lid in the kitchen oven we went to the backyard and filled the furnace with charcoal. A little lighter fluid and we were on our way to curing the lining. Once the steaming had mostly subsided we turned on the blower we got a very satisfying roar and a tall flame began to issue from the hole in the top of the lid. (Along with the occasional shower of sparks as the coals settled.) The next morning we inspected the lining and it hadn’t spall’d and there were only a few cracks in the lid. So we were just about ready to try and melt some metal.

The Crucible

During this time Mark and I had also been on the lookout for a crucible. Gingery had suggested a cast iron pot, but we hadn’t been able to find one that was narrow enough to fit the furnace. Everywhere we looked we were judging things in terms of their suitability as a crucible. We were watching a movie and we both reacted to a scene in which a lovely stainless steal container was visible in the back of the operating theater. We had a bad case of crucible fever. Trips to the local diner became increasingly painful. (lots of steel containers) Eventually I found a cute steel cream dispenser at a Good Will. It was made of reasonably thick metal, and had a little hinged lid. It became our first crucible.

Other Miscellany

Well a lot of the start up time for a foundry is just all the little odds and ends. So here’s a quick list of other things we made for the foundry: Molding sand made from silica sand, fire-clay and water; A big sand bin made from a piece of plywood, some planks that we found in the car port, and two sets of fancy chromed legs that someone was throwing out on a Big Trash pickup night on Beachwood Blvd; A cheese-ie flask made from scrap wood; Parting dust (graphite) sack made from an old sock.; A rammer that was just a hefty turned table leg.; We made a riddle out of 1/4″ screen and scrap wood.;Venting wire made from an unbent paper clip; A bottom board made from …. a board; Mark managed to get some metal tongs from CMU’s physics stock room; We also bought:Face shields, large leather welding gloves, the list goes on…

The First Pour

We decided to do our first pour in an open sand mold. We scoured the house for something that would make a decent impression on the sand. A dinosaur shaped shampoo bottle (bubsaurous) was rejected. My attention was drawn by a box of salt dough figures that various friends of ours had molded during a previous soiree. (With the theme of baking salt dough denizens for a model village we had constructed in the living room out of cardboard, construction paper, and string.) So our first cast was done in the imprint of a salt dough gargoyle.

We put the creamer (loaded with scrap aluminum) into the furnace, and packed a load of charcoal around it. I had been somewhat worried that handle of the creamer was located right at the point where it would be optimal to grip the rim of the creamer with the tongs for pouring, but as the blower blew, and the roaring coals began to heat the crucible my worries vanished. The handle had apparently been hard soldered on and it simply fell away as the crucible came up to temp. The hinge for the lid was spot welded on, so it stayed on nicely. We got the crucible up to a bright orange glow, and then we poured the charge. There’s something very primal about the roaring fire and the liquid metal. One of my favorite sites is when the molten aluminum is cooling in the air, and it reaches the stage where it is glowing a very deep red, and a very thin layer at the surface has cooled enough to become silvery. This effect is pretty much only visible in low lighting. The casting came out very rough with sand inclusion, and very low detail, but that’s about all I’d expect from an open mold. I think we still have it around in a box somewhere.

The First Pattern

The first pattern I made was one of the feet for the Dave Gingery Lathe project, and the first time I tried to cast it I think I made every mistake in the book. The flask that we had was a lot bigger then was needed for the foot pattern. We’d made it that size thinking it would give us more flexibility in the size of the patterns we could cast. Not a good idea! I spent most of my time ramming sand into all the extra space in the flask. The filled flask must have been about as heavy as 3 cinderblocks. We had trouble flipping it, we had trouble opening it up to remove the pattern. The foot is roughly the shape of a rectangular top hat, with the sand in the drag going up inside the hat to form a green sand core. When we separated the flask that core broke off, but rather then try and re-ram all the sand I just stuck it back on. The flask didn’t have any alignment pins, so putting the flask back together was ticklish work. Especially considering how heavy it was. It seemed like every thing had gone wrong, but in the end the casting came out ok. The best thing about the foot was that it was a completely non critical casting, so with enough filing it ended up looking ok.

What Were We Casting?: Caution to the Wind

Well from there we started learning a lot about pattern making, molding sand maintenance, casting, and metal working in general. I eventually bought little delta disk/belt sander with a tilting table. That was most useful for making patterns with uniform draft. Bondo is very useful for filleting. You can mix some up, and then squeegee it onto place using a piece of plastic cut to just the shape of fillet that you need. It dries quickly and sands very smooth.

We quickly discovered that if you had the blast up to high on the furnace you’ll burn a hole right through your crucible, and your charge of aluminum will flow out into the bottom of the furnace. After this had happened a few times our tuyere became too blocked with aluminum to allow enough air through. I pried open the sheet metal tuyere to discover that we had cast our first art piece. The flows of aluminum made a beautiful puzzle which could be disassembled into the individual flows, or re-assembled to form the inside shape of the tuyere.

Problems? You bet! We had sand inclusion, porosity, cold flows, shrinkage, and one time when we had the sand too moist we poured in the metal, and the sprue hole blew a number of aluminum foil bubbles. Yes. We were learning.

foundryInSnow
Rain Nor Snow Nor Dark of Night…

We continued casting even after winter had come. We moved the bin of sand into the unused basement bathroom, and shoved out the two feet of snow in our back yard. Every book warns about the dangers of casting in a wet environment, but we did it anyway, and with a lot of care (and luck) we never had a miss-hap. There we would stand in the cold and dark of our back yard watching the fire, and toasting marshmallows over the exhaust hole. Here’s are some pictures of Mark and myself  in our winter casting garb.

markWithGloves kurtWithGloes

Where Are We Now?

Well Mark, Kate, Janice and I moved out to California, and brought most of our foundry with us. We left the bin, and the sand behind. “I’ll be damned if I’m going to drive 100lbs of sand across the country!” I wonder if the new tenants ever figured out what the HooverCraft in the car port was… Anyway leaving the sand behind was probably the best choice we could have made. Once we were settled in here I began the search for some actual foundry sand. I had heard that nothing is as good for casting as sand from an actual foundry. One of the hardest things for a book on foundry work to do is to describe the consistency of optimal foundry sand. How sticky? How porous? How fine? Do I want oatmeal? Concrete? So I began the search for an actual foundry’s “magic sand”. Well I never quite found actual foundry sand, but I did find a place in Oakland called Industrial Foundry Supply. Where (with a $100 minimum order) you can buy Petro-Bond sand. (A petroleum bonded molding sand designed specifically for foundry work.) Mark and I got up early and drove over there in Marks VW camper to pick up our sand. Cruise on down to the industrial part of town to fetch some drums of magic sand. Somewhere on the trip to California our blower got lost, but we managed to get another surplus blower, and I wangled together a natural gas burner for the furnace.

We haven’t done much casting with the new setup, but so far the results have been spectacular. You can take a look at our first casting with the new sand.

firstCast

We had never gotten really nice surface finishes/detail out of our old sand, and the results that we were getting were highly varied. With the new sand we’ve managed to get an order of magnitude better detail, and since the sand is a petroleum bonded sand we don’t have to spend hours re-conditioning the sand before a cast. The new sand is a little messier, and less “natural” but I think it’s well worth it for the MUCH better results we’ve been getting. Also the natural gas burner is very nice. Melts take only about 15 mins, and we don’t have to scoop out loads of ash, or keep opening up the furnace to add more fuel.

Another good page about setting up a furnace is the Building an Inexpensive Small Scale Furnace page over on wuarchive.

Here is a quick walk through of an evening of casting:
  • Here is our bin of sandsandBinInDayLight
  • I first carve a wooden pattern of the part that I want to cast. To do this I use the great carving tools that my sister Inge gave mewoodToolswoodCutPattern
  • Then I ram foundry sand around the pattern inside a flask. Then I can split the flask in two and remove the pattern leaving a cavity in the sand in the shape of what I’m trying to cast.kurtWithSand
  • After ramming up the sand it’s time to light the furnace and melt a charge of metal to be poured into the sand.foundryWithLidOff
  • After the charge has melted, and the dross is skimmed away I’m ready to take the crucible out of the furnace and pour the metal into the mold. I then pour any excess metal into one of our handy muffin tins.crusableCommingFromFurnacepouringpouring2
  • Once the metal has cooled we can knock away the sand and have a look at the results castingInMold
  • Here we can see both the original pattern, and the final casting patternAndCasting
What’s Next?
Mark and I have embarked on a new furnace that is somewhat bigger then the last one. There’s also an interesting book on building a cupola furnace that may contain the seeds of our next adventure.

The original page in the Internet Archive.

The original page was one of the very early backyard foundry pages on the net, and it got a moderate amount of traffic.  I even parked backyardfoundry.com for a while, but never actually hosted a site on it.  4k Images!  What was I thinking!  lol