A Totoro Step Stool for my Son

The japanese director Hayao Miyazaki has produced some of the world’s best animated films.  His “My Neighbor Totoro” is one of my favorite kids’ films.  It came out in 1988, but didn’t really make a showing in the US until much later.  Around 1990 a friend of mine who is an Anime fanatic introduced me to Miyazaki’s work.  We would watch the movies, and someone would read the text translation as the movie progressed.  How primitive!  One of the great things I noticed about Totoro in that setting was that it was universal.  Pastoral beauty, kids being kids.  It needed no translation.

Disney has finally decided that Miyazaki movies have a market in the US and has produced some decent dubbed versions of his movies on DVD for the US market.

Now that I have a son of my own I want him to grow up loving Miyazaki’s work too.  So for his second Christmas I gave him My Neighbor Totoro, and Kiki’s Delivery Service on DVD.  I also decided to make him a wooden step stool that looked like Totoro.

The Sketch

sketch_1_small
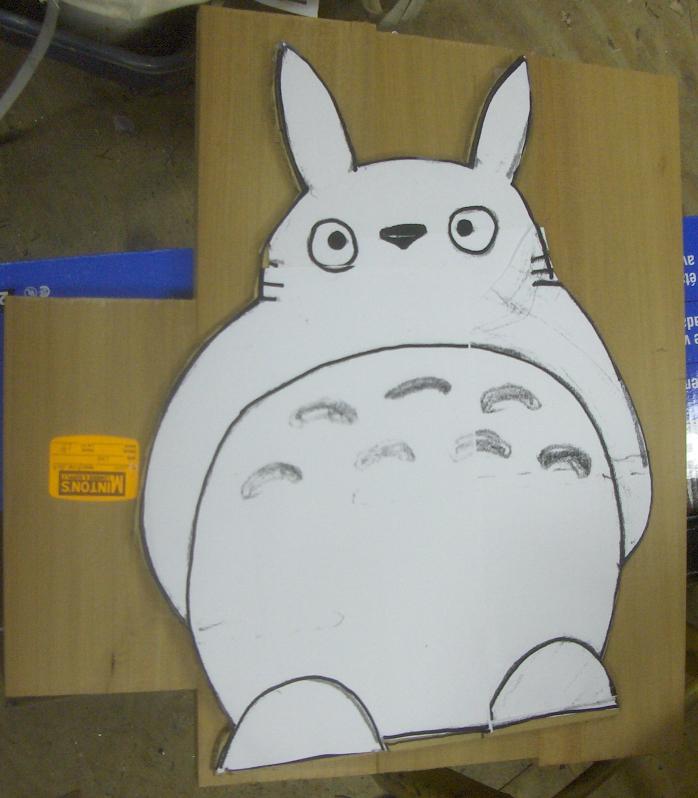
So I did a sketch.  That’s the problem with a lot of the projects I do.  I’ll do one or two quick sketches, and then I’m off slavishly producing that exact thing in wood/metal.  Not exactly going with the flow and following the inspirations provided by materials at hand, etc.   I did the sketch.  I went down to shipping and receiving at work and snagged some cardboard boxes.  I blew the sketch up on the photocopier and used that as a pattern to cut out a full-sized mock up.  Doing a mock up is good.  It’s something you can do in 30 mins with office tape and scissors that’ll warn you about things that you wouldn’t otherwise discover until 2/3 of the way though the project.

sketch_2_smallI decided on an overall scale for the project, and I was off to the races.

Totoro’s an Owl?

cardboard_proto_small
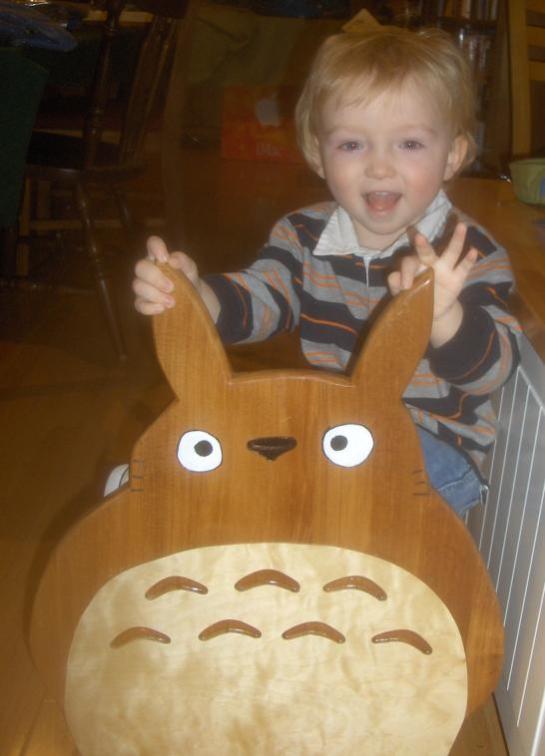
I took the cardboard Totoro home.  I sort of hid it by tucking it vertically under the bench, but the next time my son came out to the shop he went straight to it.  I guess even the clutter and chaos of my shop has enough pattern to it that he was able to pick out the “new” object in a flash.  He went right over and grabbed it.  He was 20 months old at this point.  “Whaz that?”  He said excitedly.  He put his arms around Totoro’s neck.  “Eye.  ‘nother eye!” he said with his face only an inches away from Totoro’s eyes.   “Ear.  ‘nother ear” he said grabbing the ears.   “Owl?”  Apparently Totoro was an owl.  I hadn’t thought about it before, but he does rather look like an owl. At this point, he’d never seen the movie.  He had no idea what Totoro was, but I could tell by his excited reaction that the Totoro project was going to be a success.

The construction plan

paper_pattern_on_wood_smallI wanted to use natural wood colors for the various bits of Totoro.   I don’t know why I do this except that I rather like wood’s natural beauty, and many of my staining projects seem to come out somewhat blotchy.  So I went to the Minton’s lumber to get some darker looking wood.  I settled on Alma Rose.  I have no idea what kind of wood that is, but it was brownish, with even grain,  it wasn’t heavy, and it was comparatively cheap.  (Less then $2 a board foot)  So I was all over it.

I biscuited it together, and low and behold the joints weren’t that flat.  So I spent a good chunk of time hand planing and then random orbit sanding with a 60 grit disc to get it flat.

I hate veneer

I had originally thought I’d do his belly using some spare white formica that I had left over from a counter top.  Then I had this “good” idea. Instead of using formica I could put a light wood veneer on, it would look more natural, and I’d still be able to route through to  produce the darker chevrons on Totoro’s chest.  I got some veneer and some veneer glue, and I stuck it on.  Now it is at this point dear reader that I noticed that the clamping force recommended in fine print on the glue’s label was something like 200 lbs per square inch!   Now that was going to be something like 14 TONS of clamping force.  I started to get a bit worried.  I noticed that the piece’s shape made it hard for me to get clamps to reach many of the edges of the veneer.  I worried more.  I put the board on the shop floor with a board over it, and then piled layer after layer of concrete block on top of that.  Still probably had less then half a ton total on the board.  Not good.   The next day I unpiled the stack only to discover that the veneer had rippled horribly.  I had to sand it all away again using a 60 grit pad.  Tediously back to square one.

Resawing is hard

So I thought I’d glue down thicker wood.  I had some nice figured maple and I thought if I resawed it into 3/16 boards it would look really nice.   However I didn’t have a resaw blade, and I quickly discovered that resawing figured maple is a lot harder then just sawing thin strips of wood off a pine 2×4.  The blade wandered and pretty much destroyed the piece of wood I was trying to resaw.  The smell of burnt wood, the destruction of one of my nice chunks of maple.  All the hallmarks of a “learning experience.” What the heck was I going to do?  Time to go back to the wood store.  I finally decided to go with some very thin plywood.  It looked nice, and glued down without a ripple. Not as nice as solid wood, but hey Christmas was coming and I was working with a deadline.

Totoro starts to take shape

His belly was on.  So I traced and cut out his outline.  I cut the outline on the bandsaw. Now he was starting to look like like something!  I used the belt sander to round the various contours, and then a drum sander chucked in the drill to round some of the harder to reach inner corner edges.  Then there was lots and lots of hand sanding to refine what I’d done with the belt sander.

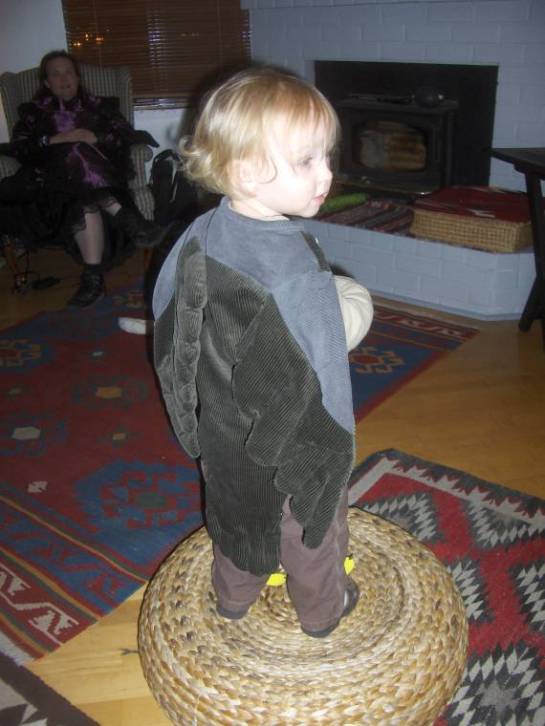
My son wasn’t in the dark about this project.  If I’d been spending this much time out in the shop without him getting to see what was up, he would probably have exploded.  So he came and checked out how things were progressing.

Router templates are fun

router_template_small
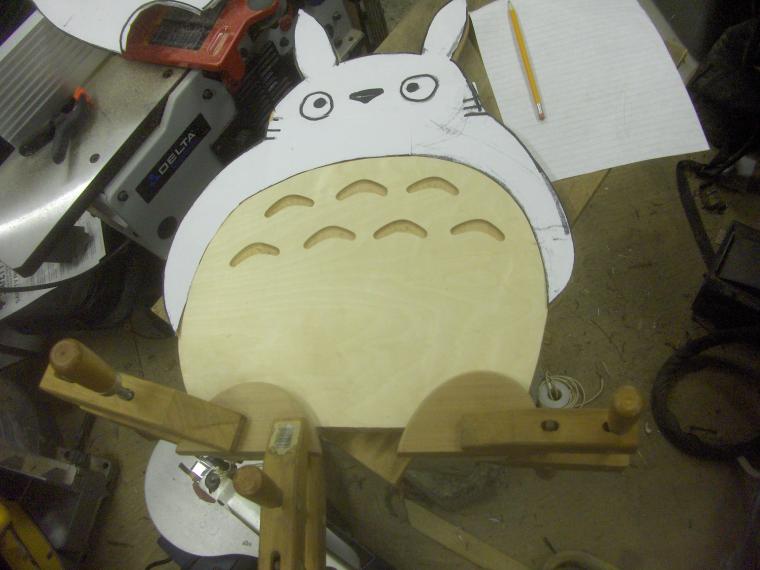
So then I made a router template to cut the chevrons on Totoro’s chest.  I did a sketch on paper, cut the outline onto some 1/8″ acrylic sheet, and drilled/filed the shape out.  Then I’d clamp that into position for each of the chevrons and routed away.   I used a ball end bit, and would do a “once around the outside,” and then a series of evenly space vertical passes to route out the interior.  I didn’t want to have to finish the bottoms of those things and I figured that sort of pattern would provide an interesting look that wouldn’t need much touching up.

routing_for_treds_small
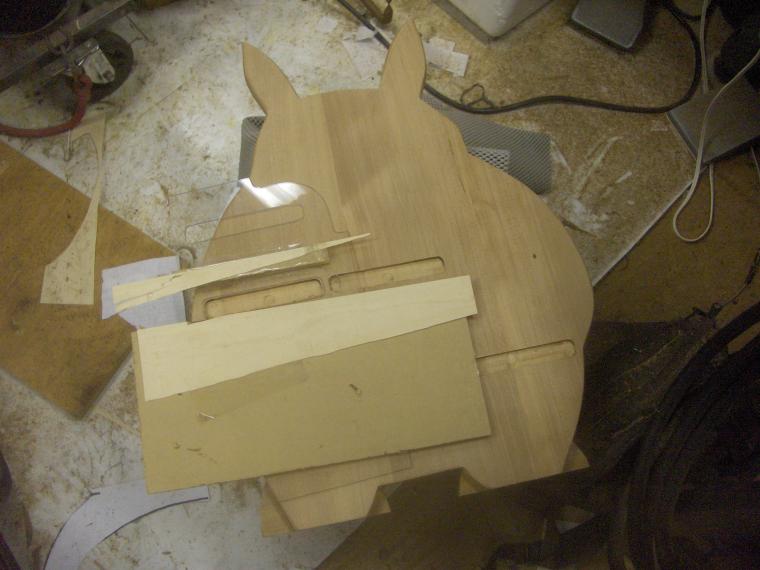
I also used a router template to route the recesses in the back of Totoro that would hold the treads of the step stool.  That exact pattern took quite a bit of trial and error filing because the treads were somewhat cupped and I wanted the holes to match the boards rather closely.  I also did a routing trick on the feet to make it so that they overlapped the bottom of the belly plywood.  That way there was no visible edge just above the feet.

cut_out_with_chevrons_smallAt this point I also needed to work on the other side of the stool.  I didn’t quite have enough Alma Rose left to do it out of that, so it was back to the wood store for the third time.  They didn’t have a nice Alma Rose board, so I opted for some Australian Blackwood that was a similar hue, and quite a bit denser.  That had the advantage of counter balancing the bigger Totoro side of the bench.

clamped_feet_small
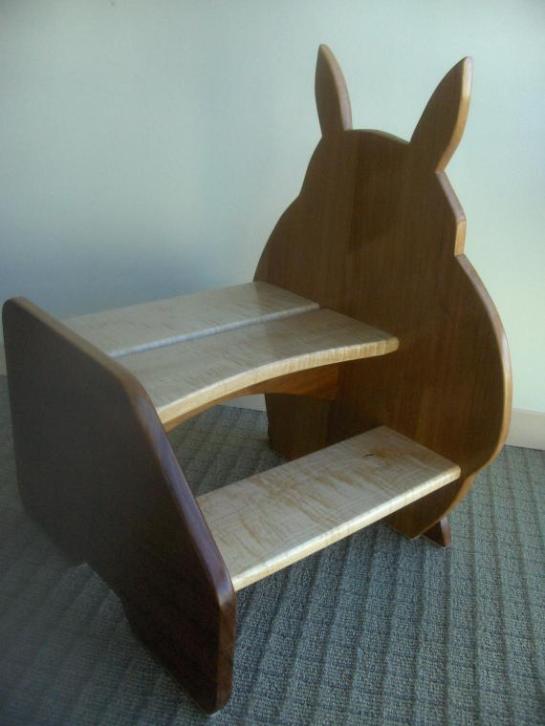
I cut the treads from more figured maple that I’d snagged by picking carefully through the boards at HomeDepot.  It’s amazing what you can find there if you keep an eye out.  Don’t tell anyone!  I cut a nice curve out of the upper tread, and echoed it in the piece I put underneath to provide more diagonal reinforcement.

Horror and Heartbreak

treds_glued_in_smallSo I routed the Totoro side.  Then I took careful measurements and routed the hole for the treads on the other piece.   I SHOULD have taken a piece of paper and a pencil and made rubbing of the routed recesses to make the pattern on the other side.  What did I actually do?  I took some careful measurements and laid out the other side.  After routing those holes I tried putting it all together only to discover that the bottom tread was off by exactly 1/2″ back to front.  Horror!  I was forced to route another opening, and make a 1/2″ curved patch to put into the extra gaping hole on that side.    I don’t know where that 1/2″ went, but it was so big, and so exactly 1/2″ I can only assume I screwed up my measurement somewhere.  So some time was lost making the patch, but the end result isn’t that bad looking.  It’s not easy to pick out at a glance.   An imperfection to show the hand of the maker and placate the gods.

Burn your face

face_burned_on_smallSo I used a wood burning pencil to burn Totoro’s face on.  Always a bit hairy because with a wood burning pencil there’s no erase.  (Well short of gouging out a fair amount of wood.)  So that was a bit ticklish.  Thankfully I was able to follow my original sketch’s lines reasonably well, and his face came out fine.

soot_sprite_smallI had decided to burn on of the Soot Spirits on the other side of the stool, but then decided that such a spirit would be much more at home hiding in a dark corner on the underside of the stool.   That would have been a lot easier had I done that before gluing the whole thing up.  Oops.  Still I managed to burn it without any big screwups. Even if it was 3 times harder because it was in a corner. He just feels safer and more comfortable down there.

Finishing “Sticky …. sticky… sticky”

So then it was off to put various coats of polyurethane on the project.   The hard part was that I couldn’t finish it out in the shop.  It was too cold and damp and dusty to have it finish in any sort of time, and I only had a few days left before Christmas.  So I put the finish on it in the house.  That seemed to be going reasonably well.   I had put on the last coat and was kicking back when I heard a bad sound from the other room.  “Sticky … sticky… sticky…”  My son was saying “sticky” over and  over.  I could only think of one thing is that room that was probably still sticky.   A great big half-dried Totoro.  Oh no!   So Cheryl and I went in there. Cheryl washed off his hands while I tried to deal with the hand prints.  I ended up putting on another thick coat right then and that mostly hid them, at the cost of a few drips that cleaned up with a razor blade.

Ready for Christmas by a Whisker.

Well Christmas came, and our son was flooded with gifts.  The Totoro had been a more or less constant presence at our house for the past few weeks, so it wasn’t exactly a surprise.  Still he was excited to be able to clamber all over it (finally).   He used it to get on his new train table.  Thank goodness it was done, or very nearly done.   There were a few finishing touches that I put off until the new year.  Felt pads on the feet, painting the background of his eyes white, and putting on his whiskers, but by Jan 3rd it was well and truly done.  phew.

totoro_finshed_front

done_three_quarter_view

final_hanging_out_with_cardboard_prototype

pioneer_on_totoro

Here is the original page in Internet Archive.

Halloween Costumes

I like making Halloween costumes.  When I was little my mother did a lot of sewing, quilting, embroidery, knitting, crochet, tatting, etc.  She showed me how to do the basics.  How to sew on a button, and encouraged me as I worked on various projects.  A square of cathedral window quilt, a lion embroidered a lion on my lucky sock, a counted cross stitch bear.  I can remember arriving at a friends house, only to realize that the embroidery hoop was unexpected affixed to my knee.  I’d stitched through my pant leg during the drive.

So I knew the basics, but had never gone very far with it. Then for many years I didn’t do much more then hem a few pairs of pants.   Then my son Pioneer was born, and when Halloween rolled around I realized that I was interested in making him a costume.

I had seen a cute baby dressed as a pumpkin, and though “I can do that.”

I discover I have a super power

Well, I wasn’t exactly bitten by a radio active spider, but I did spend many hours sifting through the mixed buttons bin at “Finche’s Fabric Farm” while my mother shopped.  I’d spent untold hours in the sewing room listening to the whir of the sewing machine, playing with the snap pliers, pinking sheers, tracing wheels. I remember the smell of the sewing machine oil in its little can.

mommy_and_pumpkin_boy_smallAs I started in on Pioneer’s pumpkin costume I discovered that all those hours in my childhood had instilled in me a mysterious power.  I was totally at ease at the fabric store buying materials for the costume.  I knew exactly what to do, just by going with what felt “right”.   I made paper templates.  I folded them in half before cutting to make the symmetrical.  I cut test pieces, left seam allowances, added piping.  I knew how to lay things out, pin them up, sew them, turn them inside out and stuff them with fiber fill.   It all felt totally comfortable.  Like I’d done it a thousand times, even though I’d never actually done it at all.  It felt like coming home.

standing_pumpkin_smallBest of all, the results were actually pretty good.  Now it may seem like silliness to spend 7 hours making a costume that Pioneer only ever wore for 5 minuets (seven month olds aren’t big on wearing hot heavy outfits with hats for very long) but once you’ve discovered a mysterious power, who wouldn’t want to try it out?   To give it free reign and see where it takes you.

Why Costumes?

Halloween costumes have a lot to recommend them.  They’re 85% aesthetic.  If they look good, they are good.  They only need to be sturdy enough to survive a few hours of trick-or-treating.    They have a fixed deadline, and a short schedule, and a very short lifespan. These are ideal conditions for getting in touch with ones inner seamstress.  If I’m not sketching, cutting, pinning or sewing every minute. I’m not going to finish, so I don’t have time to second guess.  It turns out to be ridiculously fun.

I try making an owl costume.

costume_on_floor_smallFor his second Halloween I had Pioneer choose what he wanted to be.  He chose an owl.  He likes owls.  He points to them in our bird book, makes hoot  hoot sounds with me when we see them in his “Animals Showing Off” pop-up book. We’ve stood together on the deck, under the stars, listening to their deep calls. Yup.  He wanted to be an owl.  It wasn’t until I did some web searching that I discovered how difficult a task k this was.  These human owl hybrids are tricky, and every owl costume I saw on the web looked either sad or ridiculous.  I had my work cut out for me.

Rule 1.  No mortar boards

One thing my research into owl iconography made clear was that if you’ve failed to get people to recognize your owl you slap an mortar board on top.  Owls are very striking birds. I was hoping I could get the owl idea across without resorting to whacking people with a board.

The pumpkin had been all about fleece, but in my book owls are corduroy.  Something about the the texture and softness.  So I went off to the fabric store and bought three kinds of corduroy.  I also started making some sketches and paper mock ups of what the owl might look like.  I got in the zone,  and cranked out the owl costume in one weekend (plus two weekday evenings.)   I knew I was going crazy when I considered making a lining for the costume.  I had to remind myself that I’d be lucky if he’d wear it for more then 5 mins.

Lessons learned from the corduroy owl:

pinned_in_messy_workshop_smallNever mark white corduroy with a sharpie unless you’re ok with both sides being black.  Doing lots of sewing in a shop littered with sawdust and metal shavings involves the fine art of never dropping anything, and perhaps most importantly when you’re son pulls out some polyester fiber fill and puts it under his chin and says “beard…  beard!”   it’s so cute that it is very nearly fatal.

I had done a nice mock up in paper of what I wanted to do.  However when it came time to make that vision a reality it turned out that toddler heads are pretty darn big, and in order to make the owls eyes/face the way I’d originally intended I’d have had to make the head HUGE.  I think this a problem many of the web owl costumes were suffering from.  A too small head perched on top of the kids face.  Weird and distracting. I don’t think Pioneer would have dealt with a full owl mask because that’s just too much face coverage.  Besides his face is super cute, so putting something over it, or right above it seemed like a tragic waste of cuteness.  So I opted for a more stylized treatment of the head.  Just a kind of owl horns hood stiffened with sheet plastic and welding wire on the inside.  As it turns out he actually likes wearing that part of the costume.  He didn’t want to take it off.

hands_on_head_smallSo on Halloween he wore the main part of the costume pretty much all day.  It looked great.  He came to work during lunch time, and then we went out trick-or-treating with his baby group pals at night.  We couldn’t quite get him to say “track-or-treat” but he kept saying “candies” and motoring on to the next house.  He did freak out a little at one house when a motorized disembodied hand started crawling across the porch towards him, but we distracted him with a kitty that was right there, and he seems to have not been to scared by the experience.  He loved all the lights and decorations.  We went to quite a few houses, and then our friends/neighbors Carl and Rita invited us in and gave us dinner, and he got to see some old school stop motion dinosaurs in “The Lost World.”

All in all it was a very successful Halloween.  I’m hoping next year he’ll be willing to try some things on before the big day.  After I’d seen him wear the thing, I realized there are some alterations I’d like to do.  The lower back section is pretty square, and could really use a couple of seams to take out some of the extra material and make it more form fitting.  Also the Velcro flap that holds the front closed isn’t sewn all the way to the top, and that made it so it was free to flop out a bit at the top.  I was going to hand sew that section, but didn’t manage to get around to it.
front_of_costume

pioneer_on_floor
owl_on_nest
street_corner_owl
moon

Hey, I even have a picture of Pioneer clearly contemplating how many licks it takes to get to the center of a tootsie pop:

how_many_licks

The original web page in the internet archive.

Building a Bar Themed Lamp 

drinksonme_thumbnailI like making lamps.  You get to have fun playing around with light and shadow, they’re useful, and as long as you do it right you don’t burn down anyones house.

My friends got married, and I wanted to make a wedding gift for them.  They are into bar paraphernalia.  They even provided the wet bar at my wedding, so it seemed like a natural to make them something with a bar theme.  I’ve made a number of lamps so I built them this lamp made from 4 jiggers, 4 martini glasses, and a martini shaker.  Pushing the cap on the shaker acts as the off/on pushbutton for the light, and the glasses are not fixed in place, so the lamp can be used to serve drinks!

The basic idea is sketched out

At first I didn’t have a plan, so I poked around the web looking at various shakers, jiggers, tongs, juicers, strainers, etc.  I noticed that the bell shaped jigger looked like it would make a nice bulb enclosure.  I wanted to do a low voltage halogen lamp for it’s nice warm light, so I needed something big enough to hide the power supply.  A shaker fit the bill nicely, and it seemed like glasses could act as the light diffusers.  I also realized that maybe the glasses didn’t have to be fixed in place so people could actually drink out of them!  I originally thought of making a base out of a serving tray, but had trouble finding one that looked nice, and was thick enough to hide the wires.  So I eventually opted to fabricate a solid wood base.

Building Details

base_construction_thumbnailI used a push button toggle under the shaker’s cap to provide the on/off switch.   I routed the circular recesses in the base so that the whole base could act like a big coaster.  The recesses are stepped to form 2 concentric rings the inner matches the base on the glasses, the outer adds a nice additional detail.  The recesses help keep the glasses in a nicely aligned position.  I needed a way to put the shaker up above the base (so it would be at the right hight above the glasses) so I opted make a faux rubber bellows by cutting disks from particle board, gluing them up, turning them, and then painting the whole thing mat black.

The bulbs are 10W halogens that plug into ceramic sockets that are riveted into the jiggers using rivets I formed from lengths of brass tubing.  There was a lot of fiddly small hole drilling through the jiggers since I had to drill 2 holes for the wires, and 2 for the rivets.  I also had to avoid drilling out the spot welds that held the jiggers together.  The wiring is co-axial 16 gage power cord wire from the surplus store (from a laptop power supply.)  I just wanted nice black circular cross section 2 conductor wire that was thick enough.  That fit the bill.

Building The Arms

before_assembly_thumbnailI had to build a special jig so that I could center drill a passage into each of the jigger handles.  I also machined some tubes that could be bolted together to form a + shape with each of the jigger handles sliding over an arm of the plus, and wires going through channels inside the + to meet at the center.  That’s what keeps the arms from drooping, and keeps then at a nice even 90 deg spacing.

arm_closeup_thumbnailThe wires emerge inside the jigger and meet up with the fuse, switch, and power supply.  The wire passes through 2 small grommets, and the whole jigger handle feeds through a big grommet into the main body of the shaker.  That gives all the connections a nice professional feel.  I hope the rubber doesn’t degrade to quickly because the final assembly of that sucker was a lot of octopus wrestling.

The base was made from some nice figured wood that I found by picking through the boards at Home Depot.  Hey, only $2.80 a board foot for wood with a lovely figure.  I biscuit joined two consecutive sections of the board to make a sort of pseudo book match.  The recesses were cut using the router, a circular template, and a collar.  I made the template by cutting a hole in some particle board using one of those single point circle cutters.  Actually I think I cut 5 holes before I got the diameters just right.

A few rounds of sanding and polyurethaning the lamp was basically done.  I bead blasted the interiors of the glasses to make them a nice diffuse white.  It wasn’t that complicated a project, but the stainless, and the grommets really give it nice professional feel.  About the only thing I’d change is that the push button I used was one I got at Radio Shack, and frankly the action on it is clunk-clunky.  Not that slick a feel.  I could have gone around to the various surplus places and found one that had a nicer action, but hey it works.

base_illuminated_small

base_view_small

top_view_small

upward_view_small

The original page in the Internet Archive.


Making Wedding Wine Charms

I made personalized  win charms for everyone at our wedding.  I used Press-n-peel Blue as an etch resist and etched them out on copper sheet.

dewling_irons

I masked the border with contact paper and used Ferric Chloride to etch in the details.

charms_resist_mask

I drilled all the little holes using an etched starter dot,  and then I used an arbor press and this circle punching die to cut each charm out.

arbor_punching_small

arbor_press

charms_on_paper

Electric Scooters Before They Were The Rage

When I first started restoring my Isetta, I swore off any non-Isetta related projects.  I knew that project was so huge, and had so many different parts to it that it could act as its own heap of projects, and if I was ever going to get the whole thing done, I was going to have to focus.

Somewhere just before the end of the second year of working on the car, my project composure cracked. I wanted to do a big project.  I wanted specifically to do something unrelated to the Isetta.  I wanted to bust out. I did NOT want to be derusting or restoring something.  I wanted to make something new.  Preferably something a bit electronics heavy, something fun. Thus was born the Electric Scooter project.

Now let me just state that I knew I was biting off a fairly large project when I started this.  The electric bike project was going to pale by comparison.  First, with an electric bike you’re starting with a complete vehicle.  You have wheels, a frame, steering, brakes, a place for cargo, in short, a whole host of things that are already there, and all you have to do is not screw them up as you add motors, batteries, etc.

Secondly when starting off on the electric bike, I had specifically decided: no drive electronics. Just a two-speed  relay system that could be wired up in a few hours.  Doing a high current motor driver is a big deal.  There are a lot of tricky issues that come up that complicate the design.  In short, I have studiously avoided projects that require chopping more then a few amps through a motor.  The whole point of the electric scooter project was to face some of these tricky electronics issues (and have some fun doing it of course).

I drew some sketches and decided on an approximate size.  Then it was off to the surplus stores to find a suitable motor.  The motor would dictate most of the rest of the design.  I spent a day digging through various piles of grubby motors looking for a DC motor with enough torque.  I finally settled on a 50v motor which had started life as the spindle motor for one of those ancient reel-to-reel tape drives for computers in the 60’s.  I also picked up two wheels, some sprockets, and some matching bits of chain.  I decided I could run the motor at 48v from 4 12v lead acid batteries.

trombone_slide
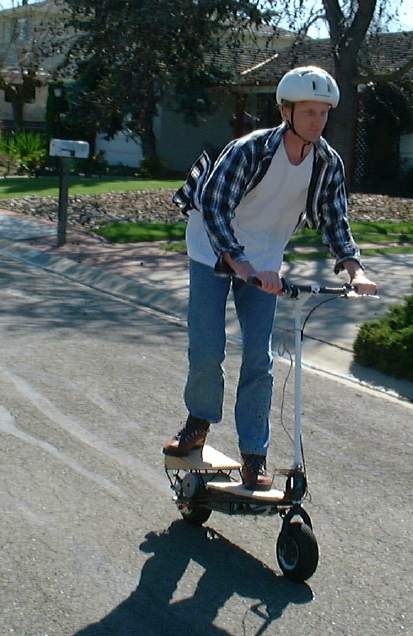
It seemed like the first order of business was to determine what kind of reduction ratio to run on the motor to give me some decent torque, but also have a reasonable top speed.   I bent a piece of black pipe into a ‘U’ shape much like the slide of a trombone.  (Well a rusty thick-walled trombone slide.) I machined an axle, welded on some fitting so the axle could bolt across the two legs of the ‘U,’ and welded on a piece of angle iron so I could bolt on the motor.  Now my trombone slide had a motorized wheel at one end.  Still this was a long way from being a scooter, but I was itching to see what kind of power this thing was putting out.  What to do?

Motorized Hand-truck Terrorizes Neighborhood

hand_truck2
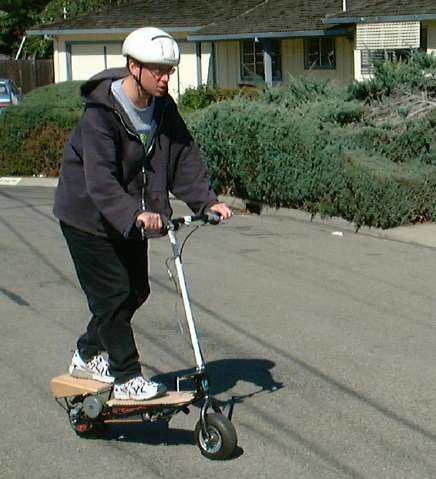
Then it struck me.  I didn’t need steering or brakes or much of anything to give this puppy a road test.  All I really needed was a few more wheels.  So I bolted the trombone piece to the back of my hand truck, put a board on top to sit on and to hold the batteries.  I stuck the whole contraption into the street and climbed on.  I touched two alligator clips together, and zoom! I was shooting up the street.  Now let me tell you,  I have done a lot of wacky projects on this street.  The electric bike never even got a second glance.  The completed electric scooter didn’t cause a stir, but by gum a motorized hand truck really brings people out.  Within moments I was surrounded by neighbors asking what the heck that was.  I guess my other projects just end up looking like something I might have bought, but throw together a vehicle with clamps, a hand truck, and loads of loose wires, batteries, etc, and everyone’s impressed.  Go figure.

scooterRearDriveCrop2It was clear that the motor had zip, and I guess I lucked out on my guess about the gearing because it seemed to be just about right.  So it was back to the shop to build the host of things needed to turn a trombone slide into an actual electric scooter.  I welded the rest of the structure using 1/4 iron rod to form box sections.  It was strong, but wasn’t about to win any awards for being light weight.  Still it looked nice and was easy enough to do.  The next big issue was the front wheel.  It needed to be articulated so I could steer, and my design also called for another pivot so the whole scooter could be folded up.  What to do?

The Great Bicycle Caper

Now let me tell you I hate bicycle thieves.  When I was in high school someone stole my red Schwinn World Sport right off our porch.   It had been my first full-sized bike, had had many component upgrades, and had been my faithful touring bike on numerous bike tours.  I had gone thousands of miles on that bike, and I knew every scratch and ding.  When it was stolen, I wandered around town in a fog hoping against hope that I might find it parked somewhere. I knew that the thief didn’t appreciate that bike.  Not the way I did.  So you can understand why it took me some time to warm to the idea of The Great Bicycle Caper!

Now one thing I haven’t mentioned yet in the project is that I was not taking this on alone.  My friend and former co-worker Pioneer was also on the case.  He was there from the very first sketches on napkins over lunch.  Now maybe Pioneer wasn’t doing the welding, or surplussing, or electronics design, but it was his enthusiasm for the project that really saw it through to the end.  He was an excellent sounding board and made sure we maintained the appropriate goofy perspective on the project.  He was also the person who talked me into The Great Bicycle Caper.

We had been looking for a cheap donor bike at various Salvation Armies, Goodwills, etc. with no real luck.  For some reason those stores were either out of bikes, or wanted so much for them that it didn’t make sense since all I was really interested in was the front fork.  Now I knew that one would show up at a garage sale at some point, but we were looking for a bike, and the sooner we found one the better. Pioneer had noticed a bicycle frame locked to a tree near his apartment.  He pointed out that the wheels and components had been stripped, and that the frame itself was bent, but the front fork was still OK.  I balked at the idea of stealing even this abandoned wreck, but Pioneer kept after me, working the angle that we would actually be doing a public service by removing this abandoned hulk.   After a while he managed to bring me around, and I began to plot how best to steal this bike.

coneThe facts: The bike was U-locked to the tree.  The tree was at a very busy corner right next to the entrance to a Cost Plus.  The plan:  I knew my angle grinder would make short work of the U-lock, but with an obvious shower of sparks, and we’d need electrical power.  I also knew there was no way we were going to be able to do that unobserved, so going with the “public service” theme I outfitted us with face shields and orange safety vests.  We put out some safety cones, and Pioneer ran an extension cord into the Cost Plus.  We acted very businesslike. My grinder cut through the U lock in a mater of seconds.  We rolled up our extension cord and ambled off with the bike frame.
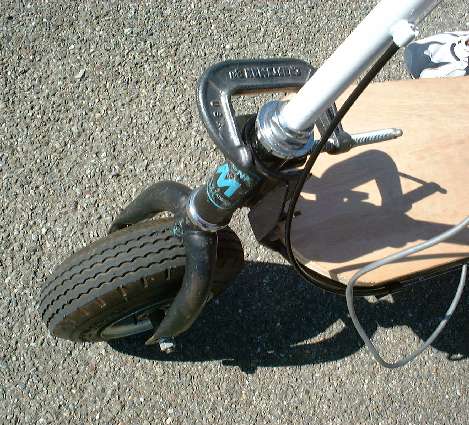
This would have all been much easier if we’d had some sort of vehicle, but since I only had a motorcycle, we weren’t going to look too official showing up on that.  Also riding a motorcycle while holding a bike frame would have been unsafe.  So we had walked over from Pioneer’s place, and we walked back with frame in tow.  I still feel a bit funny about the whole thing, but I do really think we were performing a public service, and that no one was victimized, so I guess I should just stop worrying about it.

The scooter takes shape

front_fork_cropI used a large lever arm to adjust the set of the bike fork, cut the fork much shorter, collapsed the ends, and cut slots in the flat areas to create a place for the front wheel’s axle to bolt.  I mounted the fork, extended the handlebar’s stem to be much longer, and suddenly the project started to look like a scooter.  As a quick initial test I cut a piece of plywood to act as a deck,
stuck some batteries in, and wired a switch to the handlebars.  No brakes, no speed control, but it was time for a test run.  I climbed aboard and I was off. After a little bit of use the power switch welded itself shut, and I found myself abord a runaway scooter with no brakes!

I leapt off and hauled the scooter into the air to keep it from running away. It was heavy, and the rear wheel kept brushing the ground. Now the question was how to disarm this howling squirming scooter.  I clawed as some wires and eventually managed to disable it.  Now we were having fun!  After that all tests were carried out with an exposed loop of wire which could easily be yanked free. A kind of “nearly dead man’s switch.”  The next order of business was to try a relay controller.  I wired up a big relay and hooked that to a control switch.  Pioneer and I tried this configuration out with a bit more trepidation, but things seemed to be going well.

Eerie Lights shine under the scooter

However, we did notice two things.  One was that when you released the switch, the motor did not cut out immediately, and two as darkness fell, we noticed the occasional eerie glow coming from under the scooter.  Was the scooter possessed?  Was it space aliens?  Nope.  It was the glow of an electrical arc shining out from the relay.  Because the motor was running on high current DC power when the relay opened, it was striking an arc, and electricity was still flowing through the relay even after it was fully open.  Needless to say the relay did not last super long under these conditions.  Scratch one relay.  I’ve often wondered if there is a simple passive capacitor circuit that would keep the arc from starting until the air gap was wide enough.  Who knows?  It was back to the motor control drawing boards.

Boring Technical Stuff About the Motor Controller

protoboard_cropNow I had sworn off high current chopper-based electronics projects for the same reason I don’t do high frequency digital electronics.  To many spooky issues involving high speed transients taking advantage of parasitic inductances and capacitances.   The circuit designs can get pretty finicky, and you end up putting a lot of ground planes around and just hoping for the best.  Also when you are doing high-current stuff, you end up having to deal with more expensive components, heat sinking, thermal runaway, great big gate capacitances, larger explosions, etc.  In short it’s a much bigger pain.  There are some very nice websites about these issues.  The Q4D folks have a very helpful site that talks about some of this, and SGS Thompson has a number of very interesting (well for motor control geeks) technical papers relating to this.

scooterSideView_cropI spent two months making various prototypes of my motor controller before building one that wouldn’t blow up when I actually tried it under full load on the scooter in the street.  (That’s two months when I didn’t have a day job, so that was a LOT of time.)  However the design I have in there now is pretty much exactly the design I started out with before I had decided I’d try and make all but the power MOSFETs be components that you could get at Radio Shack.  What a mistake.  I was building push pull stages to play tug of war with the MOSFET gates, and those stages always ended up having crazy noise issues, or suffering from thermal runaway, and just popping right off the board.  So I finally caved in and bought a SGS Thompson gate driver chip.  It pretty much worked right out of the gate.  I didn’t even blow one of them up, and I think they cost less than $2, so it was dumb not to be using them from the outset.  Still I learned a lot.

controller_box_cropI etched a number of different designs, but somehow even though they worked on the bench on protoboards under pretty heavy load (sticking a 2×4 against the rear wheel), they’d still blow up once I had them etched and was testing them under full load.  Finally I managed to build one that didn’t blow up.  It has some issues where when it goes to 100% on it has a lot more power then at less then 100% so it feels as if you have variable slow speed control, and then a kick of extra power when you go full throttle.  Which is fine although I’d like to know what is really causing this. I boxed the whole thing up in an aluminum box with a big heat sink sticking out one end.  The nice thing is that it’s all in one module, so I could pull the controller out and stick it into another project if need be.

Making The Throttle Handle

hand_grip2_smallAfter the motor controller was working, I needed to make a nice interface for controlling the variable resistor that was the throttle.  I decided a “motorcycle” style twisting hand grip would be swank.  So I cut off part of one of the handle bars just inside the hand grip. This part was to be the twistable throttle. I measured the amount of twist needed to go from idle to full on my motorcycle, and I made that be the amount of twist available on the hand grip.  Now Mark has been dabbling in clock restoration, and he was a great source for some spring steel that I used to act as the return spring for the handle.  Finally I used a toothed belt to hook the twisting grip to the potentiometer.  All in all it makes a nice motorcycle hand grip, but it was a fair amount of work to make.  If I were to do it again I might opt for a snowmobile style thumb lever or some such at least as a first pass.

So It Goes.  What About Stopping

break_super_closeup_cropThe next thing to consider was a brake.  You would think I’d have made one of these earlier, but where’s the fun in that?   I got a surplus stainless steel disk, and mounted that on the rear wheel.  I had been planning to use the spent brake-shoes from my motorcycle in a custom caliper made from some chunks of AL plate, but there were space issues, and it seemed like a complicated build.  So I eventually opted for an off-the-shelf caliper that I got at a go-cart shop.  It was fairly small, and was already fitted for cable drive.  So that made things a lot simpler.   I brazed various cable connections on the scooter just like a real bike, and ran the cable up to a brake lever on the handle bars.  Suddenly trying out the scooter was much less scary and entered the realm of something casual guests could try.

Dressing It Up

right_side2_cropSo then there were the countless cosmetic improvements.  I made a center stand for the scooter.  I made a clear plastic deck for the scooter with a nicely patterned grip tape surface (thanks to the local skate shop).  That and a nice paint job, and it was looking pretty good.   The scooter still sports a fairly silly plywood “kick tail” that I added for ergonomic reasons.  It turned out that otherwise the foot you had at the back would be at a somewhat uncomfortable angle. Also I still have never made a build-in locking mechanism for the folding action of the scooter.  I’ve always just used a C clamp.

Speed, Range, and Showing It Off

drew_riding_cropWell at this point, it was pretty much ready for folks to ride.  On several occasions my friends came over to check it out and ride it around.  Top Speed?  Well I’m not entirely sure; my best guess is something like 12mph.  Weight?  The bathroom scale claims it’s a chunky 56 lbs.  When I built it
weight was not the highest priority.  I’m sure it could shed quite a few pounds with a cast AL frame and lighter handlebar stem and tires.  As it stands, it’s quite rugged, but no featherweight.  Most of the weight comes from the 4 lead acid batteries and the motor.  Not much I could do about those without a full redesign.  So now comes the question of range.  How much range did it have?  Everyone wants to know about the range.  Honestly I just don’t have a clue.  In all the times it’s been ridden we either didn’t ride it enough to run down the charge, or it wasn’t fully charged to begin with.  So I guess the answer is that it had enough range to out last our attention span for riding it up and down the street or around the block.  It just isn’t really comfortable enough to want to take it for range trials around and around and around the block.

jon_normal_footed

kurt_riding

folded_view_with_kurt

jon_one_footed

Building a Custom Waffle Iron 

Sometimes a project gets started with something as innocent as having a few waffles.

I was at my uncle’s house having breakfast, and I noticed that he was using a quaint electric waffle iron.  It looked like it dated from maybe the 30’s or 40’s, and it was pretty cute.  The thing that really caught my interest was that the waffle “iron” had aluminum grids on it.  I realized that I could probably buy an electric waffle iron, make some new grids for it, and turn it into a personalized waffle making machine.  That thought put quite a sequence of events into motion.

The first order of business was to select the right candidate for conversion.  I went to a number of thrift stores, but most of their waffle irons didn’t have much character.  However, I did discover a few things about electric waffle irons.  There seemed to be a wide variety of ways the grids were mounted and heated.  Some grids were clipped in and could be popped out for cleaning; others had the heating element and grid as a single integrated unit. Clearly I needed to steer clear of those.

So it was off to eBay for me.  What did I find?  154 waffle irons, almost all of them different.  Luckily I could ignore the cast iron ones which were designed for use with a coal stove, and that cut the list down to something like 50 electric irons.  After much indecision, I eventually bid on an iron which I thought looked nice and seemed to be in excellent shape.  I couldn’t tell from the pictures if the thing was going to be easy to retrofit with custom grids, but it seemed worth the risk.  No one seems to take pictures of the inner workings of the waffle irons they’re selling on eBay. Not surprising I guess.

I won the auction, and a few days later the iron was at my house undergoing a thorough cleaning and disassembly.  I was lucky that the iron had heating elements which simply screwed onto the grids.  Removing these elements was a bit ticklish because I could tell that the fragile heating element would be very easy to break, and there’d be no real hope of re-attaching it if it did. So I removed the heating elements from their nest of hook-up wires, which felt a bit like defusing a sticky 50-year-old time bomb.

After the heating elements were out, it was nice to give the rest of the  iron a very thorough cleaning.  WD-40 did a good job of cutting through the ancient baked-on oil and flour mixture that filled every nook and cranny.  I wouldn’t recommend using it on any section that you can’t later de-grease, or on parts which are going to be coming in contact with food, but for cleaning parts like the hinges, it really did the trick. I was thinking about giving my Mom a little fire extinguisher as one of the auxiliary gifts.  95% as a joke.

The plan was to cast new replacement grids out of aluminum so I needed to come up with a pattern. The original grids had been die cast and had various knobs and bumps that were drilled and tapped to take mounting screws.  I realized it would probably be a lot easier to use the back half of one of the actual grids as the pattern for the back of my new grids. I used auto body filler to fill all the waffle grid holes and remove some of the extraneous details which would make it harder to cast in a sand mold.

originalGrid

What about the actual grid design?

I thought it would be best to make a board-mounted pattern and design it so the deepest parts of the mold were less then halfway through the board. As long as I kept the outline of the design symmetric I could use the same pattern to cast both the top and bottom grids.

pattern

The plan was to give the waffle iron to my mom for Christmas. She and her husband Stan have been building a victorian home in Historic Rugby, Tennessee. Since Stan likes Calla Lilies, they named the house “The Calla Lilly Cottage”.  I thought the house would be a nice theme for the grid design, so I decided to make the Calla Lilly Cottage Waffle Iron.

I drew sketch after sketch trying to make a design that embodied Calla Lilly Cottage but was simple enough to act as a practical waffle iron.  The design had to have a balance of high and low regions so that the waffles wouldn’t be too fat and doughy or thin and crispy.

Eventually I settled on a design that produced a simple house silhouette-shaped waffle with a calla lilly embossed on it.

Carving begins

I decided to lay out the design on thin poplar, cut out the rough high and low areas, carve in the details, and then glue and fillet the whole thing back together. This was by far the most time consuming part of the construction.  I put more then the usual amount of draft on the pattern because not only would the waffle pattern have to come out of the sand, but waffles would have to come out of the iron, so I based my draft on the amount of draft on your average waffle griddle squares.

Casting begins, but time is running out

Finally the pattern was finished.  The iron was cleaned up and ready to go, and the stage was set to cast the new grids and get a move on.  I made a board-mounted pattern with alignment pins so I could use the original waffle iron grids in conjunction with the calla lilly pattern. This required making a flask with some very long alignment pins so the flask could maintain its alignment both with the board in place and after it was removed.  So I made a new flask with long dowels, but that was the cause of the first big failure of the project.

The Christmas holiday was fast approaching, and I still had a long way to go with the project.  The special flask made it so I could only cast one iron at a time, and that meant pretty much one casting per night. It was down to the last week, and I really needed to get two good castings right out of the gate in order to be able to have enough time to finish the project.

Then disaster struck.  I rammed up the mold as usual, separated the flask, and removed the pattern. So far so good.  The cope (the top part of the flask) was pretty darn heavy.  The grids are perhaps 7″ across, and that meant the cope was maybe a foot on a side. With it rammed full of sand it weighed as much as two cinderblocks.  As I was heaving it back into place and aligning the unfamiliar alignment pins, I (unbeknownst to me) brushed the face of the sand with one of the alignment pegs. This cut a channel from the mold cavity to the outside world.  And I didn’t know.

Fountain of molten aluminum!

So I fired up the furnace, and melted a large charge of aluminum.  I used cut up pressure cookers and other things that I felt were probably semi-food-safe flavors of aluminum. I got everything up to temp, skimmed the dross off as usual, and then went to pour.   As I poured, a stream of aluminum shot out the far side of the mold and began to pool on the ground.

failedTop

I stopped pouring into the mold. I poured the remaining aluminum into the muffin tin ingot molds, but I could tell that the casting was shot for sure.

The interesting thing about the resulting casting was that you could see the exact path the the rouge dowel took as it cut that channel.  The aluminum frozen into the channel had the exact shape of the dowel’s path.

channel

The other interesting outcome was that the form created by the spilled aluminum was rather beautiful.

artSpill

The aluminum was on concrete, but the puddle actually spanned a gap in the concrete that was filled with a piece of wood.  The wooden strip burned and produced a nice colored line across the form. I’m thinking about making that into a lamp.

As far as casting screw ups go, no one was hurt and I got two interesting pieces out of it, but it didn’t exactly help my time table.  The next two nights of casting went without a hitch, but I still had the task of cleaning up and machining the castings.

I had designed the main casting with a sprue that was centered and perpendicular to the face of the iron.  I did this by taking advantage of a long mounting screw that was centered on the original waffle iron grid. This gave me a handy shank to mount in the lathe so I could clean up the casting and make it fit exactly into the waffle iron body. Now you know why I selected a round iron rather then a rectangular one.  This turned out to be a god send in terms of getting the whole thing to fit.  The cast plates had warped a little as they cooled, so it was nice to have some extra meat on the casting that I could face off on the lathe so they would fit together nicely.  (There should be a little space between the plates so that steam can escape from the waffles.)  If I had it to do again, I’d probably leave a good 1/8″ of extra material on there and just face off the whole thing.

In the end I took one extra day of vacation and worked from 9am to about 2am. Fitting, machining, sanding, filing, drilling, tapping, wiring. *phew* Finally the iron was finished.  A few hours later I was off to the airport with my waffle iron in a carry-on bag.  There was no way I was going to check that baby!  I was hoping to get to see an X-ray of the iron at the security gate, but no such luck.

Where there’s Smoke there’s Wire!

Of course, I hadn’t had much time to run a test of the iron.  I had checked for shorts and continuity across the coils, but that was about it.  On Christmas Day the iron was put to the test and FAILED. The iron would not heat up.  I quickly discovered that the cord that had come with the iron was a dud. All that testing of the iron’s wiring, and I never checked the cord.  Crazy.  So we were off to Drogan’s for a new cord.

waffleIron

Was that the happy ending?  No.  As the iron came up to temp, we noticed some smoke!  I had given my mom a kitchen fire extinguisher as a warm-up gift for the iron, but I hadn’t actually thought we might need it!  Actually it wasn’t that big a deal; it was just a thin plume of smoke rising from the top grid.  The ancient wiring was slowly smoking because it was still somewhat soaked in oil and pancake batter.

Argh!  This fix required another trip to Drogan’s for a few lengths of high temp appliance wire and some crimp connectors.  I spent an evening doing the ticklish bomb defusing dance trying not to break the heating elements while attaching replacement wires.  The iron was reassembled with fresh new wiring, and finally it was taken on its first fully successful waffle run.

It works!

We set about making a whole pile of waffles. The waffles came out easily and were lovely. For added fun, the pattern in the waffles fills with butter and syrup.  Mom, Stan, Cheryl, my sister Inge, and our friend Heather all tried a few waffles.  Finally the Calla Lilly Cottage Waffle Iron was fully operational.

kurtWithIron

It’s funny casting a waffle iron grid because the iron grid, in turn,  is used to cast the food batter.  Now mom can have fun casting waffles in the kitchen. I had originally thought it would be fun to make more custom irons, but I think I’ll put that off for a good long while.  It is rather a crazy amount of work, but can be pretty rewarding.

kurtWithWaffle

I was thinking it would be somewhat easier to make two matching “mirror image” grids by sandwiching two thin boards together, cutting them at the same time with a scroll saw, and mounting them on two different boards.  If the pattern were a simple two-level design without any carved bass relief, it wouldn’t be to hard to knock a pair out, glue them up on two boards, and then fillet them with filleting wax. That would be a lot faster then my approach.  Maybe in a few years I’ll have forgotten enough about how much work it was that I’ll be willing to embark on another one.

The original page in the Internet Archive.