
 Weaving on a loom is fun. I gave my son a simple loom for Christmas, and he wove an entire scarf on Christmas Day. This got me thinking about building a computer controlled loom, maybe one that could weave any pattern imaginable. I liked the idea of taking software back to its very origins with Jacquard and the original Jacquard Loom. I also new there’d be lots of interesting design challenges.
In mid December, TechShop had filed for bankruptcy. My annual Christmas Project was in full swing, and the loss forced me to “Cancel Christmas”. I was in shock. I’d been using TechShop tools/space for 10 years, and no longer having access to their lasers, Industrial Sewing Machines, etc was paralyzing. By Christmas day, I was starting to recover and was looking for a new project. Hopefully, one that could use the PCBs that I’d already designed for my canceled project.
I still had access to a 3D printer. Could I design a mostly-3D-printed loom that used the boards’ 3-stepper motor controllers and bluetooth LE? I’d give it a shot! The basic idea I had was for a 2-motor loom. One motor would sweep through a bunch of cams, and the other motor would set the position of each cam in turn.
I took the basic specs of my son’s loom as a good starting point for basic size/layout. His is a 10″ loom with 8 threads per inch, so each control section of the loom would have to be 1/8″ wide, and there would be 80 of these sections. An initial sketch of the mechanism indicated 7 parts per section, so the loom would have more that 560 moving parts that would all have to operate flawlessly time after time, row after row, 100s of times per piece of material. I told my friends up front that it seems impossible and that this thing was never going to work, but working on the design would be really fun and get me out of my post-TechShop project funk.
Now real weaving is an art that involves rhythm, consistency, and pattern. This would never be that. The time to update the cams would be too slow for any real rhythm, but there might still be some fun art and process to it, and stringing up the loom would be quick and easy in comparison to warping a traditional loom. I also had some ideas for programatic pattern generation. Wouldn’t it be neat to weave out something unexpected? Discovering it row by row? That sounded like fun to me.
A much faster system could be built with 80+ solenoids or something, but that didn’t really appeal to me. It would drive the cost way up and certainly wouldn’t take advantage of these circuit boards I had lying around.
The Big Idea
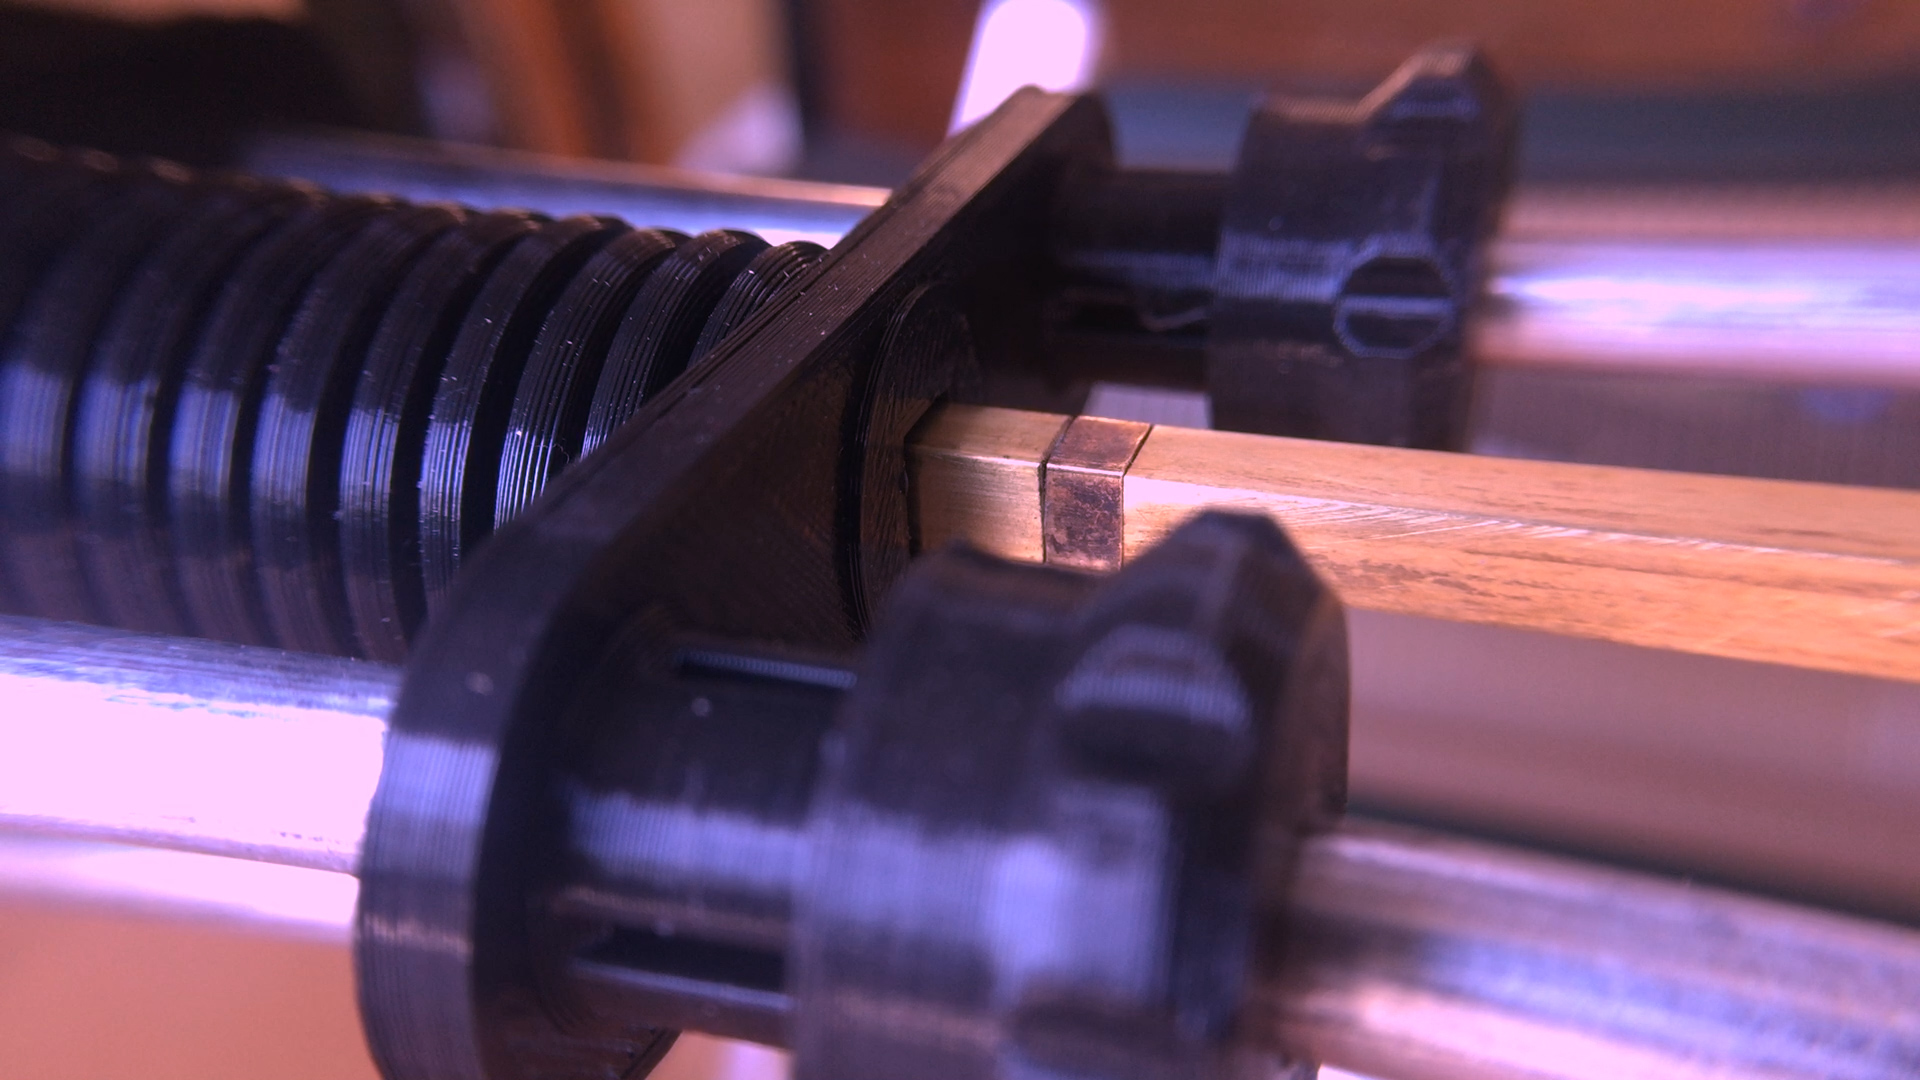 At the heart of the loom is a long row of cams sitting on a square shaft. In order to not have this giant row of cams jamming up horribly, the cams would have to have almost no load. The square shaft locks most of the cams in position but has one section that can rotate to spin a single cam. The main idea was to have the cams not do the lifting and lowering of threads directly, but to have them shift some hooks back and forth. If the hook was over a bar, then the bar could do the work of raising and lowering the threads.
 In order to be able to pull threads up or down, I use a second set of hooks and a teeter-totter arrangement. With a second set of bars and hooks, this also makes it very easy to invert the pulling up/down pattern, so an alternating weave requires no change in the cams or hook positions. It also avoids extra loads imposed by something like a per-thread return spring or weight and doubles the distance between the threads.
At first I worked on getting the carriage working. It had to slide back and forth smoothly with little backlash. I did some initial prototypes using just 1/4″ bronze bushings and flat end caps. These basically jammed all the time since the 3D printed flat plates could easily flex enough to take the bushings out of alignment. I changed the design to be much stiffer and to use one pair of linear bearings with a larger main shaft that does all the load bearing and a second 1/4″ shaft with no bearings at all that is just provides additional rigidity and alignment.
Would it work at all?
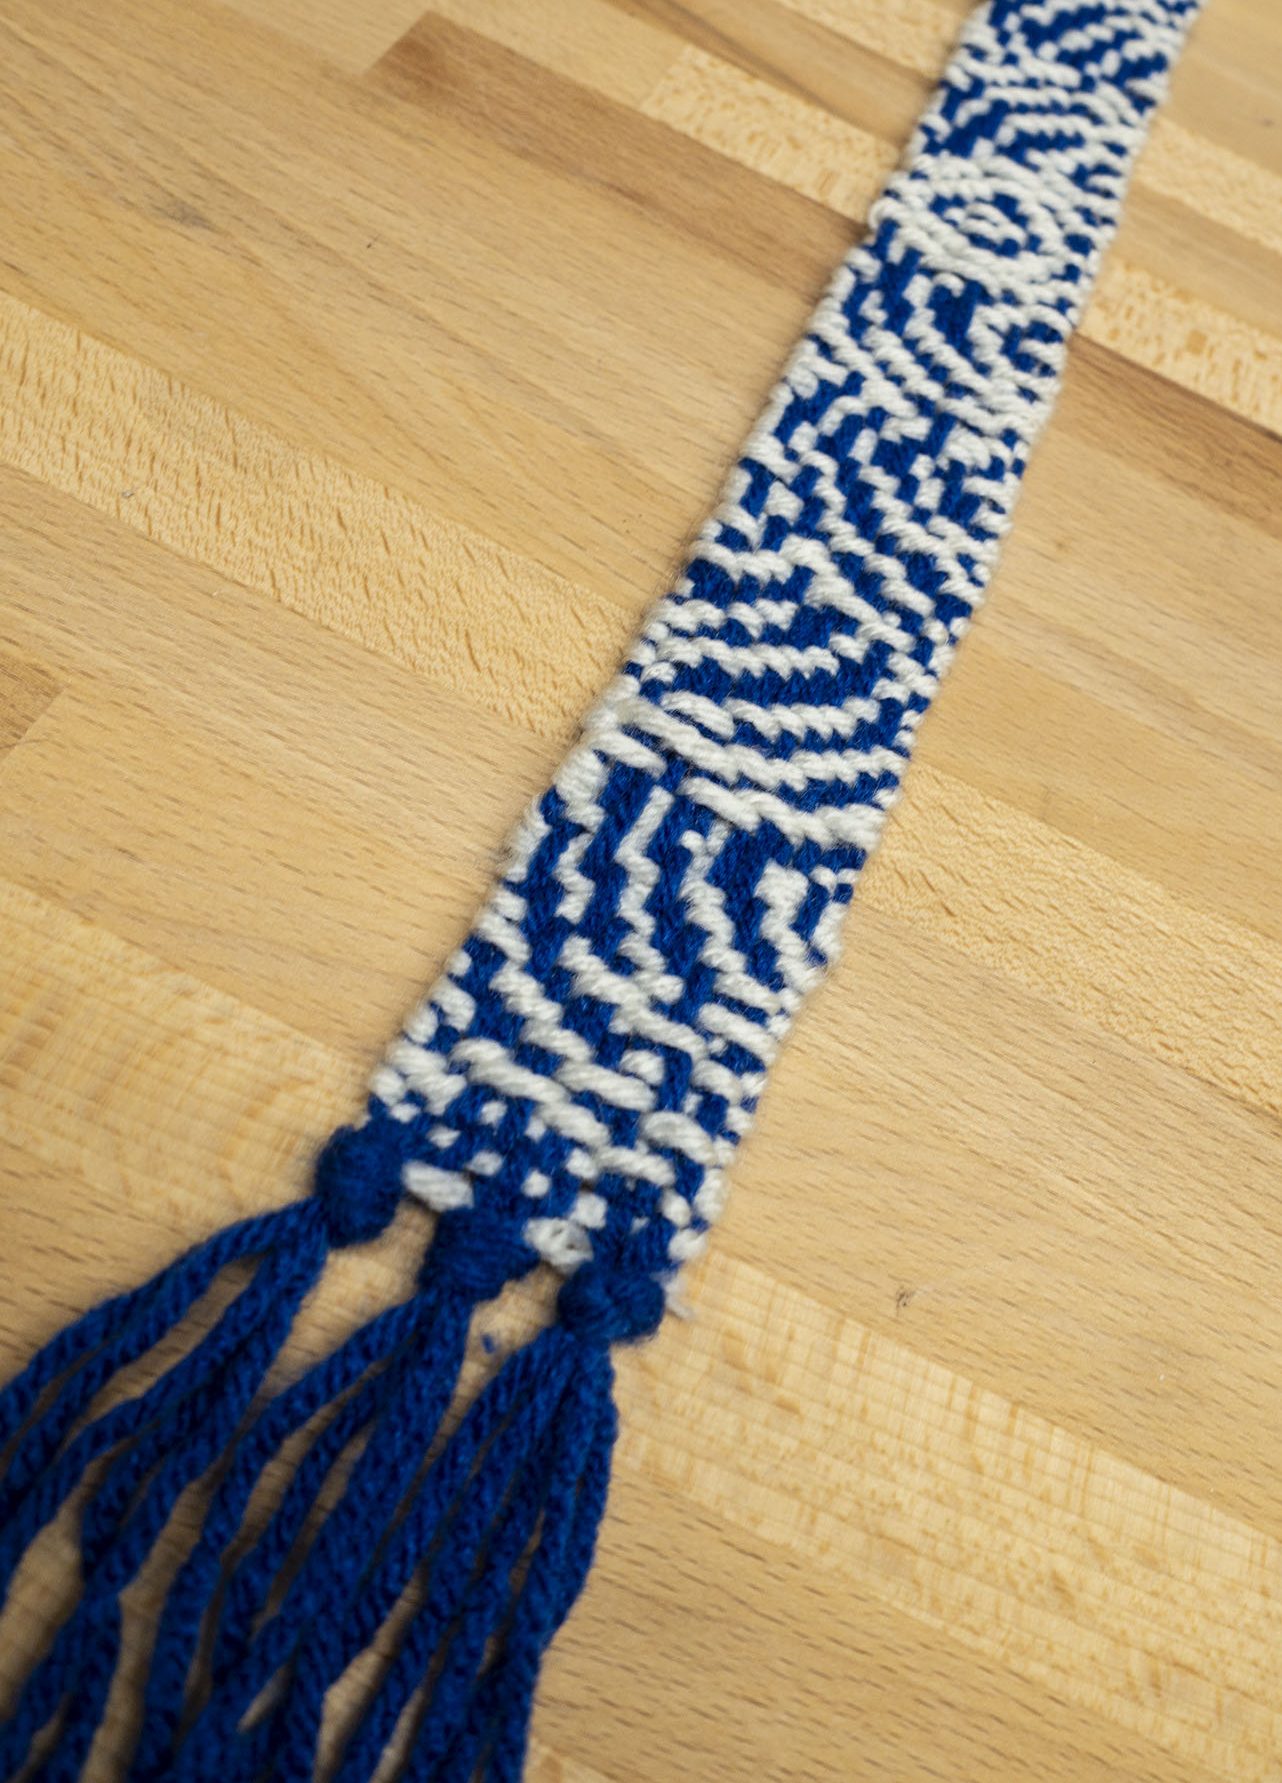
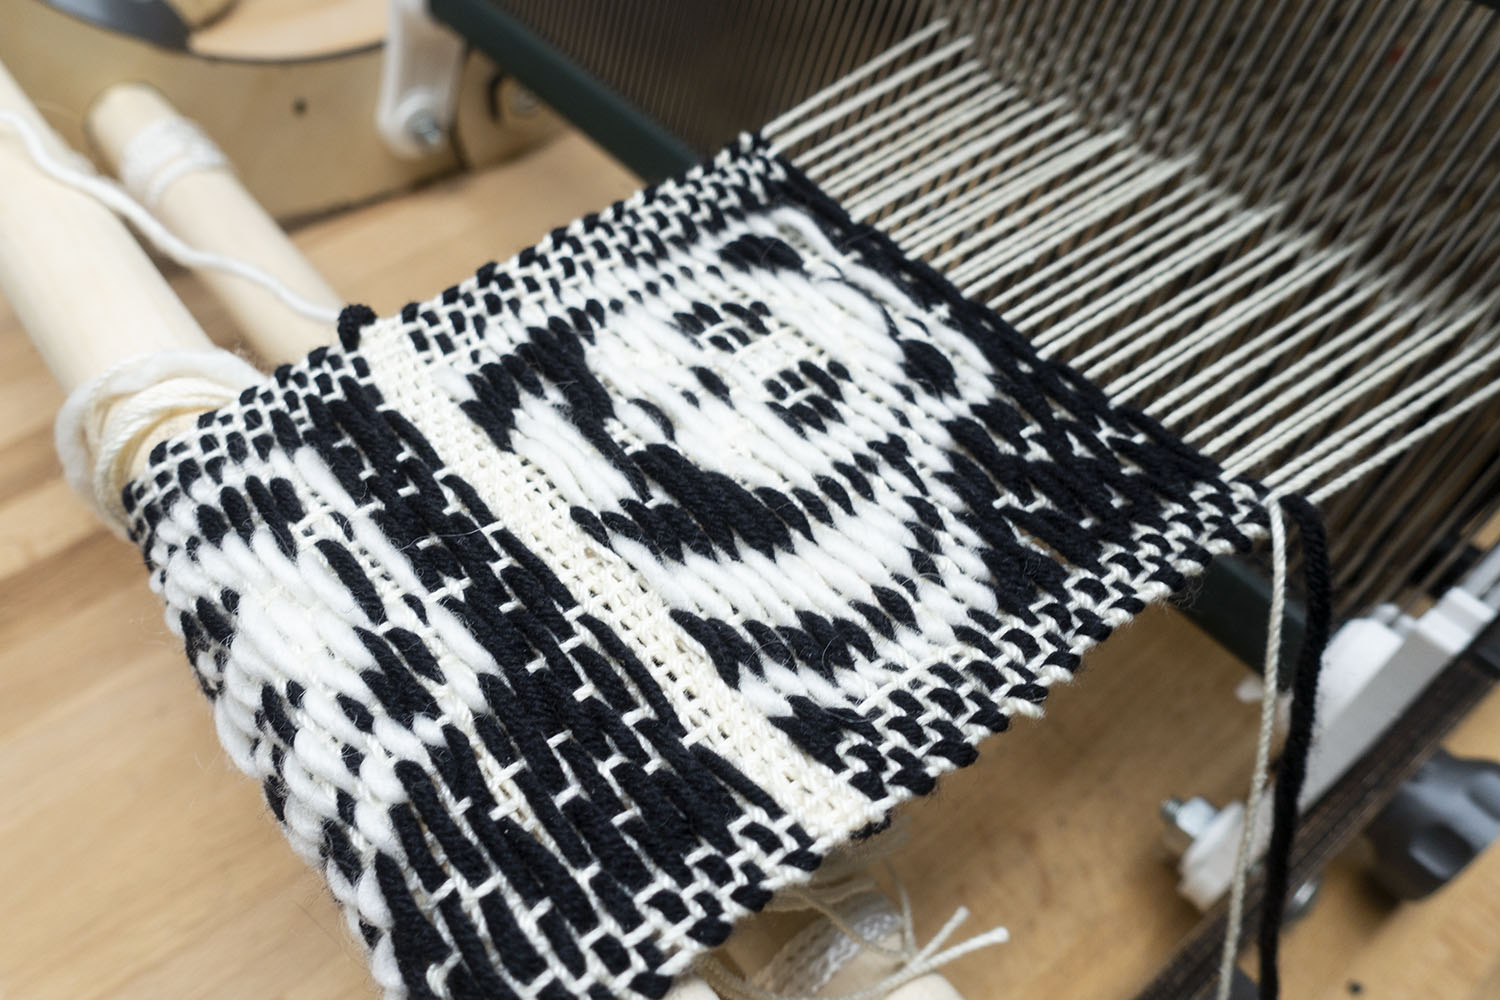
Even though the carriage movement back and forth was now working without jamming, the first time I tried to rotate a cam and seek to the next cam caused a horrible jam. The issue was that after driving the cam there’s still a lot of load from the cam on the square plate, so when you try to seek to the next position that load makes the cam really want to jam on any imperfection between the rotating square segment and the rest of the shaft, and those loads keep adding up as you rotate more cams. Thankfully this was easy to fix in software by overshooting a tiny bit and then returning so there was no longer any load from the cam before trying to seek to the next position. After fixing that, the system seemed to work. I did a 16-thread build and wove this strip of patterned material, then I built it out to 36 threads and wove these pandas.
 .
. 
Problems at scale
So after those successes, I built the loom out to 60 cams. Horrifyingly, at 60 cams I discovered an issue where the hooks really needed to be slightly thinner because the cumulate drag on each other kept adding up. It’s terrible to find issues that only manifest at 60 layers because it is not easy to iterate on a design if you have to reprint 120 hooks for each revision. This is why I started at 8 layers since I could print out 8 or 16 new parts fairly quickly. I probably went though something like 9 revisions on the cams adding features, adjusting things so that they could slide more smoothly long the square shaft, and adding some gaps in their contact ring so you can actually peek in and see where the cam mover is located. Trying to do that iteration with 120 parts is a whole different ball game since it can only print maybe 12 hooks a day it takes me close to 2 weeks of printing to change the design.
The other big issue when going up to 60 layers was that just using dead reckoning to position the cam mover exactly in each of the cams started to no longer work. Slight variations in cam thickness made it so just dividing the full range by 60 and assuming you would be in the right place stops working. I’m sure if these were identical injection-molded parts that might work at 60+ layers, but for my hand-crafted cams it stopped working. Everything was fine at 40, but when you go up to 60 it just starts falling apart. I ran into this issue on Christmas Eve after one year of working on the loom and had to give up on giving any 60-thread woven gifts for Christmas that year. Oops. Fail.
Adding cam position sensing
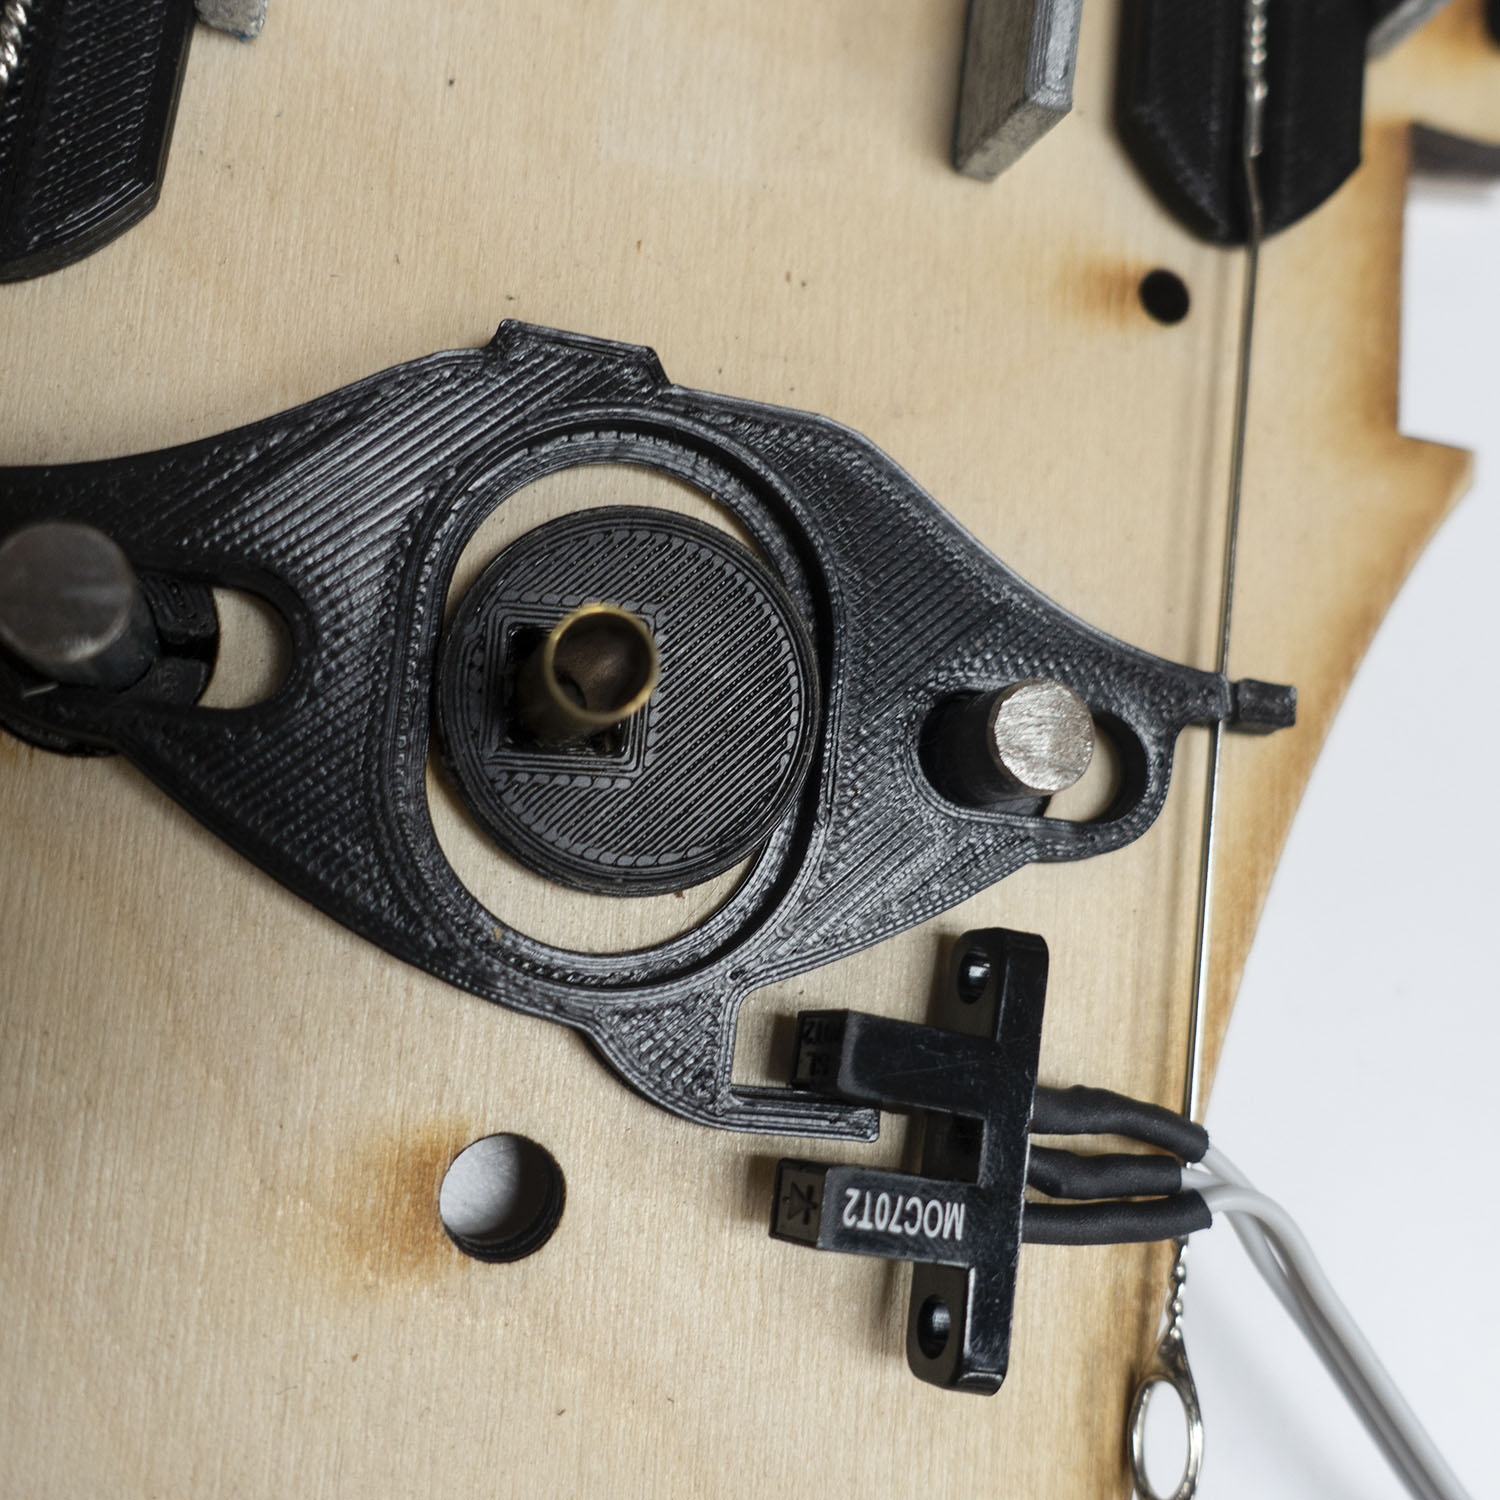 At this point, I really wanted a way to tell which position each of the cams is in, so on power up the loom would be able to scan though and check the physical state of the loom. Up until this point, I’d just been leaving the loom in a known state or manually adjusting the cams to that state, and that was a drag. Thankfully I’d put a IR gap sensor leg on each of the cam followers. When the cam was fully forward, the IR sensor would not be blocked, but when the cam was all the way back the IR sensor would be fully blocked. The IR gap sensor moved around with the cam driver, so it always knows about the current cam follower position. This made it easy to write some code to scan though all the cam positions and read the state of all the followers. This really reduced the startup time on the loom if I had left it in some random cam state on power off.
In order to view the IR sensor output directly, I added a way to poll it over bluetooth so I could see a kind of chart recorder output from the sensor. This made it easier to set the various thresholds and also see how much noise was in the signal.
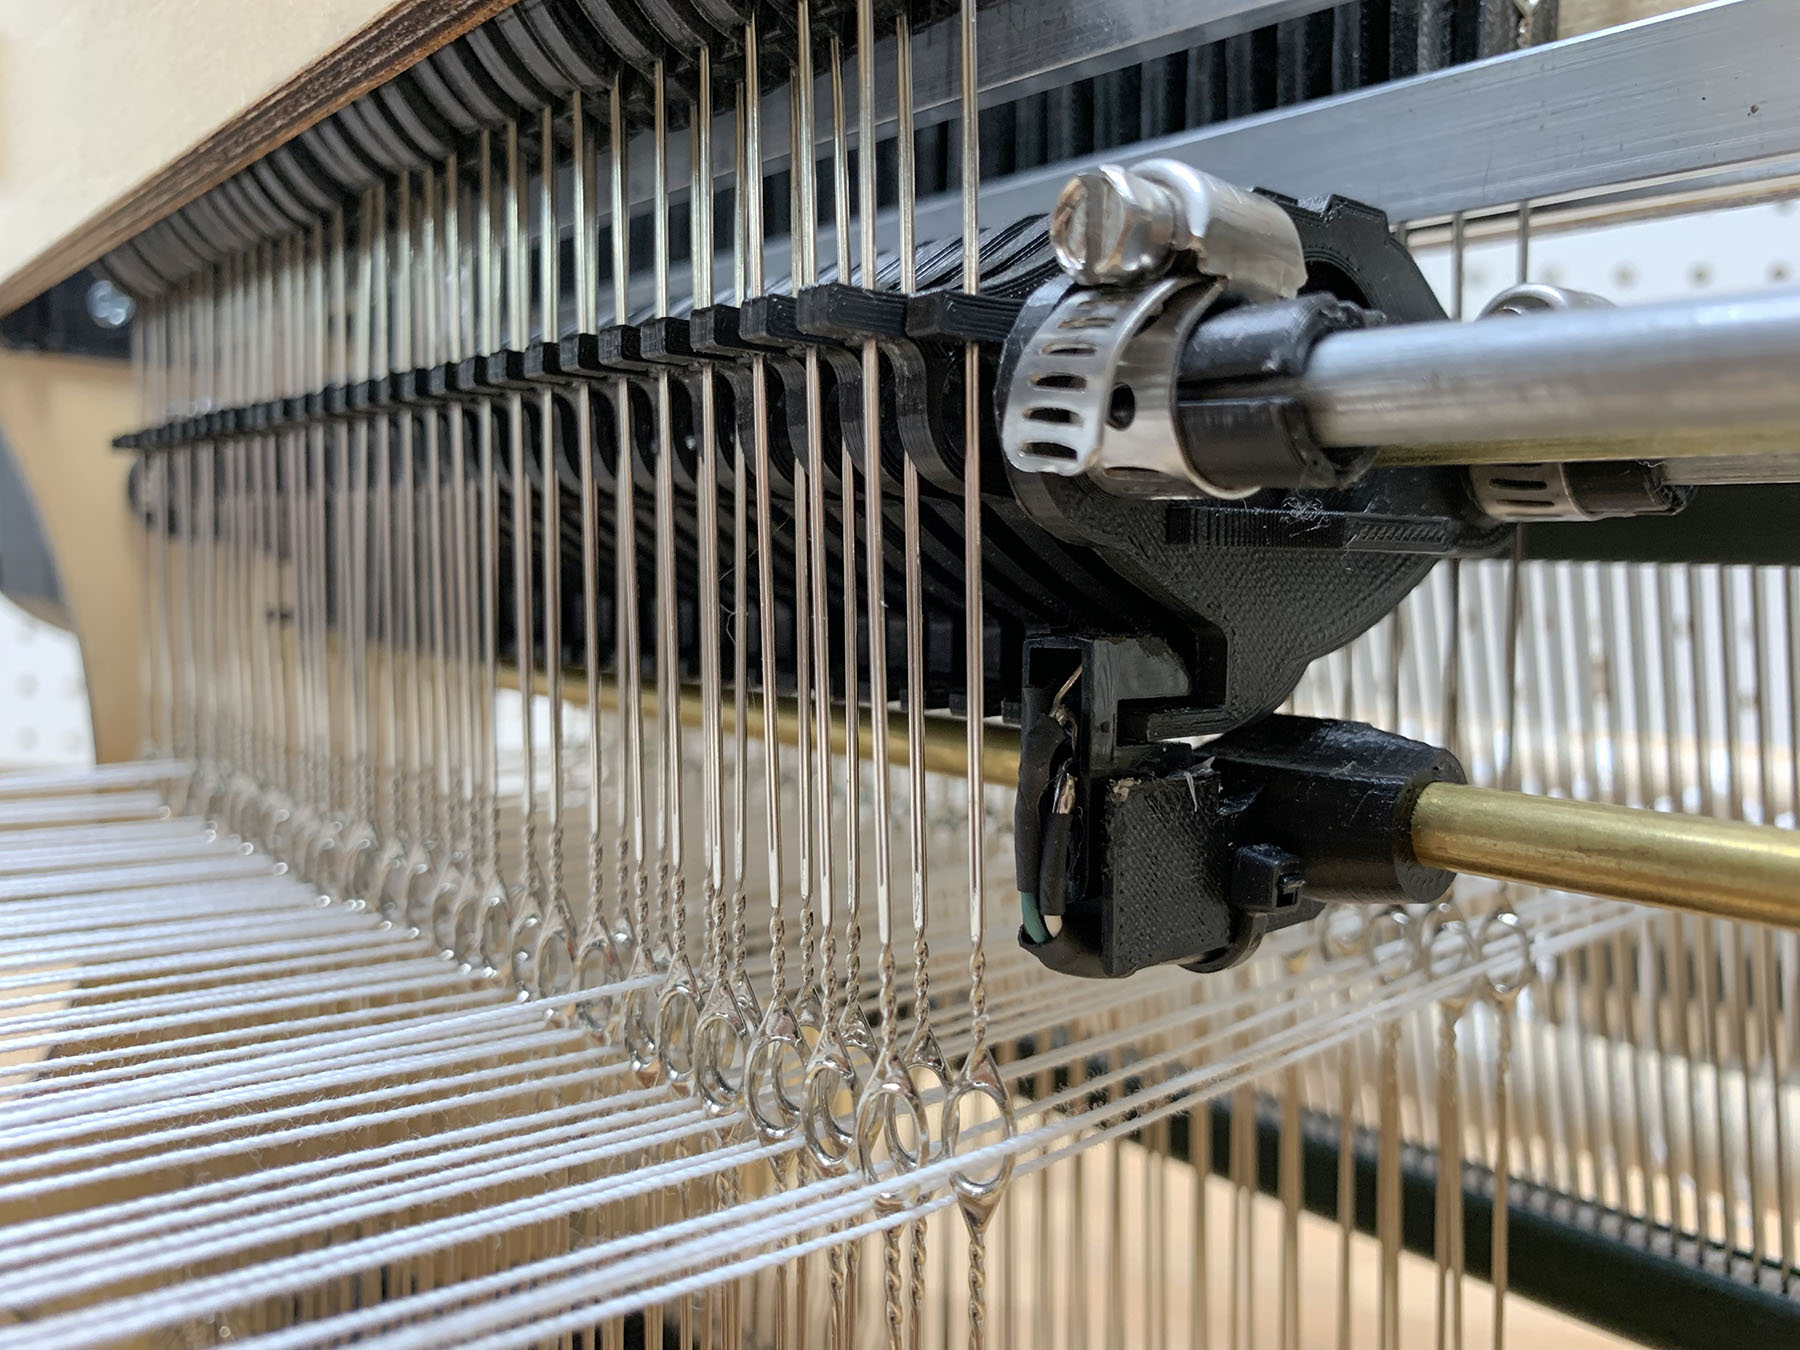
IR Sensor reading a cam position. The wires for the sensor run inside that brass tube.
How do you deal with positioning if the cams are not all identical?
At first, I thought I could scan for the cam positions using the IR sensor I’d added that detects cam positions.In theory that might work, but sadly because the cam followers are thin enough to not rub against one another and float a bit on the cams, there’s a lot of noise in the exact positions relative to the cams. So scanning their positions was not really the silver bullet I’d hoped for. Thankfully I had another idea. I could number all the cams then assemble the loom with JUST the cams. Then I used my phone to manually seek the positioner section to the center of every 10th cam. I wrote down those values and wrote some interpolation software that would compute cam positions interpolating between those values. This caps the interpolation error. It’s almost like having six 10-cam looms lined up. Then you just have to re-assemble the loom with the cams in the same order. This was somewhat annoying to do, but it totally worked, and I was back in business.
The hardest part? The On/Off switch.
 After the loom was no longer jamming, I worked on redesigning the PCB and making an integrated enclosure. The problem was that the original board had been designed for something that was never going to be turned off, so it used 2 power supplies and had no support for an on/off switch. When I designed the board, I decided I wanted to simplify down to a single high current 19v laptop supply and used a buck converter to generate the 5v needed for the LEDs/electronics. However, my initial choice of using an ACT4088 was a bad plan. It didn’t have great application notes, and my initial stab at layout caused some sort of power on spike that was killing all the downstream electronics. I blew up a number of those chips and even contacted some folks online who’d used them in their projects only to find out they’d had troubles with them too, especially when operating above 12v. Clearly, I was trying to be too clever, and this was not working. I decided to make that piece of the design someone else’s problem by using a 3-pin switching regulator. I switched to the $3 VX7805-500 and got a whole new version of the PCB made. (V3 at this point)

This seemed to work, but eventually the board would die on power up. Some sort of power on transient that was still killing my boards dead. This is kind of the worst way to die since you think it’s working, fully populate the board, and think you’re done, then it eventually dies and takes $40 of other components with it. At this point I very nearly gave up, but then at the very end I decided to try again with a somewhat more expensive Traco Power TSR 1-2450 three-pin regulator. I also tacked in a 5.6 zener to try and add some protection to the 5v rail and soldered a 10uf filter cap across the BTLE daughter board since that was the only daughter board that didn’t have its own decoupling cap. This seems to have worked. At least, the most recent build of the board has survived a zillion turn ons now, so I’m going to declare it working. *knock wood*
Frankly, this version of the board is kind of crazy since it actually has the cam motor shaft passing through the board, and it uses a lot of space for a 3rd stepper motor controller that I never populate/don’t expect to populate after giving up on trying to calibrate in a second cam moving motor. So the board really should be shrunk down quite a bit, but it was fun making it fit the enclosure, etc.
One last try
I decided to warp the loom one last time and try once again to weave at 60 threads, and it finally worked without jamming. I could probably go a tiny bit higher on the thread count, but I punted on my original design plan of two cam movers since I was having enough trouble with getting one cam mover to not jam. This limited the range of travel/the total number of cams. It’s also good to have some free space on either side, so one can work in the guts of the loom if something goes wrong. I’ll probably stop at 60 instead of 80, since it’s slow enough as it is.
Video Mish-Mash
I deiced to video this project. However, I spent over a year making the loom and shooting video. During that time, I slowly got better at the video-making process, which means that the style and quality of the early videos is way worse than the later videos. This has made for a somewhat lumpy feeling for the final video. There are some sequences I’m very proud of, and others that I think are just horrible looking now. Oh well, it would be too much work to reshoot some of that stuff. It is what it is.
Where to now?
Well, I’m tempted to work on making the loom faster, but a year and a half is a long time to work on a project (for me). Most of my projects are < 6 months, so I may just move on. I would like to work on some error diffusion style weave dithering, maybe write some procedural weaving pattern stuff, but frankly I think all my friends, coworkers, and family have heard enough about weaving/looms to last a lifetime, so maybe I should work on something else.
I’ve open sourced all the designs and the code, but be warned these things are a dump of the design files/software as I made them. There are no instructions. It’s not the least bit cleaned up. There may not even be super obvious names/labels, so trying to build a functioning loom from those files would be pretty difficult. I was barley able to get the thing to go, and I’m fairly meticulous when building these kinds of things. I’m relieved it worked. Still, if you’re interested in this kind of build, it might give you some inspiration and a place to see what others have done. I’m kind of surprised there aren’t more of these things around. The ability to weave crazy designs is pretty awesome.

just so yousknow about looms in our family tree stretching from VIENNA TO GLASGOW TONORTH & SOUTH CAROLINA ON TO OKLAHOMA THEN NORTH AND SOUTH DAKOTA THEN TO THEQUACKER CITY IN 18 80s Then the parenting and patentng of commercial mechanical looms so Kurt is coming in now(that would be cheryl’s great great Grandpa and Grandma. educated for the time(could read and write English) THELOOMS MUSTGOON
Sent from my iPhone
>
Neat I did not know that!
Hi I am with the Handweavers Guild of America and would like to talk to you about this project. Would you email me? Thanks. I look forward to talking to you.
so here we sit illoomed by the loomy looms of antiquity illoomed by loomy minds of currentocity but no peddleocity! Sent from my iPhone
>
Kurt, Very impressive, indeed. Your genius never ceases to amaze me. Thanks, Mike,
Thanks! Well this particular one took a lot longer than most of my projects. I spent a year and a half trying to get that thing working! Of course part of that was me learning to make videos, so not all of that time was going into the loom itself. I built some video lights/mic stands, 3D printing time lapse rigs, remote triggers etc. All kinds of silly side projects. ;]
Nice project.. I had this kind of idea before but never started. Do you have any budget estimation for your final design? Just curious about how much I would need if I wanted to continue where you left. Thanks.
Pingback: [Latest Technology News] Open Source Computer Controlled Loom Knits Pikachu For You | Best SEO Soft
Pingback: A 3D-Printed, Computer-Controlled Loom | iotosphere - Internet of Things
Pingback: A 3D-Printed, Computer-Controlled Loom – IoT – Internet of Things
Pingback: Man Spends Year Building An iPhone-Controlled Weaving Loom | My Word[P]ress
I’m a late life newish weaver who loves to make images, since my career was illustration. Your stick-to-it-ive-ness takes the cake! I watched a retired engineer adjusting a jacquard head on a big museum loom with a catwalk so you could look at the top. Because of that experience I at least get what your cams are doing. Kudos! (Especially for buying your son a loom.)
Oh thanks! My dad made me a wooden loom when I was a kid. Just a board with two raised rows of slots to put the warp around and then you just did everything else yourself. Not much fancier than a pot holder loom. Not beater, etc. I think I only wove maybe half a boards worth of picks on to that thing, but it left an impression. It’s such a shame there aren’t hobbyist level jacquard looms at some low price point. I assume they don’t exist just because the demand isn’t high enough to make it worth tooling up for. You would be the ideal customer for such a thing with your background in illustration. I do rather wish my loom was faster. One of the great powers of digital creation is you can iterate on your designs, but the weaving is so slow I only ever iterated on one panda! At 8 thread per inch it’s a lot like tweaking the individual pixels on an icon to make it look better at scale, etc. Still your skills in color/pattern are a great asset even with more traditional weaving methods.
As I understand it, your loom is really more of an automated tapestry loom, because the colour changes are in the weft and the warp doesn’t really show. There are weavers with very expensive computerized draw looms. Everything they do looks pixellated. The thing about the many types of image weaving, including card weaving and pickup, is they all have a distinctive and attractive weave structure. The one I use is from Totonicapan in Guatemala. It has alternating black and white warp ends and coloured wool supplementary weft. It’s slow, but threading a jaquard loom is pretty onerous.
This weaver shows how tedious hobby-level drawloom weaving is. https://www.google.com/search?q=draw+%3Bloom&rlz=1C5CHFA_enCA764CA764&oq=draw+%3Bloom&aqs=chrome..69i57j0l5.3352j0j9&sourceid=chrome&ie=UTF-8#kpvalbx=1
Oh that’s interesting. My loom just provides 60 individually controlled heddles, nothing more, so a lot of different styles of weaving could be done with it, just not high TPI stuff. :] My first design (the kind of blue and white headband thing) used both warp and weft to contribute to the pattern. Later I tried out the thin warp + alternating tabby just to give myself more design control without having to worry about the fabric falling apart. Tell me more about the image weaving you do? Does it have a name? Although I have read some about various weaving techniques I’m still pretty ignorant of the wider weaving landscape. I’d never seen a drawloom like that. I’ve been wanting to try some sort of alternating black/white warp and using some algorithm to make dark to light ripples, but at 8 TPI I’m worried it won’t look very nice except maybe at a distance so your eye could better integrate the dithering. Mostly I’d like to make things that both look nice and don’t repeat since that kind of highlights the flexibility of the loom.
Right, each heddle is controlled independently, as in a jacquard loom. You vane lots to explore on your loom!
The totonicapan style as I was taught as adapted for a 4 shaft loom has a sett of 40 ends per inch. I have a picture of it in progress. You have my email, right? Email me and I’ll send you a photo.
Pingback: Making a Jacquard Loom Controlled from an iPhone « Adafruit Industries – Makers, hackers, artists, designers and engineers!
Hello, I think you’ve done an amazing job here!! I also wanted to suggest another method to try. Singer/Empisal-Knitmaster/Studio/Silver Reed knitting machines had a “weavemaster” weaving loom attachment designed for their knitting machines. You could always do the same thing with an electronic model connected to Designaknit with an aftermarket connection and this set-up.
This is amazingly cool. Thank you for sharing your process! I wrote a book, Inventive Weaving, that explores all kinds of things you can do on a rigid heddle loom. I never thought of using one as inspiration to build a jacquard loom! Well played, Sir. Well played. 🙂
OMG! That’s the book I got for my son when I got him the Cricket Loom! (Of course I’m the one who actually read the book.) It sitting out in the garage right next to my loom! I still look at it every time I warp the loom. Seeing what was possible with lower TPI weaving was one of the reasons I decided to go all in on this project, so literally your book was the inspiration to build this Jacquard loom! Your book is great! The photos are SO amazing. So clear and well lit, and so many beautiful examples. That must have been a crazy amount of work. Thank you so much for writing that book. I’m sure a lot of other beginning weavers have been inspired by it too. Few books have caused such a “oh god I’m clearly going to sink a lot of time into this!” reaction.
Pingback: Jacquard Open Source Loom | Syne Mitchell
Pingback: Another jacquard loom is coming! | Tien Chiu's Blog
Very cool. The two rows of heddles reminds me a lot of inkle looms. I think your independent control of every heddle would make an interesting result. An inkle loom makes warp based patterns where the weft is largely invisible because its compressed into the warp and the warps run over the weft every line. A related style is tablet weaving, which your loom is not designed to do but which I think you can get a close approximation to because of your independent heddle control. https://www.youtube.com/watch?v=k9Jhd80mBsQ
Neat. I wasn’t aware of inkle loom style weaving. Thanks for the pointers. It is true I’m not sure how well warp facing weaving can be done on my loom.
Incredible video and project Celtic weaver Planning to build this loom what laser printer do I need ?
Great! I’m glad you liked it. I have to warn you that the gulf between “Project that has open sourced software/hardware/designs” and “Well documented DIY Kit” is enormous. I tend to do hobby projects that I can barely build, and the only documentation is the video/blog post. So building a project like this is the wild west. If you are ok building iOS apps and Arduino code, and can dig though the schematics to figure out the general wiring, and you’re up for an adventure then sure. Have at it, and I’ll certainly be willing to answer some questions. I did have one person manage to build the board/display of an owl cock that way. It is doable. You should also be aware that in it’s current form the loom is pretty slow to weave with since it’s something like 2 pics per minute depending on how wide a design your using, and the design is fairly fiddly to get built consistent enough to not jam. You have to manually make sure the heddel wires are pretty strait/with consistent twist, etc. I have some ideas on how to make it weave faster, and those ideas might let me take another stab at some other improvements that might make alignment and setup less of an issue, buy my guess is that a build like this should only be taken on by someone excited to tinker with/improve upon/putting time into a loom project, and not by someone that wants to have a functional computer controlled loom.
Dear Sir,
I’m Lassane from Burkina Faso in West Africa.
I’m founder and president of KeoLID Innovation Hub.
http://www.facebook.com/keolid
We just received our fab lab machines from US
we are planning to build a loom machine to improve the performance of the women.
With their traditional loom, they can do 2 to 3 sheet per day.
We want a CNC loom that will enable do up to 30 per day.
If it works we will replace the traditional loom machines.
We need your assistance in the project.
Rgds,
Lassane
WhatsApp +226 70713333
Rgds,
Lassane
You are doing important work. I’m sorry to say that my loom is complex and fragile and slow. It was an interesting project to do, but I don’t think it’s a good fit for your situation. My loom is actually slower than a traditional loom. It’s main benefit is complete design flexibility and very simple threading for even complex patterns, but it does not scale well into any sort of production environment. I don’t know anything about more production style weaving, or what sorts of basic improvements could be made to help with day to day productivity. Good luck with your work!
Hello,
This is entirely admirable and is much needed on the market at an affordable price at 32” wide.
Well unfortunately this design goes slower the wider the device, so it would not scale well to 32″ wide.
Do you have it for sale?
No I’m sorry. It was a long and complex build, there’s no way I could sell such a thing any any reasonable price. Frankly it’s it’s still too slow to be a nice-to-use product. I have ideas about how to make it faster but have never done a V2 of the loom.
Hey there! This is amazing! Totally understandable that it would seem like a difficult and complex thing to work on updated versions of this and make them available for mass sale, but might you consider a kickstarter project? Just thinking of how small simple versions like this could be an incredibly innovative and cost effective option for your hobbyists to do amazing things, but future versions could also be developed for amazing small business and large scale commercial operations. There’s definitely people out there with the skills, knowledge and capability that could help you bring it to life and be revolutionary. I for one would back a kickstarter program for this immediately and I know countless others that would too – and I’m sure there’s hundreds of thousands of others I don’t know that would be all too willing to back such a project. Please update me if this is something you end up doing and I will be right in there financially backing the project and sharing it far and wide!
I do have some ideas about a rev 2 that would be faster and perhaps a bit simpler. Not sure if/when I’ll get around to making that happen, but if I do I’ll be sure to also open source the designs. When I did that project I didn’t use parametric CAD. Which is nuts. I designed most of it in Illustrator! Since then I’ve done a lot of projects in CAD. So a re-visit of the project would have a lot more useful CAD/Design files for folks that want to take the project further. I’m glad you liked the design, but I have to admit that I like to tinker and problem solve, and Kickstarters seem to be more about production and supply chain and business. Which just sounds stressful.
Just saw your video. Man! If you joined those weaving groups, you would probably find people to fund your stuff! Just imagine all the weavers that have arthritis or are like me that have no rhythm! LOL! But seriously, how much do you think a project like this would cost?
I really have no idea. I do know that if I do a V2, it would be with an eye toward being faster/more bullet proof.
I’m a mechanical engineering student working on a research project related to nanofibers. I was looking at your loom project as a model for a loom to weave nanofibers. Do you have a list of materials you used for your project? Hoping to start with that to build a loom for weaving various nanofibers.
Is there anyway to buy this custom loom or another like it?
Brilliant work!
I’m sorry to say that loom is pretty much a one-off. The amount of labor to make another would make it impractical to sell, and it’s a long road from “thing I made in my garage and can make work” to “Something anyone can easily use”.
its a good basis for a modern computer controlled loom, but I have experience with the multi heddle looms, and i feel confident I can improve on the design. And provide a better interface too.
Youtube suggested to me your Building a Computer Controlled Loom https://www.youtube.com/watch?v=Czun6yVpzp0 and I am in awe: Thank you for your write up of this – thank you for letting us know of your triumphs and troubles building and documenting your loom.
Can you post where you got your heddles?
I ordered them from The Woolery. I think maybe these ones https://woolery.com/inserted-eye-heddles.html
thank you and it is so important journal. but i need to know more detail about the machine design and its measurement, i live in Ethiopia(Africa) and its significant for us.
What a fascinating project! Thanks for sharing and documenting it! One thing I’ve been trying to figure out is how the cam selector section is moved left and right on the square shaft. Based on the video it seems to be hooked up to a stepper motor, but I’m not sure how? My main confusion is how can one stepper motor both spin and move the positioner?
There are 2 motors, one that rotates that square segment on the long square bar, and one that moves the entire carriage back and forth (moving that section between the various cams). You’re right that there’s basically no way to do that with only 1 motor.